MS Project Template Automation for Efficient Project Management
- What Is Template Automation in MS Project?
- Identifying Repetitive Tasks and Dependencies for Automation
- How to Create Automated Templates in Microsoft Project
- Microsoft Project Template Automation Best Practices
- Tips for Maximizing Productivity with Automated Templates
- Conclusion on Microsoft Project Template Automation
Maximizing productivity in a business environment heavily relies on efficient project management. However, it can be complex, requiring careful planning, effective resource allocation, and thorough task tracking. Creating project plans from scratch is one of the most time-consuming tasks.
Automating Microsoft Project templates streamlines workflow, saves time, and ensures project consistency. In this blog post, we will explore Microsoft Project template automation. We will also guide you in identifying repetitive tasks, creating automated templates, and implementing best practices to maximize productivity.
What Is Template Automation in MS Project?
Templates in MS Project are pre-configured files including tasks, milestones, dependencies, calendars, and resources. These templates serve as a starting point for creating new projects, ensuring that standard processes and structures are followed.
Template automation involves creating customizable, reusable project templates. By utilizing this technique, project managers can significantly reduce the time and effort needed to initiate new projects.
Why Standardization and Streamlining Project Processes Is Important?
Standardizing and streamlining project processes are crucial for maintaining consistency and efficiency. Template automation helps achieve this by:
- Enforcing Best Practices: Templates can be designed to incorporate established project management methodologies and best practices.
- Reducing Errors: By eliminating manual data entry and calculations, templates minimize the risk of human error.
- Accelerating Project Start-up: Pre-built templates allow for rapid project initiation, saving valuable time.
- Improving Resource Allocation: Templates can help optimize resource allocation by providing historical data and forecasting tools.
How Template Automation Works in Microsoft Project
Microsoft Project is a powerful tool with robust features for creating and managing project templates. Here’s a brief overview of how Microsoft Project template automation works within this software:
- Create a Base Template: Develop a foundational template that includes common elements like task categories, resource pools, and calendar settings.
- Customize for Specific Projects: Modify the base template to suit the unique requirements of individual projects, such as adjusting task durations, assigning resources, and setting deadlines.
- Leverage Built-in Features: Utilize Microsoft Project’s built-in features like task recurrence, dependencies, and custom fields to automate repetitive tasks and calculations.
- Share and Distribute: Once the template is finalized, share it with team members to ensure consistency and facilitate collaboration.
Understanding the principles of template automation and leveraging the capabilities of Microsoft Project, allows project managers to significantly enhance their productivity and deliver projects on time and within budget. For a deeper dive into project visibility, explore MS Project Reporting for Remote Project Visibility and learn how to enhance reporting for distributed teams.
Identifying Repetitive Tasks and Dependencies for Automation
To leverage template automation effectively, identify repetitive tasks and dependencies within your projects. By pinpointing these areas, you can streamline your dependencies in your projects.
Common Repetitive Tasks and Dependencies
When analyzing your projects, look for recurring patterns in the following areas:
- Task Structures: Are there specific task breakdowns that are common across multiple projects?
- Resource Allocation: Do certain resources or resource pools consistently appear in your projects?
- Calendar Settings: Are there standard working hours or holiday schedules that apply to most projects?
- Risk Assessments: Are there common risk factors or mitigation strategies that you frequently encounter?
Analyzing Tasks for Automation
Once you’ve identified repetitive tasks and dependencies, assess their suitability for automation. Consider the following factors:
- Frequency: How often does the task or dependency occur?
- Complexity: How complex is the task or dependency?
- Standardization: Can the task or dependency be standardized into a repeatable process?
- Potential Benefits: What are the potential time and resource savings from automating the task or dependency?
Strategies for Organizing and Categorizing Tasks for Automation
To effectively organize and categorize tasks for automation, consider the following strategies:
- Task Breakdown Structure (WBS): Break down projects into smaller, more manageable tasks. Identify recurring elements within the WBS.
- Resource Calendars: Create standardized resource calendars that outline resource availability and capacity.
- Risk Registers: Develop templates for risk assessments, including common risk categories and mitigation strategies.
- Project Templates: Create base templates for different project types, such as software development, marketing campaigns, or construction projects.
By systematically identifying, analyzing, and organizing repetitive tasks and dependencies, you can lay the foundation for efficient template automation.
How to Create Automated Templates in Microsoft Project
Microsoft Project offers a range of tools to create and customize templates. You can use built-in features like task recurrence and dependency management to automate repetitive tasks. Additionally, you can create custom fields and filters to tailor your templates to specific project requirements.
Creating automated templates in Microsoft Project is a straightforward process that can significantly enhance your project management efficiency. Here’s a step-by-step guide:
A. Step-by-Step Guide to Creating Templates
Creating automated templates in Microsoft Project involves designing a pre-configured project file with built-in automation features to streamline project creation and management. Here’s a step-by-step guide for implementing Microsoft Project template automation:
Step 1: Identify Common Project Elements
Before creating a template, determine the elements that will be standardized:
- Tasks: Recurring tasks, milestones, and dependencies.
- Resources: Team members, equipment, or materials commonly used.
- Calendars: Standard working hours, holidays, or specific timelines.
- Reports: Standard reports like status updates or resource utilization.
Step 2: Create a New Project File
To create a new project file in Microsoft Project:
- Open Microsoft Project: Launch the Microsoft Project application.
- Start a New Project:
- Blank Project: Click File > New > Blank Project to start from scratch.
- Template-Based Project: If you have an existing template, click File > Open and select the template file.
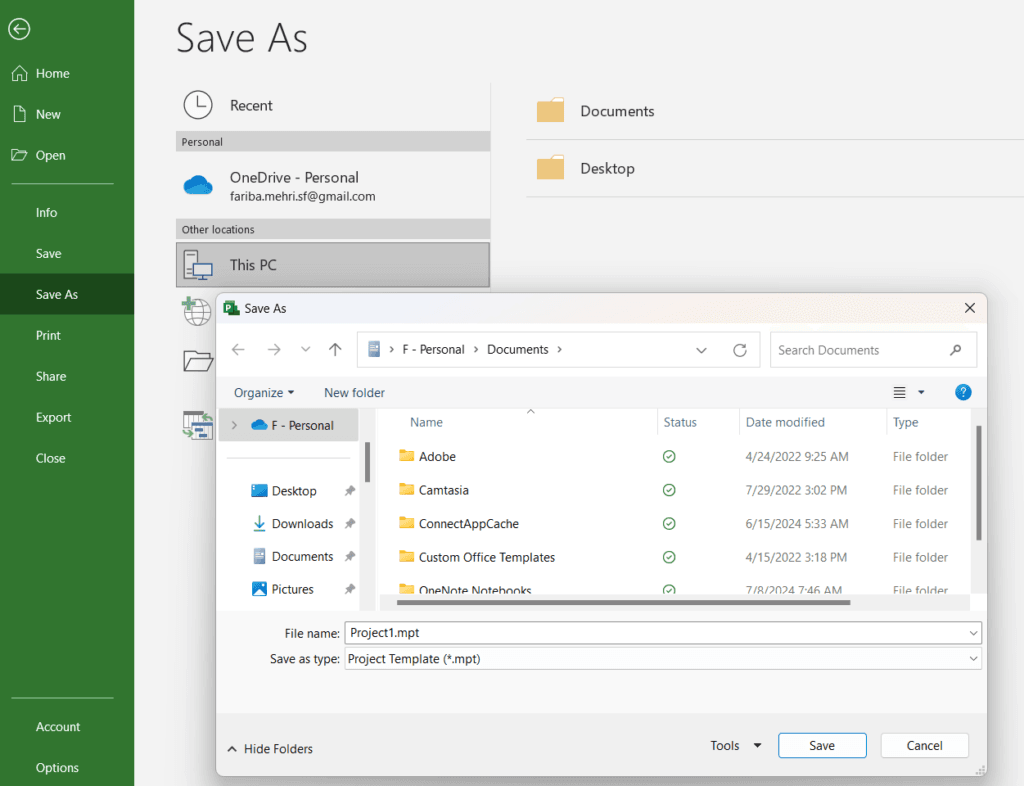
- Save as a Template: Once you’ve built your template, save it as a .mpt file:
- Go to File > Save As.
- In the Save as type dropdown, select Project Template (*.mpt).
- Choose a location to save the template file.
By saving the project as a template, you create a reusable file that you can use as a starting point for future projects.
Step 3: Define Task Structures
Defining the task structure is a crucial step in creating a robust project template. To create a well-structured project template, follow these steps:
- Create a Work Breakdown Structure (WBS):
- Break down the project into smaller, manageable tasks.
- Organize tasks hierarchically to visualize the project’s structure.
- Define Task Relationships:
- Establish dependencies between tasks to define the project’s critical path and sequence.
- Use relationships like Finish-to-Start, Start-to-Start, Finish-to-Finish, and Start-to-Finish.
- Assign Resources:
- Assign resources (people, equipment, or materials) to specific tasks.
- Specify resource availability and capacity.
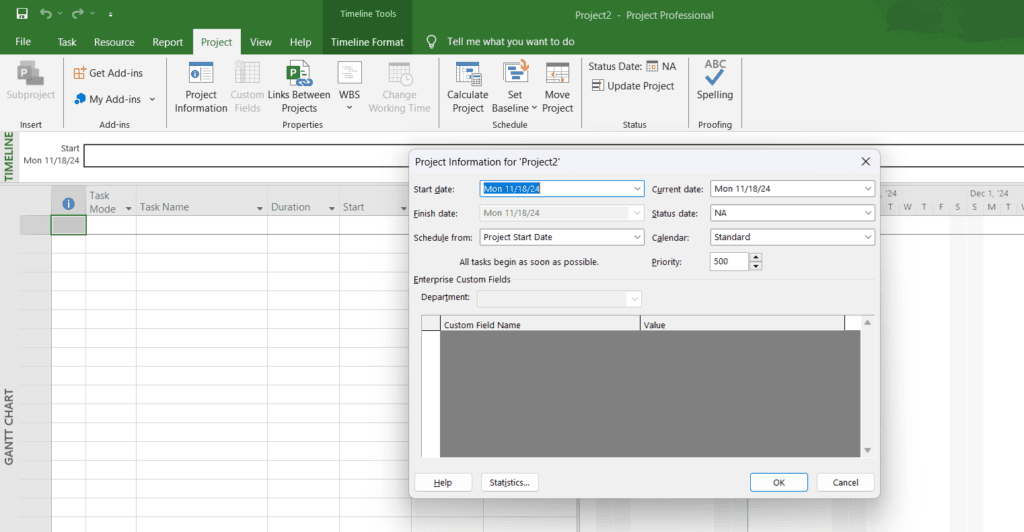
- Set Task Durations and Start/Finish Dates:
- Assign durations to tasks.
- Use placeholders for estimated durations if needed.
- Set start and finish dates for tasks or use automatic scheduling.
Step 4: Automate Scheduling
Automating scheduling in Microsoft Project can significantly streamline your project planning process. Here’s how to do it:
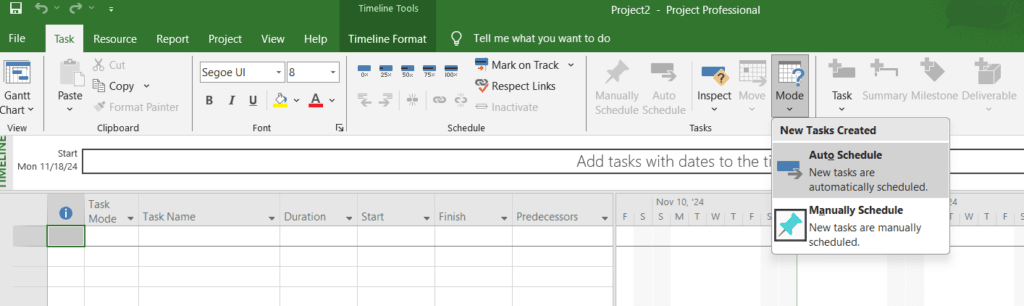
- Enable Auto-Scheduling for tasks:
- Go to Task > Mode > Auto Schedule.
- Use constraints (e.g., “As Soon As Possible”) and adjust task links to make schedules dynamic.
Step 5: Customize Resources
To ensure efficient resource allocation and utilization in your project template, follow these steps:
- Add Resources:
- Add resources (people, equipment, or materials) to your Resource Sheet.
- Assign unique names and types to each resource.
- Define Resource Calendars:
- Set working hours, non-working days, and vacation time for each resource.
- Consider factors like overtime availability and shift patterns.
- Assign Resources to Tasks:
- Allocate resources to specific tasks based on their skills, availability, and workload.
- Use resource leveling to balance workloads and avoid overallocation.
- Set Resource Rates:
- Define cost rates for labor and material resources.
- Use these rates to calculate project costs and budgets.
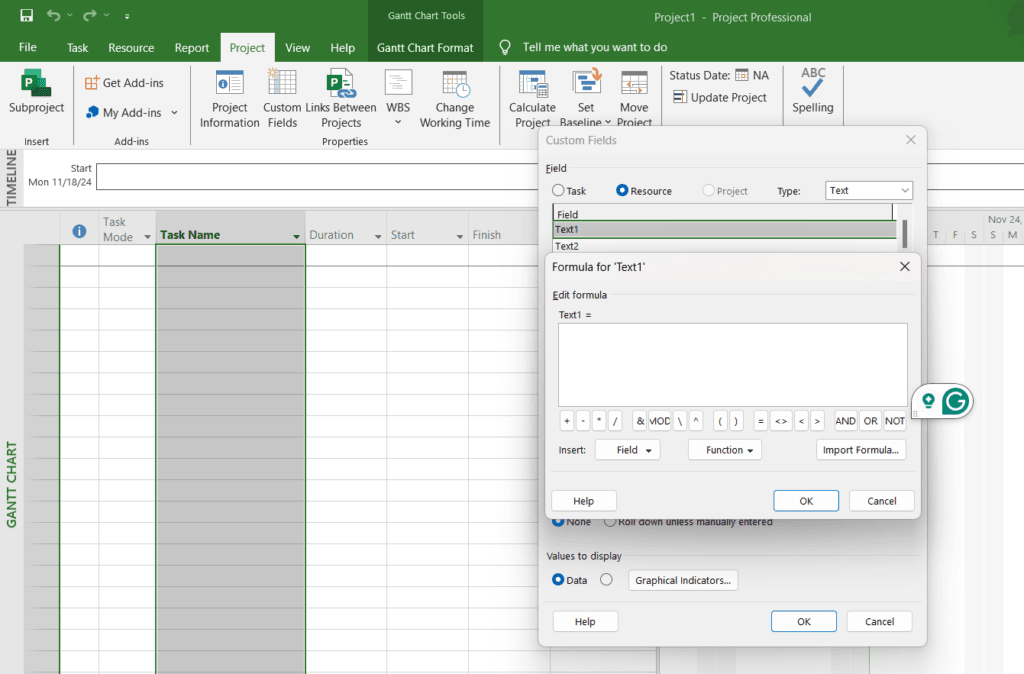
Step 6: Use Custom Fields and Formulas
Custom fields and formulas allow you to track specific project information and automate calculations. Here’s how to use them:
- Go to Project > Custom Fields.
- Create custom fields (e.g., task priority, risk level).
- Add formulas to automate calculations, such as:
- % Complete based on actual vs. planned progress.
- Budget Overrun based on baseline and actual costs.
Step 7: Add Recurring Tasks
To automate repetitive tasks in your project, you can use Microsoft Project’s built-in recurring task feature:
- Create a Recurring Task:
- Go to Task > Insert > Recurring Task.
- Define Recurrence Pattern:
- Specify the recurrence pattern (daily, weekly, monthly, yearly).
- Set the start and end dates for the recurrence.
- Define the frequency of recurrence (e.g., every week, every other month).
- Customize Recurring Tasks:
- Assign resources, set durations, and link dependencies to recurring tasks.
- Use custom fields to track specific information about recurring tasks.
Step 8: Include Built-in Reports
Microsoft Project offers a variety of built-in reports to help you analyze and visualize your project data. Here’s how to leverage them:
- Access Built-in Reports:
- Go to Report > Reports.
- Choose Report Types:
- Select from a range of reports, including:
- Gantt Chart
- Resource Usage
- Task Usage
- Cost Reports
- Timephased Reports
- Select from a range of reports, including:
- Customize Reports:
- Filter Data: Apply filters to focus on specific tasks, resources, or time periods.
- Format Reports: Customize the appearance of reports, such as font, color, and layout.
- Export Reports: Export reports to other formats (e.g., PDF, Excel) for sharing and archiving.
Step 9: Integrate Macros or Scripts
For advanced automation:
- Use VBA (Visual Basic for Applications) to create macros for repetitive tasks.
- Enable macros via the Developer Tab (go to Options > Customize Ribbon to activate the Developer tab).
- Example macro: Automatically set a task baseline.
Step 10: Save and Distribute the Template
- Save the file as a template (.mpt).
- Share it with your team or upload it to a central repository (e.g., SharePoint or Project Online).
B. Utilizing Built-in Features for Task Recurrence and Dependency Management
Microsoft Project offers powerful built-in features to automate repetitive tasks and manage dependencies:
- Task Recurrence
- Add recurring tasks for repetitive project elements like status meetings or reviews:
- Task > Insert > Recurring Task.
- Define the frequency (daily, weekly, monthly) and duration.
- Add recurring tasks for repetitive project elements like status meetings or reviews:
- Automating Dependencies
- Use Auto-Scheduling to automate task adjustments based on dependencies:
- Task > Task Mode > Auto Schedule.
- Set default task links (e.g., Finish-to-Start) to reduce manual updates:
- File > Options > Schedule > Default Task Type.
- Use Auto-Scheduling to automate task adjustments based on dependencies:
- Dynamic Date Adjustments
- Define a project start date and use relative dependencies to adjust task timelines automatically.
- Use critical path tracking to identify tasks that impact the project end date:
- View > Critical Path.
C. Customizing Templates to Fit Specific Project Requirements
To tailor templates to specific project needs, consider the following customization options:
- Add Custom Fields
- Go to Project > Custom Fields.
- Create fields for tracking project-specific metrics like risk levels, task priorities, or custom calculations.
- Use Custom Views
- Save filtered views or specific layouts tailored to project needs:
- View > Tables > More Tables > New.
- Example: A view showing only tasks at risk.
- Save filtered views or specific layouts tailored to project needs:
- Incorporate Standard Reports
- Pre-configure reports for project updates:
- Report > New Report > Custom Report.
- Save these reports within the template for quick access.
- Pre-configure reports for project updates:
- Embed Macros for Advanced Automation
- Use VBA to automate repetitive or complex processes (e.g., baseline updates, and progress notifications).
- Enable the Developer tab for access to macros:
- File > Options > Customize Ribbon > Developer.
- Adjust Resource Allocations
- Add generic resources (e.g., “Designer,” “Developer”) that can be replaced with real team members later.
- Define effort-driven tasks to automatically adjust durations when resource assignments change.
At the end of the review, check the template to ensure that all elements are functional and aligned with the project goals. Save it as a read-only file to prevent accidental edits. Then, share the template with your team or upload it to a shared platform, such as SharePoint or Project Online.
By combining these steps, along with built-in features and customizations, you can create powerful automated templates that streamline project planning and management while ensuring consistency across projects.
For teams looking to take automation a step further, automating project notifications with Power BI can help ensure stakeholders stay informed in real-time.
Microsoft Project Template Automation Best Practices
To maximize the benefits of template automation, it’s crucial to implement best practices that ensure consistency, accuracy, and effective utilization.
Ensuring Consistency and Accuracy
- Standardize Naming Conventions: Establish clear and consistent naming conventions for tasks, resources, and custom fields.
- Maintain a Centralized Template Library: Create a centralized repository to store and organize templates.
- Regularly Review and Update Templates: Periodically review and update templates to reflect changes in project methodologies and organizational standards.
- Document Template Usage Guidelines: Develop clear guidelines for using templates, including best practices and troubleshooting tips.
Testing and Refining Templates
- Thorough Testing: Test templates with various project scenarios to identify potential issues and bottlenecks.
- Iterative Refinement: Continuously refine templates based on user feedback and lessons learned.
- Version Control: Implement a version control system to track changes and manage different template versions.
- Performance Optimization: Optimize template performance by minimizing file size and simplifying complex calculations.
Training Project Team Members
- Tailored Training Sessions: Conduct training sessions that are tailored to the specific needs and skill levels of your team members.
- Hands-on Practice: Provide opportunities for team members to practice using templates in real-world scenarios.
- Create a Knowledge Base: Develop a knowledge base or FAQ document to answer common questions and provide troubleshooting tips.
- Encourage Feedback: Encourage team members to provide feedback on template usability and suggest improvements.
Many organizations have used template automation to enhance project management. By utilizing automated templates, these organizations have reduced project timelines, improved resource utilization, and enhanced overall project performance.
Tips for Maximizing Productivity with Automated Templates
To maximize productivity with automated templates, consider the following tips:
- Create a template library: Organize your templates into a centralized library for easy access.
- Continuously improve: Regularly review and update your templates to reflect evolving project needs.
- Focus on strategic planning: Use the time saved through automation to focus on higher-level tasks.
- Encourage Feedback: Regularly update templates based on user experiences.
These practices ensure your organization continues to reap the benefits of automation.
Conclusion on Microsoft Project Template Automation
Automating Microsoft Project templates streamlines workflows, boosts productivity, and ensures consistent project management. Built-in features and best practices enable the creation of versatile templates that simplify project management.
Implementing template automation can lead to numerous benefits, including reduced project startup time, improved consistency, and enhanced accuracy. Additionally, it can help optimize resource utilization, mitigate risks, and improve overall project performance.
To maximize the benefits of template automation, it is essential to continuously refine and update your templates. By incorporating feedback from project teams and adapting to evolving project requirements, you can ensure that your templates remain effective and efficient.
If you are tired of repetitive tasks and inconsistent project outcomes, BSuite365 offers expert Microsoft Project consulting servicesto help you streamline your workflows and automate your templates.
They specialize in creating efficient templates that align with your organization’s standards and best practices. By partnering with BSuite365, you’ll optimize workflows, enhance efficiency, and stay ahead of the competition.
Our experts will be glad to help you, If this article didn’t answer your questions. ASK NOW
We believe this content can enhance our services. Yet, it’s awaiting comprehensive review. Your suggestions for improvement are invaluable. Kindly report any issue or suggestion using the “Report an issue” button below. We value your input.
About the Author: Fariba Me
document.getElementById(“review-notice”).remove();
document.getElementsByTagName(“hide-notice”)[0].parentNode.remove();
}