Automating Duplicate Removal in Excel with VBA Macros
When using data for analysis and decision-making, duplicate values affect your data’s quality, accuracy, and reliability and lead to incorrect results in analysis. Duplicate data occupies a lot of space in your Excel file and time to be examined. Therefore, efficient duplicate handling in Excel is vital for any individual or business dealing with huge amounts of data. In this blog post, we’ll focus on automating duplicate removal with VBA Macros to help you reach an accurate dataset. Stay with us till the bottom line to learn more about Excel VBA duplicate removal.
Understanding the Problem
When dealing with a large volume of data, finding and manually removing duplicate values in Excel can be exhausting and sometimes impossible. Therefore, using Excel Macro for duplicate record cleanup can help in this regard.
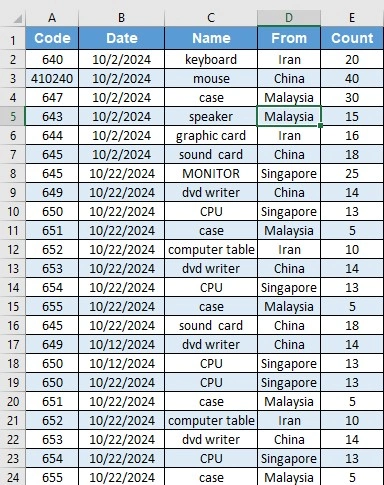
For example, a store’s sales data for a product on a specific day may be recorded two or more times due to an operator error. At the end of the month, the amount received from the customer differs from what is shown in Excel. Here, we need to identify and remove the duplicate data.
Overview of VBA Macros
Excel Macros are a set of recorded actions that allow you to automate tasks in Excel. With Macros, you can perform a series of steps with just one click, making complex processes simple and efficient. When you record a Macro, all steps are recorded in Visual Basic for Applications (VBA) code. These steps can include typing a text or numbers, clicking on cells or commands on the ribbon or menus, and others.
Each time a Macro is executed, the defined operations are carried out in sequence, and the desired output is produced. By automating duplicate removal with VBA Macros, you can assure consistency and accuracy in data cleaning efforts. VBA can handle large volumes of data more effectively than manual methods, making it ideal for businesses or projects where data integrity is paramount.
Getting Started with VBA in Excel
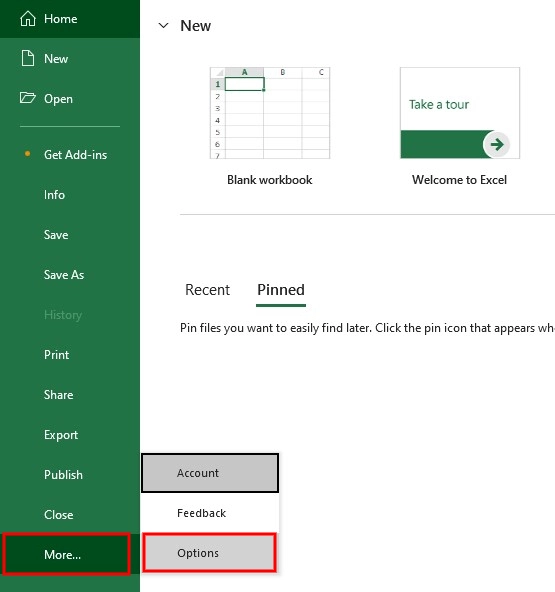
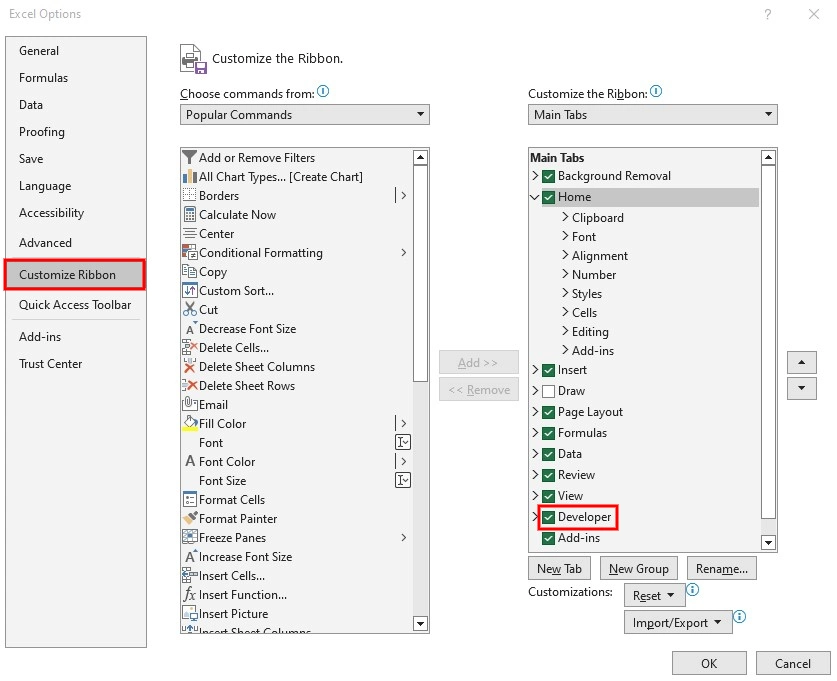
Before automating duplicate removal with VBA Macros, you need to activate the “Developer” tab in Excel:
- Go to the “File” tab > “Options”.
- Open the “Customize Ribbon”.
- In the right section, check the “Developer” option.
- Click on “OK”.
Now, the Developer tab is visible in the toolbar, and The Macro is located in its “Code” section.

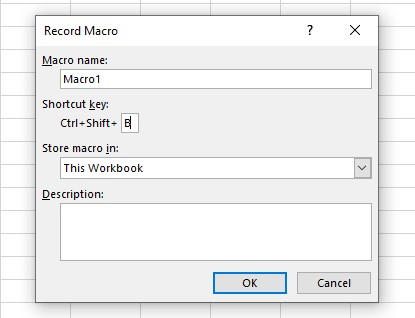
Record a Macro
To record a Macro, navigate to the “Developer” tab > “Code” section, and select the “Record Macro” item.

In the dialog box, you can see the Macro’s name and its shortcut keys which you can change and add a description if necessary.
Writing a Simple VBA Macro
To learn automating duplicate removal with VBA Macros, you may need to write a customized VBA code. There are two paths for opening the VBA editor:
- Press ALT + F11.
- Go to the “Developer” tab, and select “Visual Basic”.
In the left pane of the opened window, find VBA project > modules and double-click on the created module to open the window with the related code. You can see the codes of the recorded Macro in the window. You can also create a new module and start coding.
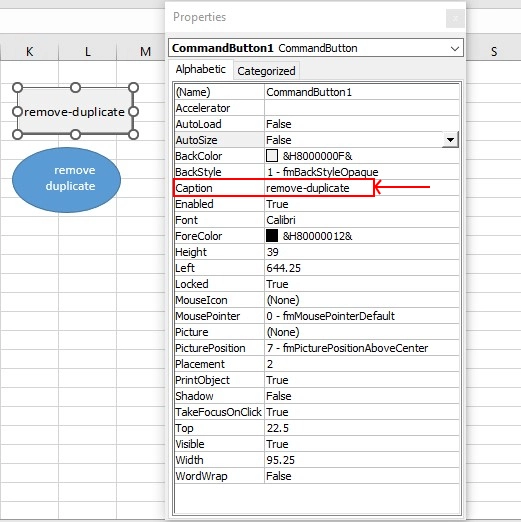
Another way of creating a Macro is by using a “Command Button”. To add this button to your sheet, go to the “Developer” tab > “Insert” > “ActiveX Controls” > “Command Button”.

You can change the size and location of the button easily. Right-click on the button, select the “Properties” item, and write your desired title in the caption box.
To automate the processes with this button, you need to assign a Macro to it:
- Right-click on the button, and select “View Code”.
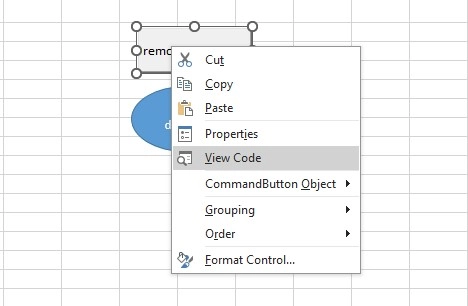
- Write your VBA script for duplicate record removal, and close the window.
- Now, click on the button and the code will run completely.
- Make sure the “Design Mode” is not activated.
The coding environment looks like this:
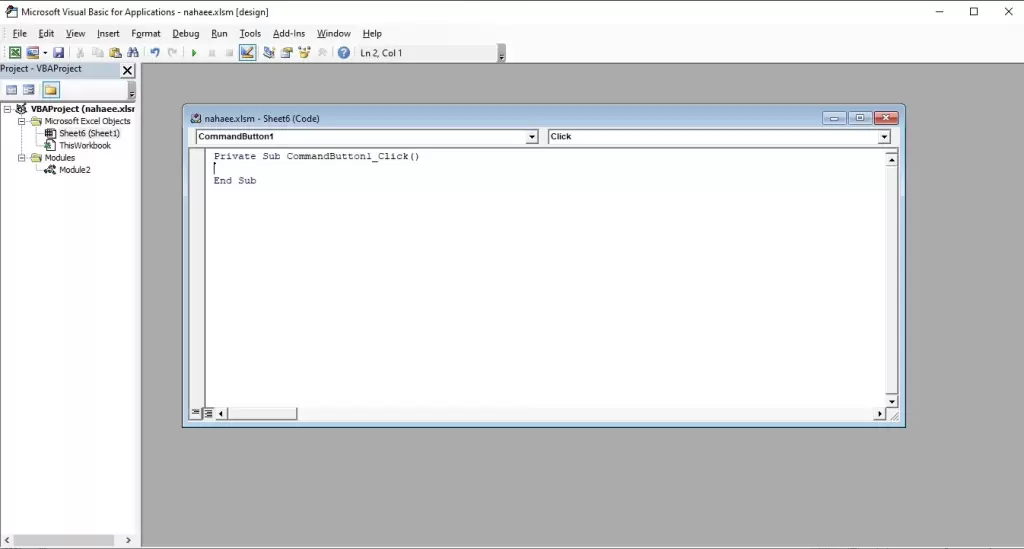
The VBA code for duplicate row deletion starts with `sub`, followed by the name of the procedure and event, and ends with the phrase `end sub`. Comments and description lines start with the symbol `’` and are colored green. After the explanations, it’s time to define the variables.
Variables refer to types of data that can store values. You can create your desired variables with types of numeric, string, and other values before starting the program or while coding. The syntax for defining variables is:
`Dim variable_name As variable_type`Data in the VBA programming language is divided into two categories: numeric data and non-numeric data.
- Numeric data includes byte (Byte) data values, integers (Integer), long integer variables (Long), floating-point with single decimal precision (Single), and others.
- Non-numeric data includes string (String) data values, date and time (Date), a True or False value (Boolean), an object (Object), and a variant (variant).
When automating duplicate removal with VBA Macros, you can concatenate two strings using the “&” operator. This operator is known as Concatenation, which performs the same as the CONCATENATE function in Excel.
Identifying Duplicate Data
You can use these methods to identify duplicate data in the process of data cleansing automation with VBA:
- Using Conditional Formatting and filters
- Using the COUNTIF function and filters
- Using the combination of Conditional Formatting, COUNTIF function, and filters
First, you need to create unique data, so in a new column, use the CONCATENATE function to merge the information of important columns that you don’t want to have duplicates.
- Define a string variable and merge the values of the cells you want to compare into that variable.
- Then, create a variable for the merged data, for example, stSum, and several variables for the number of columns, such as a, b, c, d, e, as follows:
Dim stSum As String, lastcount, a, b, c, d, e As Integer- As you need to repeat this process for each row, let’s count the rows.
- Write a code that finds the first and last rows of the data and creates unique data from the columns you want for the number of those rows.
- Define a variable with any desired name, for example, “LastCount”, and assign the following code to it:
LastCount = Cells(Rows.Count, 1).End(xlUp).Row- Since you need repetition, use a loop with the “For” command, which is as follows:
For counter = start To end [Step step]

' Code to be executed for each iteration

Next counter
From row 2 to the last row, you can put data from columns a, b, c, d, and e in the same row and column g, using this code:
lastcount = Cells(Rows.Count, 1).End(xlUp).Row

For i = 2 To lastcount

a = Range("a" & i).Value

b = Range("b" & i).Value

c = Range("c" & i).Value

d = Range("d" & i).Value

e = Range("e" & i).Value

stSum = a & b & c & d & e

Range("g" & i).Value = stSum

Next i- Then select column g with its unique data:
Columns(“G:G”).Select
- Select the whole range using “ActiveSheet.Range(“E8”).CurrentRegion” and remove duplicate data using “removeduplicate”:
ActiveSheet.Range(“E8”).CurrentRegion.RemoveDuplicates Columns:=Array(1, 2, 3, 4, 5, 6, 7 _
), Header:=xlNo
- Now, it’s time to test the created Macro. In order not to lose the data during the test, make a copy of the data in another sheet. Then run the Macro through one of these ways:
- Click on the Command Button.
- Press f5.
- Click on the “Run” button in the Visual Basic window.
Recording Macro to identify duplicate data in Excel
To use Excel Macros for duplicate elimination, select “Record Macro”, then:
- Use Conditional Formatting and Filters.
- Select the column containing your data.
- Navigate to the Home tab > Style > Conditional Formatting > Highlight Cells Rules > Duplicate Value.

As a result, the duplicate items are highlighted and can be managed based on what you desire.
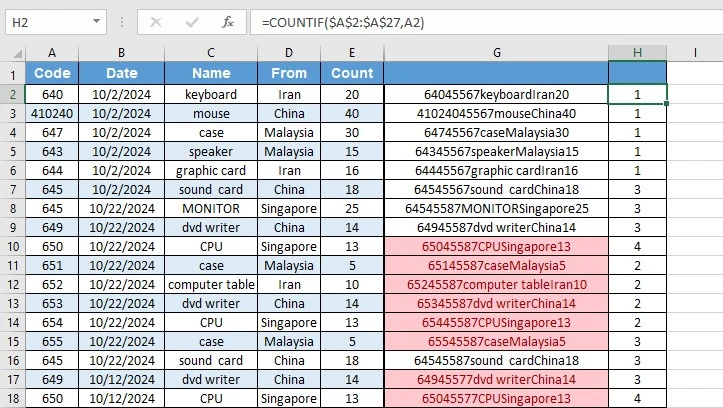
2. Use the COUNTIF function and Filters.
- In another column, add this function:
= COUNTIF(The column that should be checked), Data Range
=COUNTIF(G2:G17, G:G)
- The function returns “2” as the number of duplicate values, and you can highlight them using filters.
3. Use Conditional Formatting, COUNTIF function, and Filters
- Go to Conditional Formatting > Highlight Cells Rules > More Rules, and select “use a formula to determine…”.
- In the “Format values where…” box, enter “H2>1”.

Now, highlight duplicate values using filters.
Removing duplicate data
To remove duplicate data in Excel, select the range, go to the “Data” tab, and click on “Remove Duplicate”.
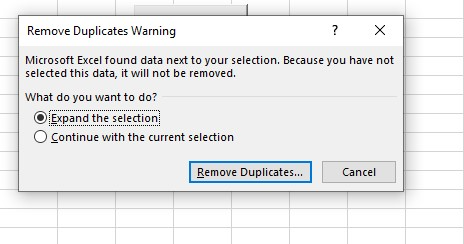
Check “Expand the selection”, and click on Remove Duplicates.
Select all columns which contain duplicate values, and then click OK.
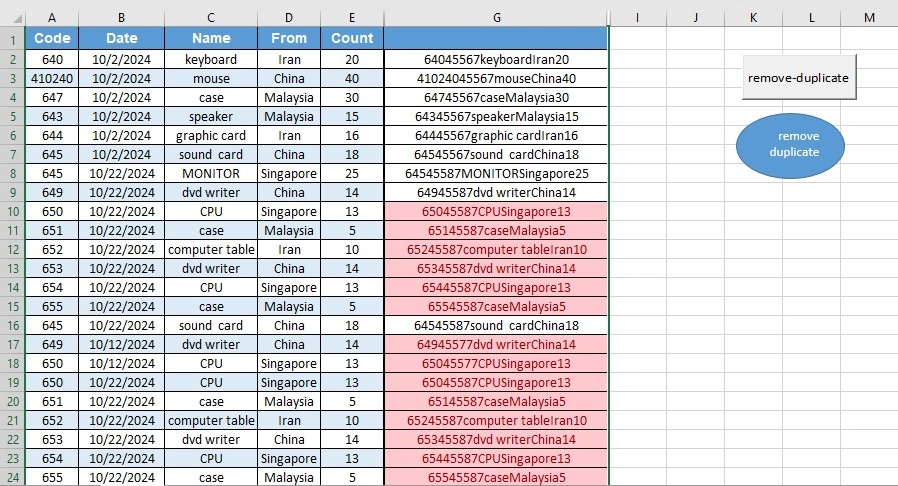
- Now let’s examine if the Macro works efficiently.
- Copy a bunch of rows, and paste them at the end of the table.
- Go to the “Insert” tab > Illustration > Shape, select a shape, and put it at the top of the table.
- Right-click on the shape, and select “Assign Macro”.
- Now, every time you click on the shape, the Macro will run.
It should be noted that this Macro merely works within this specific file and its data.
- If you’ve copied a considerable number of rows, the Macro operates only within a specific range, and won’t cover the whole data. Thus, you need to edit the Macro in Visual Basic.
- to do so, select a cell within the range, and then select the whole range using this code:
Range(“E8”).CurrentRegion.Select
- To remove duplicate values within the whole range, use this code:
ActiveSheet.Range("E8").CurrentRegion.RemoveDuplicates Columns:=Array(1, 2, 3, 4, 5, 6, 7 _

     , 8), Header:=xlNo
In order for the Macro to run smoothly and remove duplicates, use the “Ontime” code:
Option Explicit

Public bWORKING As Boolean

Public bKEEPWORKING As Boolean

Sub StartTimer()

'never let it run on top of itself

Dim dAdjust As Double

If bWORKING Then Exit Sub

bWORKING = True

'do something here; refresh connections or whatever

Debug.Print Now 'just to show it did something

If bKEEPWORKING Then _

dAdjust = Now() + TimeSerial(0, 1, 0)

'MsgBox (dAdjust)

Application.OnTime dAdjust, "Macro1"

     Application.OnTime Now + TimeSerial(0, 1, 0), "StartTimer"

bWORKING = False

End Sub
In this code, “Macro1” is the Macro you recorded. You should call the procedure using the Call function and set bKEEPWORKING as true before the calling line:
bKEEPWORKING = True

Call StartTimer
TimeSerial is used to set the duration of repetition, so enter your desired duration in this section.
TimeSerial (Hour, Minute, Second)
Examining the code
When automating duplicate removal with VBA Macros, it’s necessary to check your code for errors. The simplest debugging technique is code review. To check for any existing errors or other unwanted features, a second look at the code is vital. However, finding errors through review requires knowledge and experience of the VBA code. This method may help identify errors but is not as efficient as using built-in debugging tools.
The VBA editor has an internal debugging mechanism that allows Excel users to interact with and execute code. When you launch the VBA editor (by pressing Alt+F11) in Excel, the editor window opens, and there is a debugging option in the top menu:
When you click on the “Debug” tab, you can see a list of debugging tools accessible via shortcuts:
1. The “Run Current Procedure (F5)” tool
One of the methods to debug automating duplicate removal with VBA Macros is executing the code using the F5 shortcut key. Start by placing the cursor in a UserForm or Sub (Macro), and then press F5 to run the Sub. Please note that F5 doesn’t work when executing a Sub (Macro) that requires parameters for a function.
2. The “Immediate Window (ctrl+g)” tool
By activating the Immediate Window, when you use the command debug.print, you can see the result of variables and commands before executing the Macro in the Immediate Window.
3. The “Toggle Point (F9)” tool
If you want to execute several lines of the program and see the result, you can click on the last line, and press F9. At the beginning of the line, you can see a red bullet indicating that when the procedure is run by pressing F5, the program will execute from the first line to the point you have set.
If you encounter an error message using these methods before Excel data deduplication using Macros, read the error message to understand which part of the code the issue has arisen from, and take action to resolve it.
After removing duplicate data, you can prevent the entry of duplicate values with a few operations, which we will describe below.
- First, select the range of cells where you want Excel to prevent the entry of duplicate data. Then, go to the “Data” tab, and select the “Data Validation” option.
- In the dialog box > “Allow” section, select the “Custom” option.
- In the Formula box, enter this formula:
=COUNTIF($A$2:$A$27,A26)<1
- Assuming your desired range is A2:A27, next, in the Error Alert tab> Style, select the “Stop” option.
- Then, in TITLE, write the title for the warning window, for example, “Duplicate Data Warning.”
- In the box below, write the error message text, for example: “Warning: You have entered duplicate data.”
- Finally, click “OK”, and close the window.
Now, if you enter duplicate data in column A, you will encounter an error message similar to the above, preventing you from continuing.
Due to the daily changes in data and data storing formats, it’s necessary to periodically test the mechanisms created to prevent duplicate data entry and the Macro for detecting and deleting duplicates. This involves intentionally entering duplicate data to see if the mechanism prevents it and running the Macro to see if it detects and deletes duplicate data.
Conclusion
In this blog post, we focused on automating duplicate removal with VBA Macros. Mastering the automation techniques for duplicate data in VBA is a valuable skill for anyone working with data. By automating the process of identifying and eliminating duplicate entries, you can ensure the integrity and reliability of your datasets, saving both time and effort. Remember, consistent testing and validation of your Macros are key to maintaining data accuracy, especially as your data evolves.
For businesses handling large datasets, ensuring data accuracy and efficiency in Excel is crucial. If your team requires expert guidance in data management, automation, and advanced Excel solutions, contact us today to optimize your workflow and maximize productivity.
FAQs
Yes, VBA can be used to remove duplicates based on specific criteria. You can customize the VBA script to identify and remove duplicate entries according to your unique requirements.
Changes made by a VBA Macro cannot be undone using the standard Excel undo feature. It’s important to back up your data before running a Macro if you might need to revert the changes.
Yes, automating duplicate removal with VBA Macros has some risks, including the potential for data loss if a Macro is not correctly written or tested. Additionally, Macros can run malicious code, so only run VBA scripts from trusted sources.
VBA can be utilized for a wide range of data cleaning tasks beyond removing duplicates, such as formatting data, correcting inconsistencies, and filling missing values.
You can find sample code for automating duplicate removal with VBA Macros in online forums, VBA tutorial websites, and Microsoft’s official documentation. These resources often provide code snippets and detailed explanations.
Our experts will be glad to help you, If this article didn’t answer your questions. ASK NOW
We believe this content can enhance our services. Yet, it’s awaiting comprehensive review. Your suggestions for improvement are invaluable. Kindly report any issue or suggestion using the “Report an issue” button below. We value your input.


