Boost Your Efficiency with Outlook Email Automation Tips
We all know that sending emails manually is quite a demanding and time-consuming task. Outlook, as one of the most popular email services, offers many useful features that you can use to organize and manage your emails.
In what follows, we will be talking about this topic in more detail and provide you with a number of advanced email automation features that will save you a lot of time.
Setting Up Email Filters and Rules
Outlook allows you to create custom filters called rules to automatically sort your emails. These rules are automated actions that you can configure to handle your emails.
By setting specific conditions and actions, these rules let you automatically filter, organize, prioritize, or delete emails.
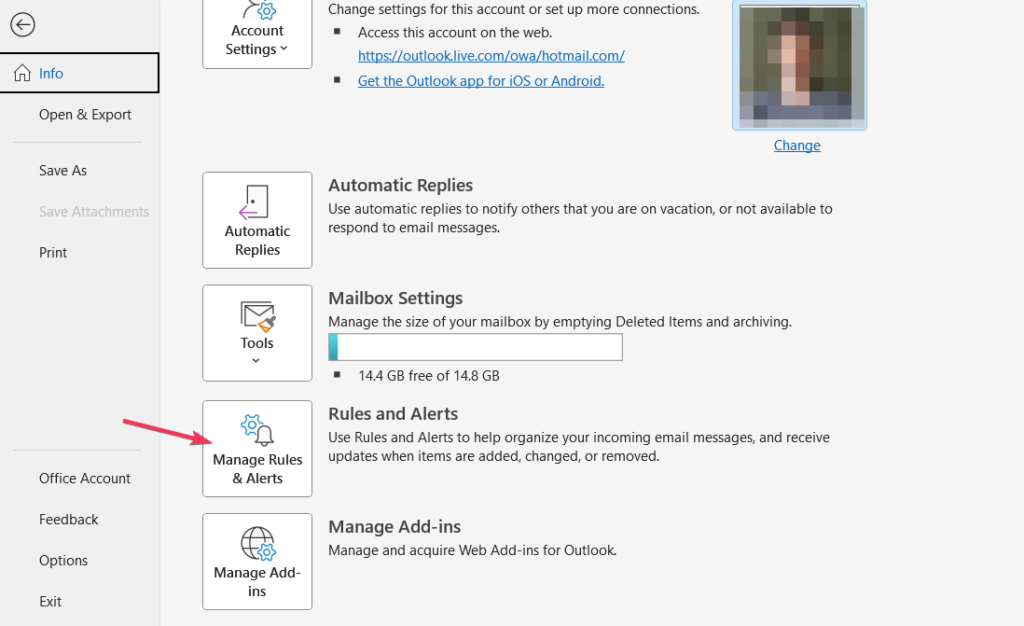
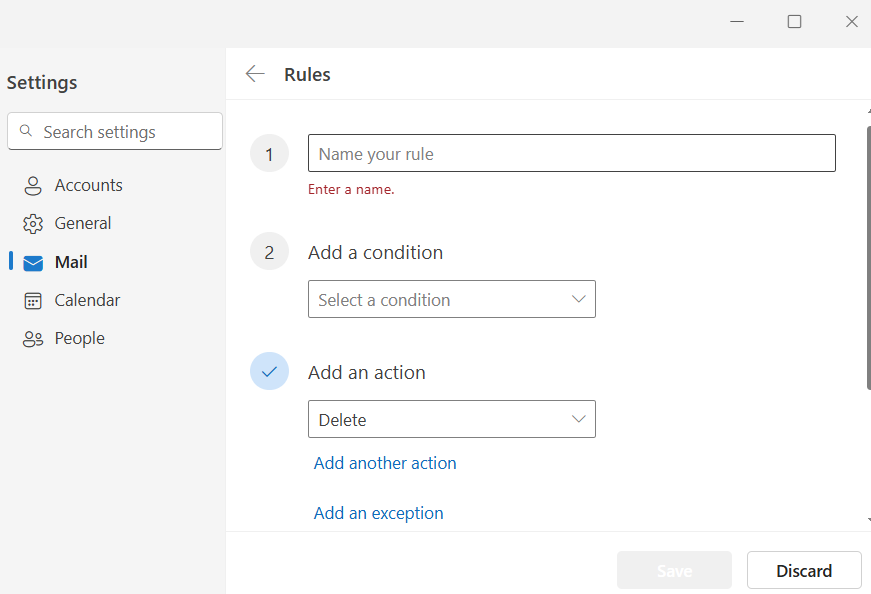
Setting up a rule in Outlook is a straightforward task. You need to follow the steps below:
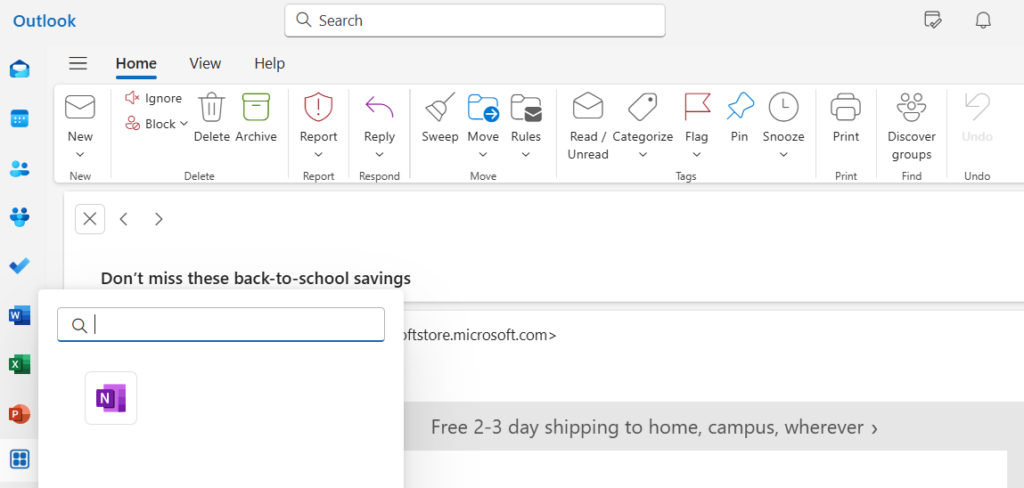
- To begin with, click on the File tab and select Manage Rules.
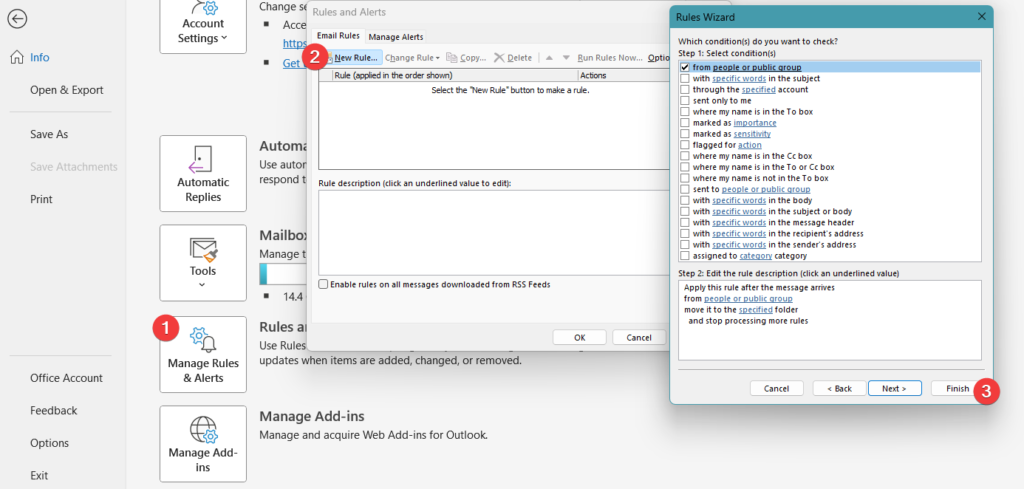
2. Tap New Rule and choose if the rule applies to all emails or just specific ones.
3. Then, you can set the triggers for the rule, like who sent the email, what the subject is, or even words in the email body.
4. Next, you need to pick the action the rule takes when the trigger is met. You can move emails to a folder, forward them, or even delete them automatically.
5. As the final step, give your rule a catchy name and hit Finish.
Creating Automatic Email Responses
Automatic replies is another useful feature of Outlook that enables you to notify others of your unavailability and indicate your return date. To configure automatic replies in Outlook, follow these instructions:
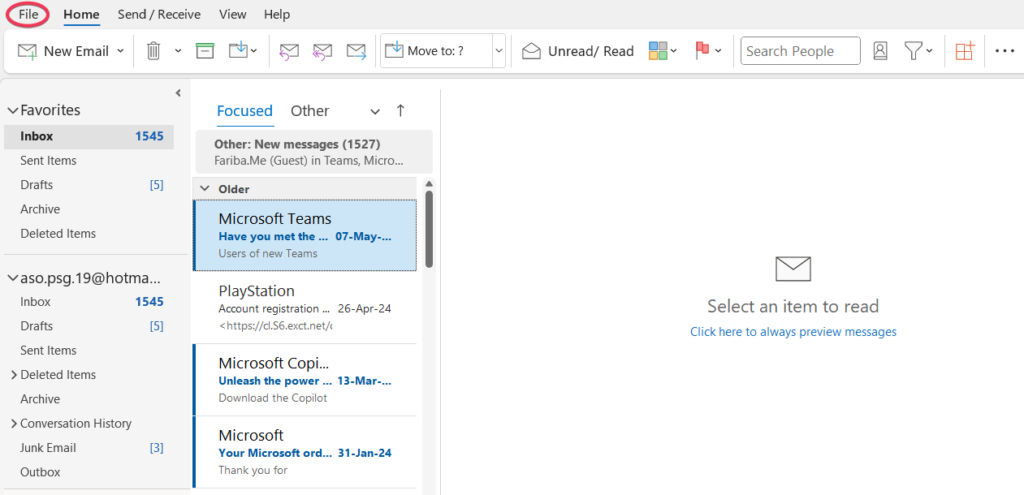
- Open Outlook and navigate to the File tab.
2. Then, select Automatic Replies.
3. Tap the option to send automatic replies.
4. Following that, set the start and end times for the automatic replies.
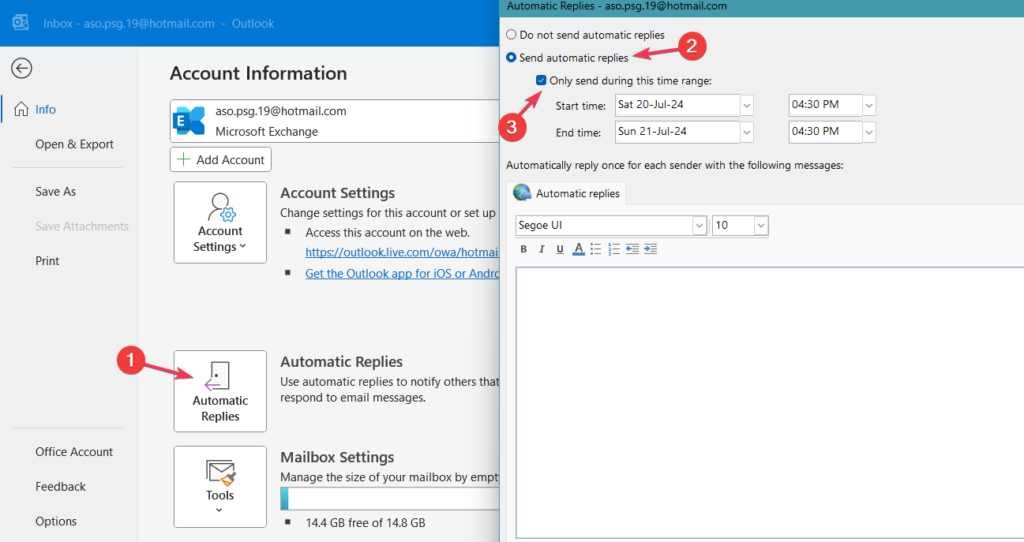
5. Finally, compose the message you wish to send as an automatic reply.
If automatic replies aren’t enough, Outlook macros can further streamline your email responses. To learn how to implement macros for smarter email automation, visit our Smart Email Solutions: Useful Outlook Macros blog.
If you’re looking to streamline everyday actions like organizing emails or setting up recurring reminders, check out our guide on automating routine tasks in Outlook.
Making Use of Email Templates
Outlook gives you the option to create pre-written email drafts, called templates, to save time. These templates include greetings, introductions, and your main message, with blank spaces to fill in specific details like names, companies, or dates.
To create email templates in Outlook, there are a few steps that you should follow:
- Click on New Email.
- When the message window pops up, find the More Options button (three dots).
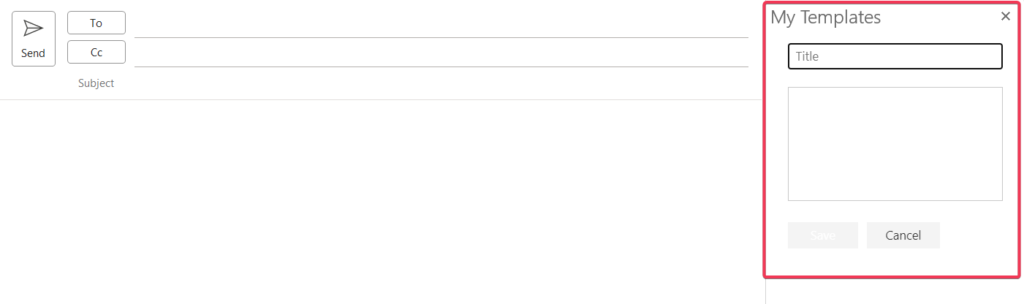
- Then, select My Templates. Note that if it is your first time, you might need to enable this option.

4. Click on the + Template button. Give your template a clear title and type out the content.
5. Once you are done, press Save and your template is ready to use.
Now that you know how to create an email template in Outlook, it is time to put it into use. To do this,
- Tap New Email to start a new message.
- Next, find the More Options button and select My Templates.
- Browse through your saved templates and pick the one you need.
- Make any adjustments specific to the recipient and hit the Send button.
Scheduling Email Delivery
Another helpful function of Outlook is the delayed delivery feature. Thanks to this feature, you can compose emails now and pick the ideal moment for them to land in your recipient’s inbox.
This comes in handy if you want to maximize the open rates or coordinate with your colleagues across different time zones. Overall, the scheduling feature helps you in two ways:
- By scheduling emails for when your colleagues are likely working, you will avoid interrupting their personal time or causing unnecessary late-night replies.
- This feature allows you to schedule emails for a time that suits you without pressuring recipients to respond immediately.
To make use of this functionality, follow these instructions:
When composing your email, you see a Schedule send option within the suggestions pane. Click on that to set a time.
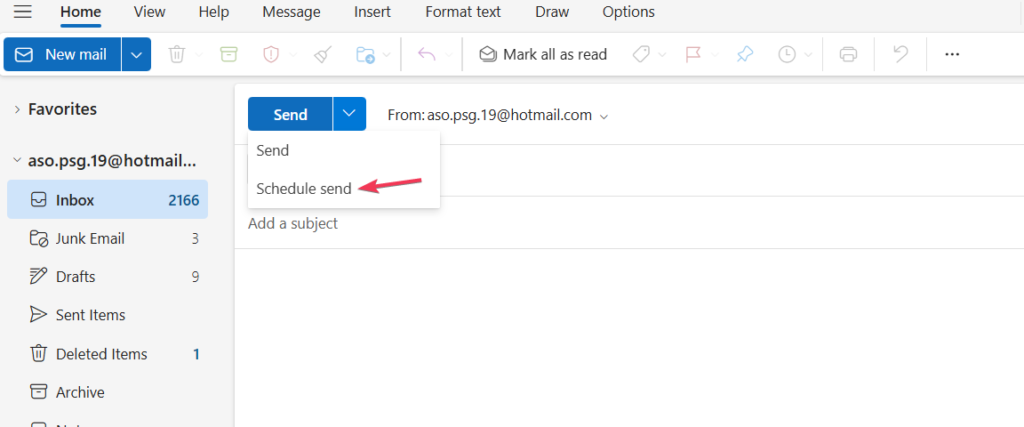
Following that, a window will appear confirming the suggested date and time. If that works for you, just tap Send within the email window.
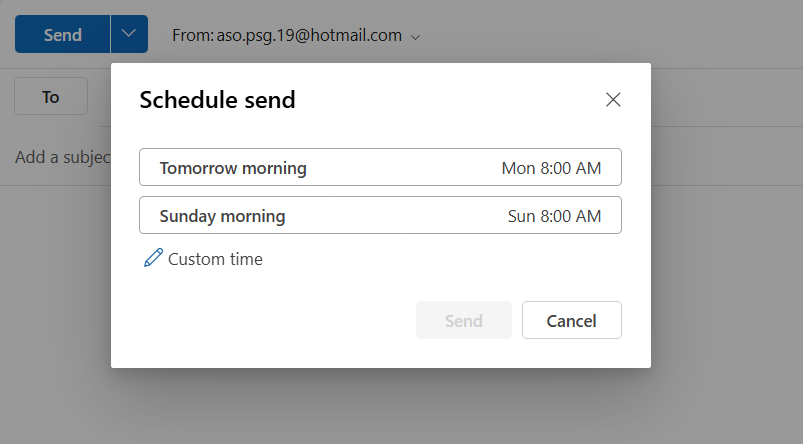
Note that if you need to adjust the timing, you can use the date and time boxes in the same window to make changes and then hit Send again. Also, if you want to ditch the schedule and send it now, simply click on Cancel delay and hit Send as usual.
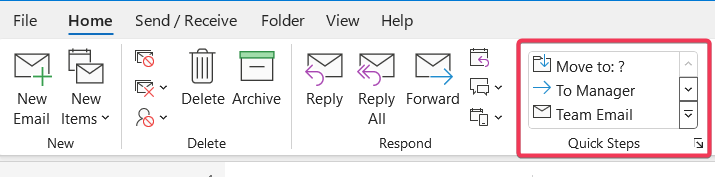
Organizing Emails with Quick Steps
Outlook’s Quick Steps feature offers you the option to define a series of actions that can be executed with a single click. You can take advantage of these actions to automate repetitive tasks related to managing emails.
Common use cases include moving or copying emails to specific folders or sending automated replies with subsequent deletion of the original message.
One of the main upsides of this feature is that you can combine multiple actions into a single Quick Step. For example, you can create a Quick Step to move an email to a designated folder, mark it as unread, forward it to colleagues, and Bcc it to a manager.
What’s more, Quick Steps are customizable and enable you to automate a wide range of routine email management tasks.
By default, Outlook offers five pre-defined Quick Steps located on the Home tab under the Quick Steps group (You can find this on the old version of Outlook). These are:
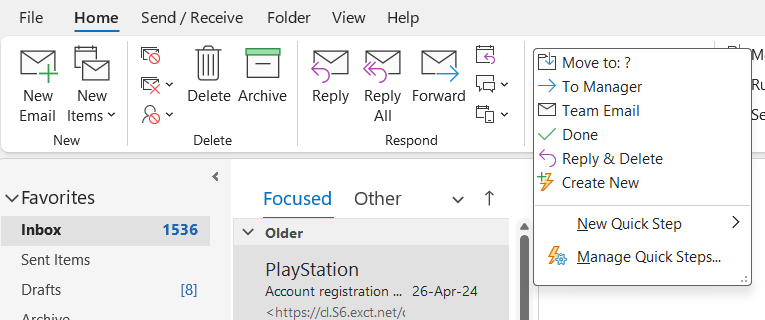
- Move to: Allows you to move the selected email to a designated folder and mark it as read.
- To Manager: Helps you forward the selected message to your manager.
- Team Email: Lets you forward the selected message to your team members.
- Done: Marks the selected email as read and complete, then moves it to a specified folder.
- Reply & Delete: Allows you to open a reply to the selected message and move the original message to the Deleted Items folder.
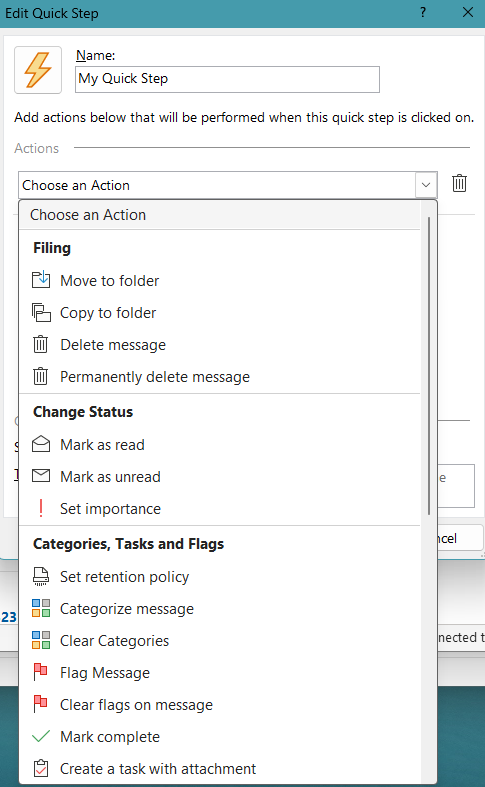
In addition to the steps above, you can create a custom quick step. To do this:
Navigate to the Home tab and locate the Quick Steps box. Click the small arrow in the bottom right corner of this box.
From the menu, select Create New.
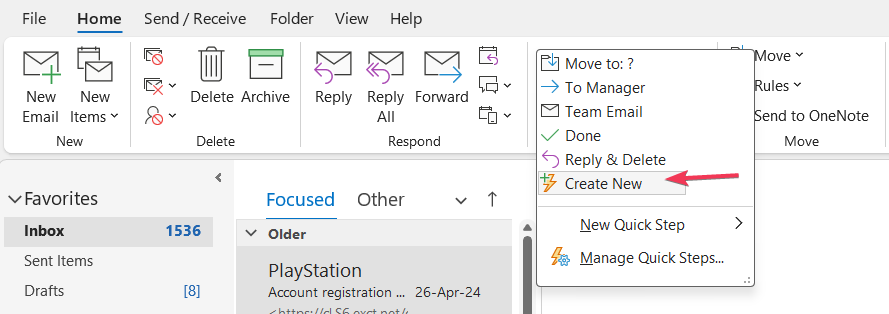
A window will appear that gives you a variety of categories, each offering functionalities that you can use to automate routine email tasks.
Managing Email Attachments
Large email attachments can take up storage space in your mailbox which results in slowing things down. To deal with this, Outlook allows you to create automated rules that tackle oversized attachments. If you want to manage the attachments, follow these steps:
Create a new rule with a condition that targets emails with attachments exceeding a specific size (in kilobytes). Choose the maximum attachment size you are comfortable with.
For these oversized emails, you can either Delete (meaning that emails with attachments exceeding the size limit will be deleted) or Move (meaning that the emails with large attachments will be directed to a specific folder).
Note that for more precise control, you can add additional conditions. This lets you apply the rule only to specific senders, email subjects, or other criteria.
Integrating Outlook with Third-Party Automation Tools
Outlook add-ins offer a way to extend the platform’s capabilities and automate various aspects of email management. These add-ins help you by streamlining repetitive tasks, improving the workflow efficiency, and enhancing the overall email productivity.
There are many actions that these ads-in can do, including:
- They can automate replies to emails that meet specific criteria.
- They let you schedule emails to be sent at a designated time.
- They can also create pre-written drafts for commonly used emails.
- They allow you to personalize content within bulk email campaigns.
- They help you track email open rates and analyze email performance metrics.
To find the add-ins, you can locate it within the navigation bar on the left side of the Outlook interface. You can then browse and select the add-in that best suits your specific email automation needs.
When using email automation through add-ins, remember to select tools specifically designed for email functionalities, as some add-ins may have broader applications beyond email management.
One useful Outlook add-in for automation is Zapier. This tool facilitates connections between Outlook and hundreds of other applications and helps you create automated workflows.
Zapier allows you to define triggers within Outlook. When these triggers occur (e.g., closing a deal in a CRM or receiving a new survey form entry), automated emails will be sent via Outlook.
This integration between platforms streamlines communication and saves you a great deal of time by automating repetitive tasks.
Final Words
By now, you have probably come to the realization that the Outlook’s automation features will be very beneficial and time-saving when it comes to managing your email workflow. We hope that the features outlined above will help you organize your emails more effectively.
However, organizing your emails is just one piece of the puzzle. Ensuring the security of your email communication is equally important. To safeguard your inbox and protect your sensitive information, we recommend reading our blog on Outlook Email Security Best Practices. It’s packed with essential tips to help you maintain a secure and efficient email environment. Don’t miss out on these crucial insights!
To optimize Outlook for your business needs, explore how MS Outlook Consulting & Development Services can help you unlock the full potential of Outlook for seamless email management and automation.
Our experts will be glad to help you, If this article didn’t answer your questions. ASK NOW
We believe this content can enhance our services. Yet, it’s awaiting comprehensive review. Your suggestions for improvement are invaluable. Kindly report any issue or suggestion using the “Report an issue” button below. We value your input.