Connecting Shape or WordArt to an Excel Cell
Connecting shapes or WordArt to specific cells in Excel can enhance the visual appeal and organization of your spreadsheets. It allows you to create dynamic presentations and dashboards, where visuals are linked directly to underlying data. In this guide, we’ll explore how to connect shapes or WordArt to Excel cells, empowering you to create more interactive and visually compelling documents.
Insert WordArt in Excel
To use the WordArt in Excel, follow these steps:
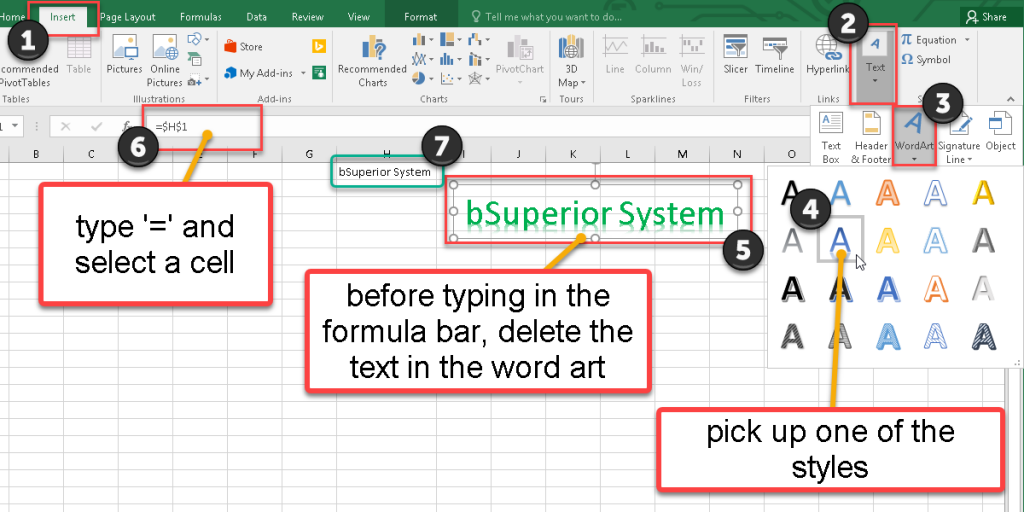
- Go to the Insert tab from the ribbon.
- Click on the Text button, and select the WordArt, then choose one of the styles.
- Delete the text in the word art.
- Type ‘=’ in the Formula Bar.
- Select the cell where you want to see the result and press “Enter.”
- Now whatever you type in the cell, you will see in Shape or WordArt styles.

As you see, it’s bSuperior System!
Modify a WordArt
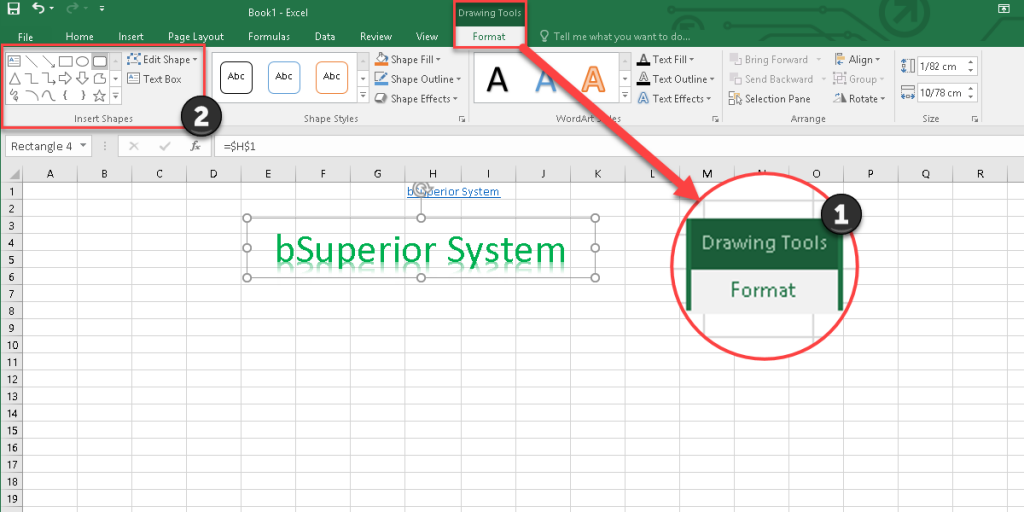
When you add a word art, a new tab opens on the ribbon, which is called the Format tab. This tab contains these groups of tools:
- Insert Shapes (we’ll explain in the Insert shape part.)
- Shape Styles
- Quickly add visual styles.
- Change the color by the Shape Fill
and the Shape Outline
options.
- Change the effects such as shadow, reflection, etc. by the Shape Effects
option.
- Wordart Styles
- Add some artistic flair by choosing between predefined text styles.
- Change the color by the Text Fill
and the Text Outline
options.
- Change the Effects such as shadow, reflection, etc. by the Text Effects
option.
- Arrange
- Bring the objects forward or send them backward by the Bring Forward
and the Send backward
options.
- The Selection Pane
helps you see all of your objects on a list and select them or edit them quickly.
- The Align
option helps to change the placement of the objects.
- The Align
option helps to change the placement of the objects.
- The Rotate
option rotates or flips the objects.
- Bring the objects forward or send them backward by the Bring Forward
- Size
- Change the height or width of the objects by the Shape Height
and the Shape Width
options.
- Change the height or width of the objects by the Shape Height
Transform your financial analysis with our comprehensive Excel Financial Modeling Services, providing accurate and insightful models to drive informed decision-making.
Insert Shape in Excel
A way to add shapes to an Excel worksheet is:
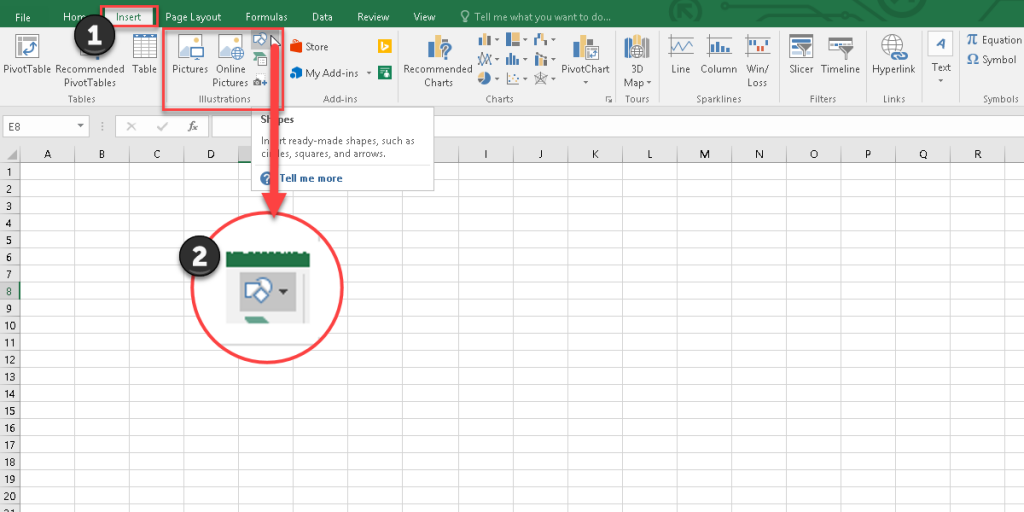
- Go to the Insert tab.
- From the Illustration section, click on the Shape button
.
- Now select the shape you want.

If you added a word art and want to insert a shape to the worksheet too, follow these steps:
- In the Format tab from the Drawing Tools, go to the Insert Shapes group.
- Pick one of the shapes from the ready-shapes list.

You can edit the shapes by the Edit Shape option, such as edit points or reroute connectors. Also, you can add text boxes to your shapes by the Text Box
.
Looking for visualizing your Excel reports? Please contact us through the Excel visualization services page.
Conclusion
By linking shapes or WordArt to Excel cells, you can seamlessly integrate visuals with your data, improving clarity and usability. This technique enables you to create more engaging spreadsheets and presentations, enhancing the effectiveness of your communication. Whether you’re creating reports, dashboards, or presentations, mastering this skill opens up new possibilities for showcasing your data in Excel.
Our experts will be glad to help you, If this article didn’t answer your questions. ASK NOW
We believe this content can enhance our services. Yet, it’s awaiting comprehensive review. Your suggestions for improvement are invaluable. Kindly report any issue or suggestion using the “Report an issue” button below. We value your input.


