How To Lock Cells In Excel
We need to know how to lock our momentous cells in Excel to prohibit anybody from reformatting or deleting them. It may be required, particularly when you share (internal link: How to Share Excel blog) your data.
Here are different cases you may want to lock the cells to prevent users from changing or erasing the values accidentally in Excel:
- Cells locked by default
- Lock all the cells in a worksheet
- Lock the worksheet except for a few cells
- Lock some specific cells
- Hide the formulas when cells are locked
In this tutorial, we are going to learn all these cases.
Cells Locked by default
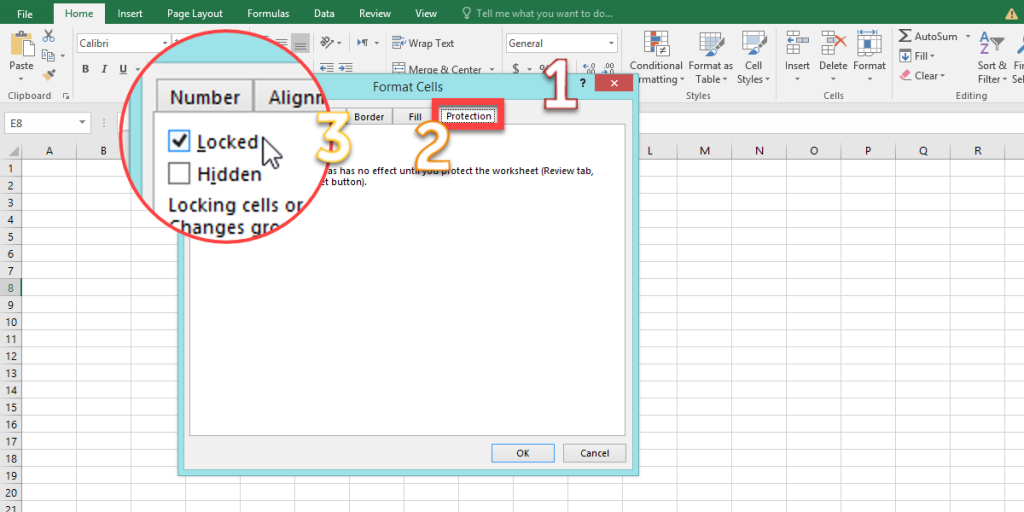
When you open a worksheet, all of your cells are locked by default. Select any cell you want, Right-click on it, and choose Format Cell.
Note: Other ways to open the Format Cells dialogue box are:
- Go to the Home tab from the ribbon.
- Click on the small arrow in the Alignment group, the Format Cells dialogue box opens up.
- Use the keyboard shortcut Ctrl+1 to open this window.

Then choose the Protection tab from the format cell dialogue box. Now you can see the Locked checkbox is enabled. But how can we edit the cells although they’re locked?
Actually, cells are ready to protect.
Lock All the Cells in a Worksheet
To protect all cells in a worksheet:
- Go to the Review tab from the toolbar.
- In the Changes group, choose the Protect Sheet option, the Protect Sheet dialogue box opens up.
- Enter a password that is asked to unprotect the sheet (optional) and re-enter it.
- Press OK.

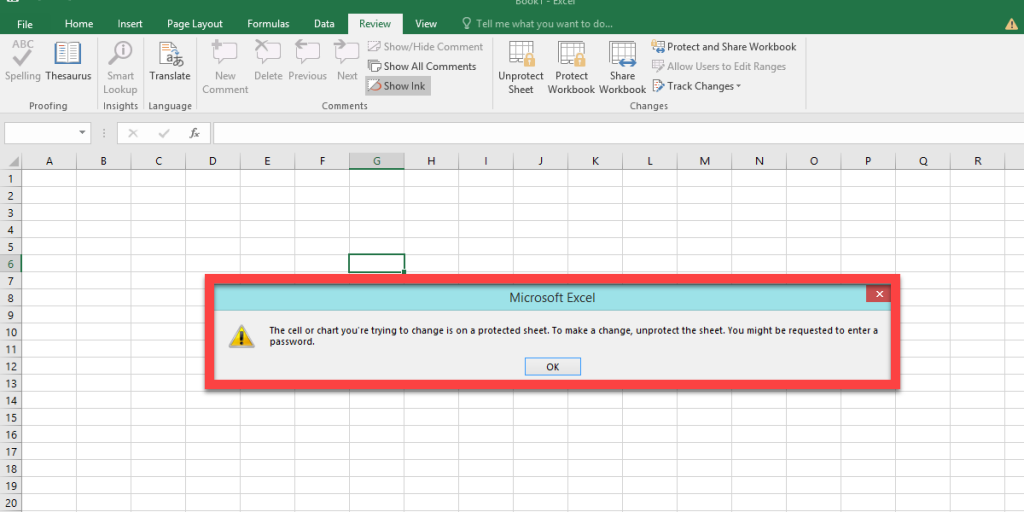
This method will protect your worksheet, whether cells are locked or unlocked.
After protecting the sheet whenever anyone tries to edit the cells, this massage will open up:
Lock the Entire Sheet Except a Few Cells
Sometimes you need some transformative cells in a protected worksheet. Follow these steps below (according to video 1):
- Select the cell you want to be unlocked (cells you want to be editable after protecting the sheet.)
- Press Ctrl+1 to open the Format Cells dialogue box.
- Go to the Protection tab.
- Uncheck the Locked checkbox (which is checked by default.)
- Press OK.
- Go to the Review tab from the toolbar.
- In the Changes group, select the Protect Sheet to open the Protect Sheet dialogue box.
- Enter a password (optional).
- Press OK.
Now you can change the unlocked cells.
Lock some specific cells
Occasionally some data or formulas are essential, and you don’t want them to be changed independently. So just lock them and protect your data as shown below:
- Select all cells by right-clicking on the triangle in the left upper corner of the table.
- Choose the Format Cells.
- Go to the Protection tab from the Format Cells dialogue box.
- Uncheck the Locked checkbox and press OK.
- Select the cells you want to keep locked.
- Repeat steps two and three but now check the Locked checkbox and press OK.
- Go to the Review tab and select the Protect Sheet.
- In the Protect Sheet dialogue box, enter a password and press OK, then re-enter the password and press Enter.
Hide the Formulas When Cells Are Locked
All of the examples which we mentioned before lock the cells and don’t allow others to edit its content, however, those methods leave the formulas visible in the formula bar.
To hide your sensitive formulas, here are the steps (according to video 3):
- Select the cell which contains the formula.
- Press Ctrl+1 or right click on the cell and choose the Format Cells.
- Go to the Protection tab from the Format Cells dialog box.
- Check the Hidden checkbox (make sure the Locked checkbox is enabled, too.)
- Press OK.
- Go to the Review tab from the ribbon.
- Choose the Protect Sheet option.
- Enter a password and re-enter it, then press OK.
If you’re also looking to keep specific rows or columns visible as you scroll through large worksheets, you may find our guide on freezing rows and columns in Excel helpful.
You can connect with us, ask our experts if you have any inquiries and get more support via Excel Support Services.
Also, reduce costs, accelerate tasks, and improve quality with Excel Automation Services.
Our experts will be glad to help you, If this article didn’t answer your questions. ASK NOW
We believe this content can enhance our services. Yet, it’s awaiting comprehensive review. Your suggestions for improvement are invaluable. Kindly report any issue or suggestion using the “Report an issue” button below. We value your input.


