How To Password Protect Excel Files
How to encrypt Excel files? And what is the benefit of encrypting files? Excel files can be encrypted to prevent viewing and editing of the files by unwanted parties or for its overall protection and privacy. There are 3 ways you can go about doing this:
- Setting a password for the entire Excel file
- Setting a password for a sheet
- Setting a password for a workbook
Let’s see how to password protect Excel files. We’re going to take a look at each of these individually.
Setting a Password for the Entire Excel File
The easiest way to protect the data is to limit access to the entire file. By doing this, the user has to provide a password before they can open any sheet.
Let’s see how to password protect an Excel file, firstly click on the File tab. Then click on the Protect Workbook option and select Encrypt With Password.
In the new window, enter the password you would like to set and then click OK. You will have to enter the password again for verification.
Now Save the Excel file. Now, if you close the file and open it up again, you will be prompted to enter the password.
For removing the password, click the Encrypt With Password again, remove the password in the field and then click OK.
Setting a Password for a Sheet
There is another way you can go about encrypting your data, and that is by password-protecting a specific sheet. Let’s review how to encrypt Excel spreadsheets.
Navigate to the Review tab and then select the Protect Sheet. In the new window, enter your desired password in the Password to unprotect sheet field and then click OK. In the next window, enter your password again for verification.
To remove the password in this section, you have to click on the Unprotect Workbook option and then enter the password you previously defined.
Partial Password-protection of a Sheet
When you set a password for a sheet, you will be unable to edit any cell within that sheet. This can be slightly troublesome for users. In cases like this, you can partially protect the sheet. Meaning, some cells, rows, or columns can be left unprotected. This allows you to protect the important cells and rows within a sheet and still leave the cells that you might need to edit frequently, as unprotected.
Before you proceed to protect the sheet, do the following: press Ctrl + 1 to enter the Format Cells window. Navigate to the Protection tab and then uncheck the Locked box and click Ok.
Hiding Cell Content and Protecting Formulas
When you’ve defined the formula for a cell, the contents of it will be displayed in the Formula Bar. To prevent this from happening, you have to protect the sheet, but before doing that, you’ll need to follow the steps similar to the last example. Press Ctrl +1 and then navigate to the Protection tab and then check the Hidden box.
Now in order to apply the ‘Hidden’ option, you will have to set a password for the sheet.
If you would like to hide cell content in addition to the formulas, You will have to open the Format Cells window (Ctrl+1) again and navigate to the Number tab and select the Custom category. In the Type field, enter 3 semicolons (;;;) and press OK.
Protecting Parts of a Sheet
When you set a password for a sheet, you will be unable to enter new data in that sheet while it’s protected. Maybe you would like to set a different password for different parts of the sheet.
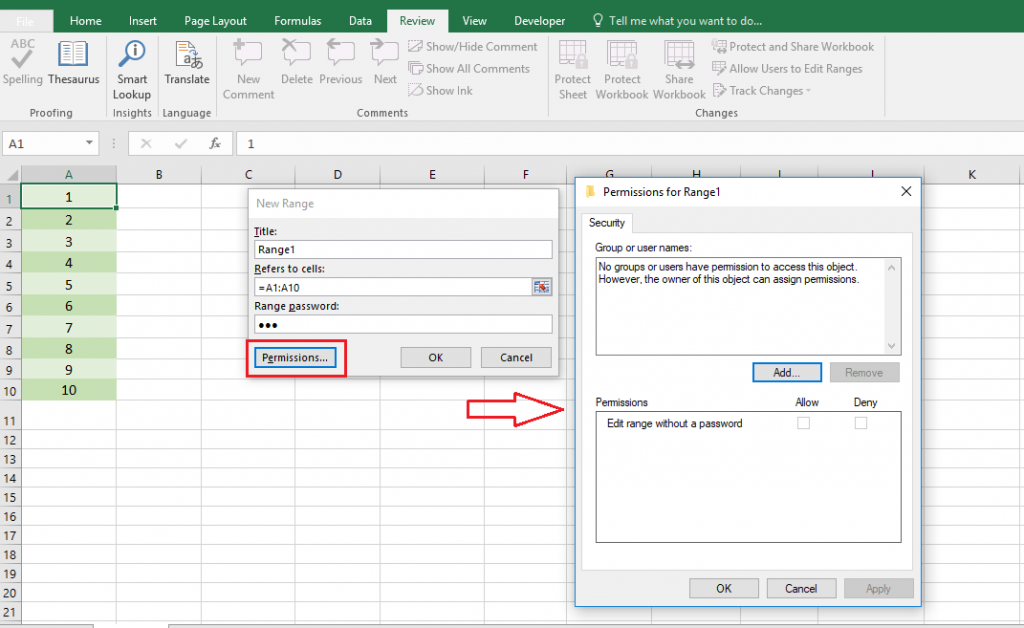
First, navigate to the Review tab and click on the Allow Users to edit ranges option. Click on the New button.
In the New Range window, there are 3 fields:
- Title: select a name for the area
- Refers to cells: enter the range of cells you would like to be included in the area. For Example from A1 to A5
- Range password: enter the desired password for the selected cell
In the end, click on OK. Now from the Review tab, click on Protect Sheet and then select the intended sheet. For editing the range you selected before (A1 to A5), you will have to enter the specific password for that section.
Note: The ‘permissions’ option is used when you would like to give access to a few users. It’s used when you’re sharing the sheet within an internal network, for example, at the office. It’s not suited for use on different computer networks.
Setting a Password For a Workbook
If the workbook is password protected in this manner, you will be unable to right-click on the sheets and make adjustments such as deleting, adding, or removing columns and rows.
To activate this option, navigate to the Review tab and click on the Protect Workbook option. A new window named Protect Structure and windows opens up. Enter a password in the password field and then click OK. Enter your password again for verification.
If you need to remove the password, you have to click on the Protect Workbook again and then remove the password.
Note: You will see two options in the Protect structure and windows:
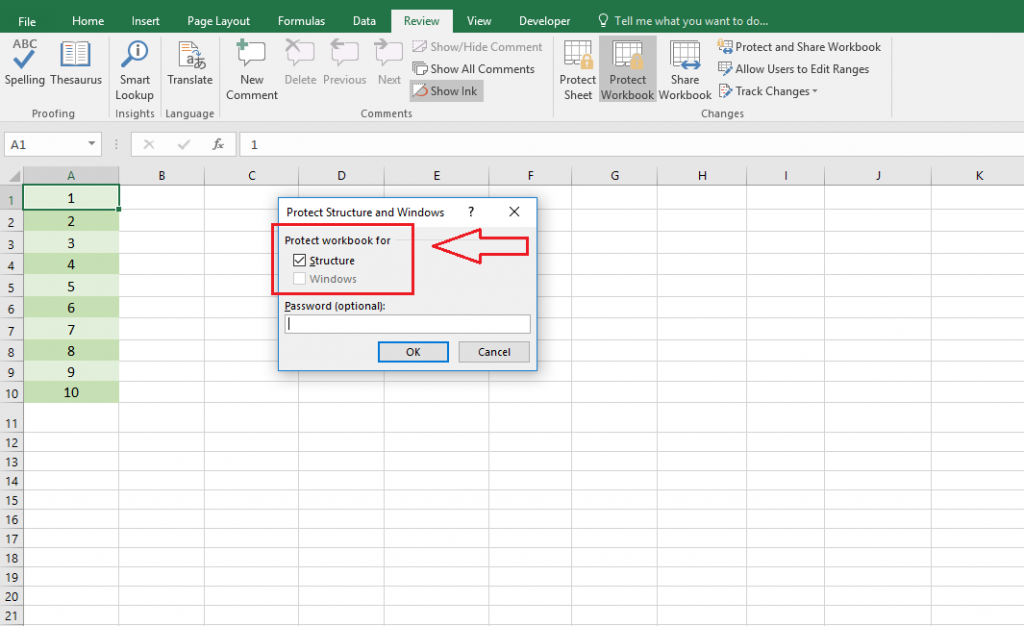
- Structure: when this option is selected, users will not be able to add or remove sheets or edit them in any aspect.
- Windows: when this option is selected, Excel will not allow the user to change the size of the working window. It will also not allow freezing.
Now that your Excel file is protected, you might want to collaborate with others securely. Here’s how to share an Excel file without compromising your data.
While password-protecting your Excel files enhances security, it’s also smart to be prepared for unexpected mishaps like losing unsaved work. Check out our detailed guide on how to recover unsaved Excel files to stay fully covered.
Our experts will be glad to help you, If this article didn’t answer your questions. ASK NOW
We believe this content can enhance our services. Yet, it’s awaiting comprehensive review. Your suggestions for improvement are invaluable. Kindly report any issue or suggestion using the “Report an issue” button below. We value your input.


