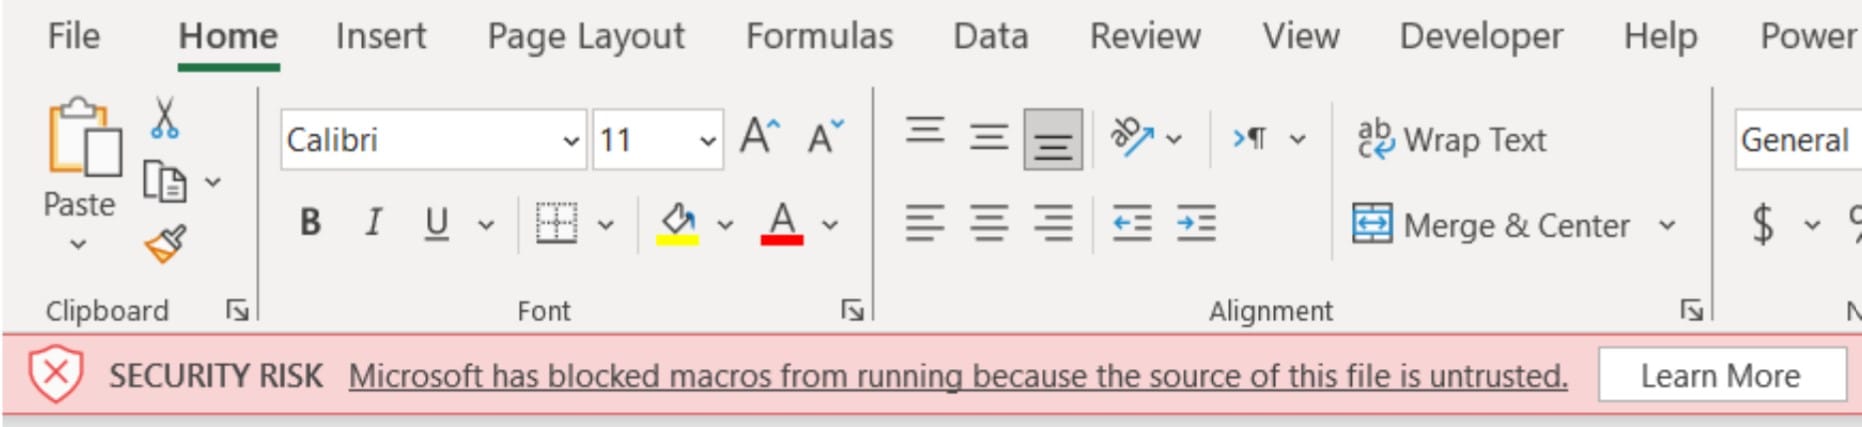
How to Unblock Macros in Excel Files from the Internet
To unblock macros in Microsoft Excel files downloaded from the Internet, you can either modify the file’s properties directly or set a specific network share or website as a trusted site in Windows. Here’s a summary of both methods:
Method 1: Unblock File Properties
Detailed Steps:
- Locate the Excel File:
- Open Windows File Explorer. This can be done by clicking on the File Explorer icon on the taskbar or by pressing ‘Windows Key + E’.
- Navigate to the folder where you have saved the downloaded Excel file. If you’re not sure where the file is, you can use the search bar in File Explorer to search for the file by its name.
- Access File Properties:
- Right-click on the Excel file. This will open a context menu with various options.
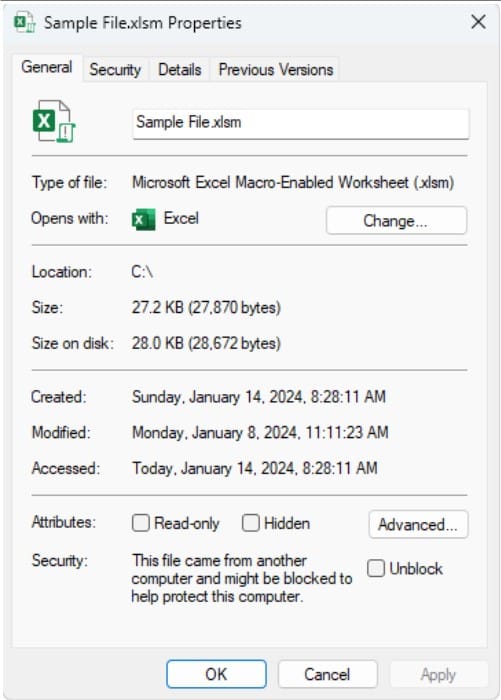
- From the context menu, select “Properties”. This is usually found at the bottom of the menu. A dialogue box titled “Properties” will appear, which contains several tabs such as General, Security, Details, and Previous Versions.
- Unblock the File:
- In the “Properties” dialog box, go to the “General” tab. This tab typically shows basic information about the file, such as type, location, size, and dates created or modified.
- At the bottom of the General tab, there is a security section that may contain a message saying, “This file came from another computer and might be blocked to help protect this computer.”
- Next to this security message, there should be an “Unblock” checkbox. Check this box to unblock the file. This action tells Windows that you trust this file and it’s safe to open.
- After checking the “Unblock” checkbox, click “OK” to apply the changes and close the dialogue box.
Enhance your business efficiency with our specialized Macro Development Services, tailored to automate and streamline your operations for maximum productivity.
Method 2: Set Trusted Sites in Windows
Detailed Steps
- Open Internet Options:
- Press the Start button or the Windows key on your keyboard.
- In the Start menu search bar, type “Internet Options”. This search should bring up the Internet Options control panel as one of the top search results.
- Click on “Internet Options” to open the Internet Properties dialog box. This box contains several tabs like General, Security, Privacy, Content, etc.
- Navigate to the Security Tab:
- In the Internet Properties dialogue box, locate and click on the “Security” tab. This tab is generally second from the left in the top row of tabs.
- The Security tab will display several security zones for browsing, including Internet, Local intranet, Trusted sites, and Restricted sites.
- Trusted Sites:
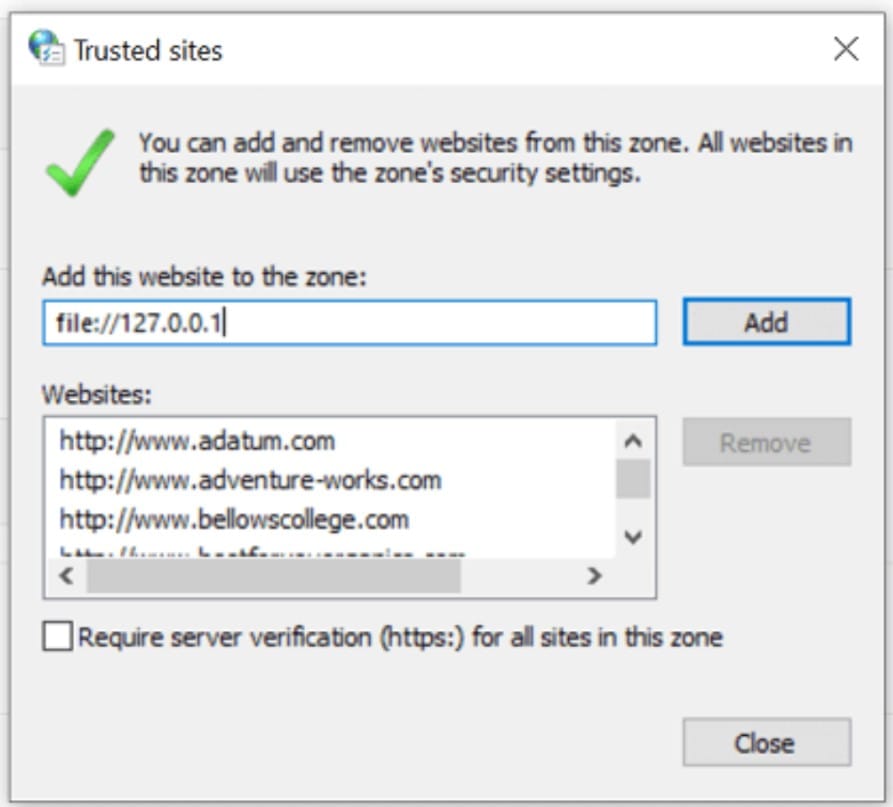
- Within the Security tab, look for a green checkmark icon labelled “Trusted sites” and click on it.
- After selecting Trusted Sites, click the “Sites” button. This opens a new window specifically for adding or removing websites in the Trusted Sites zone.
- Add URL or Network Share:
- In the Trusted Sites window, you’ll find a text box for adding a website. Here, type the URL of the site or the address of the network share that hosts your Microsoft 365 files with macros. For example, “https://www.yourcompanydomain.com”.
- After typing the URL, click the “Add” button. This action will add the site to the list below the text box.
- Adjust Settings for HTTP and Network Shares:
- If you need to add a site that begins with “http://” or a network share, you might need to adjust a setting. By default, Trusted Sites require a secure connection (https).
- To add non-https sites, uncheck the box next to “Require server verification (https:) for all sites in this zone” located at the bottom of the Trusted Sites window.
- After making this change, you can add URLs starting with “http://” or network share paths.
- Save Changes:
- After adding all the necessary sites, click “Close” to close the Trusted Sites window.
- Back in the Internet Properties dialogue box, click “OK” to apply the changes and exit.
Now that you’ve unblocked macros, you can harness their power to automate tasks between Excel and Word efficiently. Learn more in our guide on Automating Excel to Word Data Transfer with Macros.
Additional Considerations
- Check for Unexpected Macro-Enabled Files: Exercise caution with unexpected macro-enabled file attachments. Even if they seem to be from someone you trust, such attachments can be phishing attempts. It’s a good practice to avoid opening any unexpected files, as attackers often disguise themselves as familiar contacts.
- Beware of Strangers Prompting Macro Activation: If someone unknown to you is urging you to activate macros in a document—for reasons like order cancellation or legal document review—be skeptical. Legitimate businesses do not require you to use Excel to cancel orders, nor do they need macros enabled in Word just for reading documents.
- Alertness to Macro Activation Pop-Ups: Be suspicious of any pop-up messages encouraging you to enable macros, particularly when downloading files from the internet. These pop-ups are common strategies employed by attackers and can be a red flag that the file may be harmful.
For professional assistance in handling advanced Excel functionalities, contact us today to optimize your workflows and enhance efficiency.
Our experts will be glad to help you, If this article didn’t answer your questions. ASK NOW
We believe this content can enhance our services. Yet, it’s awaiting comprehensive review. Your suggestions for improvement are invaluable. Kindly report any issue or suggestion using the “Report an issue” button below. We value your input.


