How to create a Macro in Microsoft Office
Using macros in Microsoft Office can completely change how you do things, making it easier to handle repetitive tasks and freeing up your time. Whether you’re already experienced with them or just starting out, getting the hang of macros can make your work life a lot smoother and help you get more done. This guide will show you step-by-step how to create and use macros in Microsoft Office, giving you the tools to supercharge your productivity.
What is a Macro in Microsoft Office?
You might have experienced being required to do repeatedly some tasks in Excel. Examples being tasks such as copying a certain part of a software’s output in another sheet, etc. Doing something repeatedly usually takes too much time and is also boring. You may get rid of this work using macro tool in Excel. A macro is a piece of computer code or a set of actions that is written for Excel using the Visual Basic for Applications (VBA) programming language. By macro you can perform Excel automation so that you may not need to repeat them manually. In the following you will learn how to create a macro in Excel.
Here I will show you how to create a simple macro using Excel’s Macro recording functionality. Once you have recorded the macro, you can repeat the set of actions as many times as you’d like, by simply running the recorded macro in Excel. We can also create macros using VBA which assists us in writing more complex and advanced macros. Creating macro by VBA development requires more knowledge, so we will discuss it separately in future. Now let’s create a simple macro by Excel. Suppose that the output given below pertains to our software:
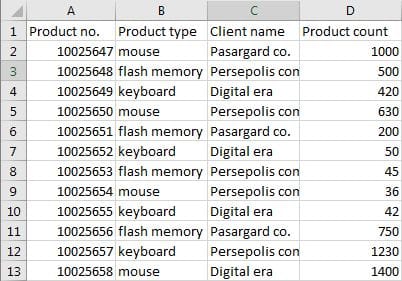
As you see the output does not follow an appropriate format. According to the output, if we want to provide a daily report about the product “mouse”, for instance, in a format like below:

then once we get our output every day, we have to categorize our data in accordance with the types of “mouse” product, choose appropriate font for the texts of the output, and highlight the first line in Bold type, etc. which takes a long time and is too boring. Now we want to automate this task by creating a macro in Excel. In order to create a macro, you need to start the recording process. To do this, click on Macros menu which is located in the View Tab, and then select the option “record macro”.
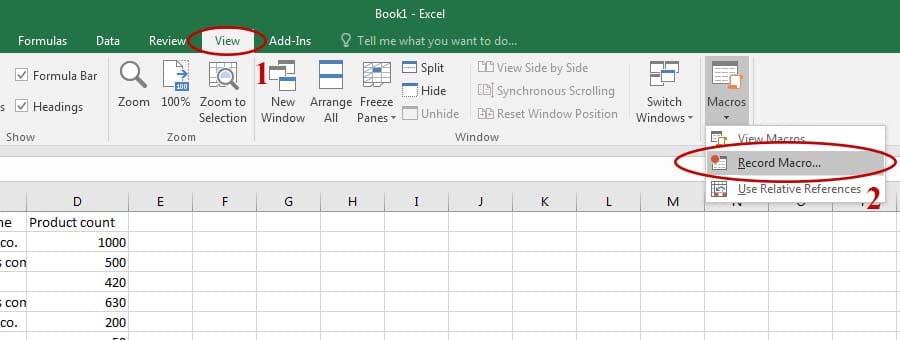
Then you will be presented with an option box by which you can modify settings related to the macro which you are going to create. The setting options include:
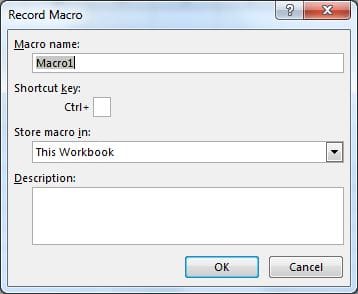
Macro name
you can choose a name for your macro.
Shortcut key
you can assign a keyboard shortcut to easily run the macro. For example, you can write the letter U, so that you will run the macro by Ctrl+U.
Store macro in
By this option you can determine where to store the macro. If you select this workbook, the macro will be stored in current workbook. Remember that you should store the macro in xlsm extension. By Choosing new workbook option, a new workbook will be created and the macro will be stored in it.
If you choose personal macro workbook, the macro will be stored in a personal file named as personal.xlsb. whenever you open Excel, the file will be opened as a hidden file. Therefore, if you want to have your macro available in all workbooks, you should store it in personal macro workbook.
Description
Here you can enter a description for your macro
Once you have modified all the settings, click Ok to start recording. As soon as your macro starts to record, every action that you perform will be captured. Then you will perform the actions that you want to record in your macro. For example, here we change the font of the text, highlight the first line in Bold type, and categorize the types of “mouse” products.
When you have completed the actions, you can stop the macro recording by clicking on the stop button which is located in macros menu.
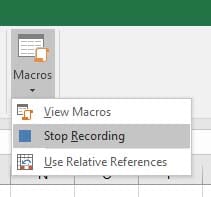
Now your macro will be stored in the location where you had assigned before. From now on, you can click on View macros to run these actions automatically. having clicked on View macros option, a list of created macros will be shown, and you should choose your macro and select run.
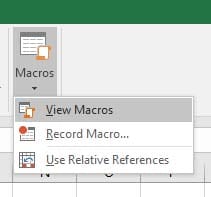
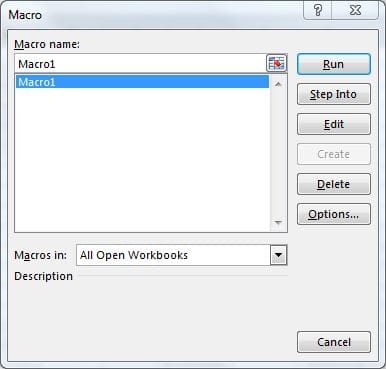
This way you can repeat the set of actions as many times as you like, by simply running the recorded macro. This is much more efficient than repeating the same set of actions manually each time. However, macro has more applications in Excel which I will explain them separately in future.
Looking for macro solutions to automate your daily tasks? Please contact our Excel Macro consultant.
Conclusion
By mastering macros in Microsoft Office, you’re not just saving time; you’re opening up a world of possibilities for optimizing your workflow. Whether it’s automating tedious tasks or streamlining complex processes, macros empower you to work more efficiently and effectively.
Our experts will be glad to help you, If this article didn’t answer your questions. ASK NOW
We believe this content can enhance our services. Yet, it’s awaiting comprehensive review. Your suggestions for improvement are invaluable. Kindly report any issue or suggestion using the “Report an issue” button below. We value your input.


