How to Use ComboBox in Excel for Interactive Worksheets
Do you need to design Excel worksheets that actively interact with the user? A ComboBox provides you with the tools to make your Excel worksheets more dynamic by reacting to the changes and creating outputs based on the user’s selection.
What Is a ComboBox in Excel?
In Excel, a ComboBox is a widget that makes the workspace more interactive by letting users choose a value from a predefined list. ComboBox combines a text box with a list box to create a drop-down list.
With a ComboBox, you can create worksheets that perform differently based on the value selected by the user. This makes Excel even more versatile and useful for a wide range of applications.
Let’s get to know this helpful Excel feature more.
When to Use ComboBox in Excel
Use a ComboBox on the following occasions:
- Give users the means to select a value from a predefined list of choices.
- Hide list items on the worksheet by default.
- Display values retrieved from a predefined list, residing in the same worksheet, a worksheet in the same workbook, or even from another workbook.
Types of ComboBoxes
Before adding a ComboBox, you should know the different types of ComboBoxes to understand which one is a better option for your needs:
There are two types of ComboBoxes in Excel with different properties and methods:
- Form Control: It is a simple ComboBox that you can add to your spreadsheet. It doesn’t require any coding.
- ActiveX Control: It is a more complicated type of ComboBox with more options for modification and customization, so it would be better if you knew advanced Excel or VBA coding.
How are Form Control and ActiveX Control ComboBoxes Different
| Form Control ComboBox | ActiveX ComboBox |
| Enables modifications to the text entry, i.e. styling, changing the font, size, color, etc. to make the text easier to read on a zoomed worksheet. | No means to modify the style of the text entry. |
| Can be configured to make it appear in cells that contain a data validation list using VBA. | No means to use VBA for advanced configuration. |
Boost your productivity by getting a free consultation from Excel experts, and discover tailored solutions to optimize your data management and analysis.
How to Create a Form Control ComboBox?
Generally, most users prefer to add form control ComboBoxes to their spreadsheet because, in most cases, this type of ComboBox is enough for what they want. Furthermore, it is simple to create, and the users don’t need specific knowledge of advanced Excel and VBA programming.
To add Form Control ComboBox, you should follow these steps:
- Select a column that you can hide on the worksheet and create a list of items that you want to display in your ComboBox.

| Note: For the next step, we need the Developer tab activated in Excel, which is generally not the case. So if the Developer tab is not active on your Excel, go to File > Options > Customize Ribbon, and add Developer by selecting its checkbox. |
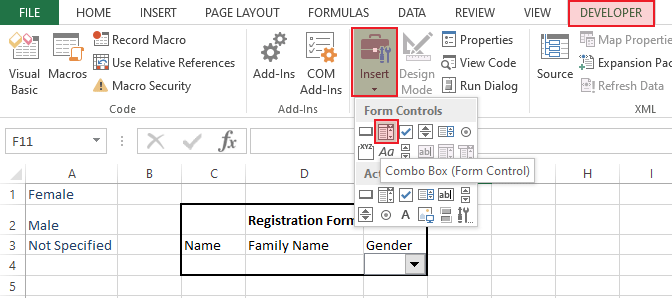
- Go to the Developer tab. Click Controls group > Insert and select the ComboBox option from the Form Controls items. Then click on the Excel sheet where you want to put the ComboBox.
In our case, we want to create a ComboBox for the Gender field.
- Adjust the position and size of the ComboBox to match the design and layout of your worksheet.
| Tips: To resize the ComboBox, point to one of the resize handles, and drag the edge of the box until it reaches the width and height you desire.To move a ComboBox to another location in the worksheet, select the box and drag it to the location you want. |
- Right-click on the ComboBox and select Format Control. The Format Object dialogue box will open.
Input range: Activate the Input range box then select the list you created in the first step. This is the list of items you want to show in your ComboBox.
Cell link: If you need to do further calculations on the value selected from this ComboBox, you should link it to a cell. To do this, activate the Cell link box and then click the cell you want to link to your ComboBox. You can see the absolute address of the linked cell is added to the Cell link box.
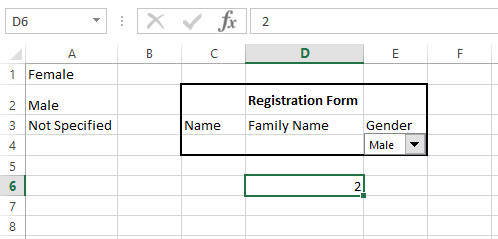
In practice, when you select an item from this ComboBox, the index of the selected item will appear in the linked cell. For example, in our case, if ‘Male’ is selected from the ComboBox, the value of cell D6 will be 2 as ‘Male’ is the 2nd item in the input range.
Drop-down lines: Enter the number of items you want to see in the ComboBox as you click on it. If the number you select for this field is smaller than the number of Input range, the list will scroll.
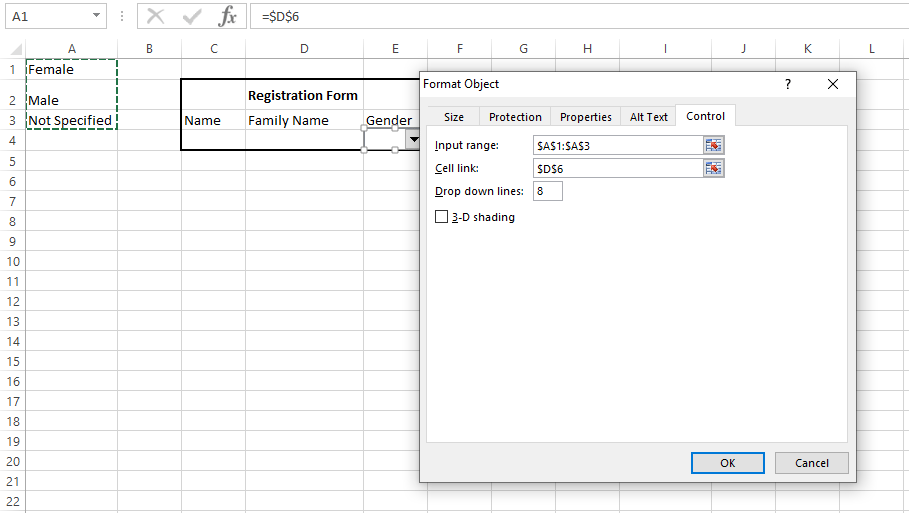
Click OK, and you will have a functioning ComboBox.
As you can see, the value of D6 will change based on the item you select from ComboBox.
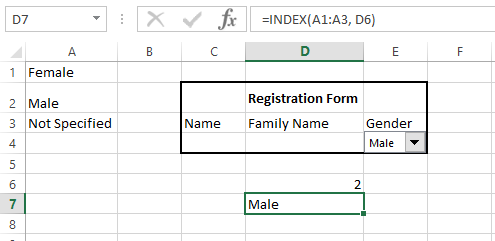
| Tip: As an inspiration for further calculations, you can use the INDEX function to show the selected item name using its index.In cell D7 type =INDEX(A1:A3, D6), press enter and you will see the selected item displaying in D7. |
Enhance your software capabilities with our customizable Add-In Solutions, seamlessly integrating new features to meet your business needs.
How to Create an ActiveX ComboBox?
ActiveX ComboBox is appealing for applications where we need more control and freedom for advanced customization. This can be done through either advanced Excel commands or by programming in VBA for even more advanced configuration. In this blog, we will take the former approach to customize our ComboBox.
To add ActiveX ComboBox, you should follow these steps:
- Select a column that you can hide on the worksheet and create a list of items that you want to display in your ComboBox.

To create an ActiveX ComboBox, it’s better to define a named range from this list. There are multiple ways to create a named range in Excel. To do it in the simplest way, select the range and type a suitable name in the Name Box.
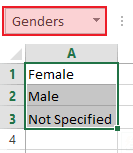
| Note: For the next step, we need the Developer tab activated in Excel, this is generally not the case. So if the Developer tab is not active on your Excel, go to File > Options > Customize Ribbon, and add Developer by selecting its checkbox. |
- Go to the Developer tab. Click Controls group > Insert and select ComboBox from the ActiveX Controls items. Then click on the Excel sheet where you want to put the ComboBox.
In our case, we want to create a ComboBox for the Gender field.
- Adjust the position and size of the ComboBox to match the design and layout of your worksheet.
| Tips: To resize the ComboBox, point to one of the resize handles, and drag the edge of the box until it reaches the width and height you desire.To move a ComboBox to another location in the worksheet, select the box and drag it to the location you want. |
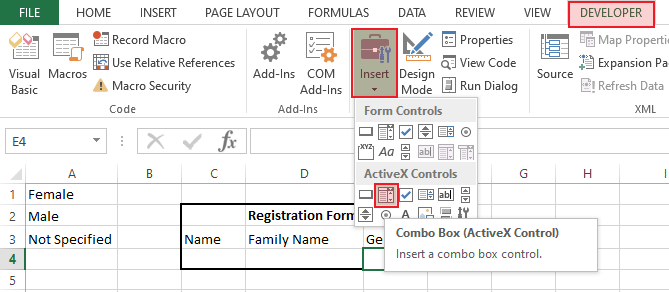
- Go to the Developer tab > Control and make sure that Design Mode is selected. Now right-click the ComboBox, then select Properties. The Properties window will open.
Many options are available on the Properties window, play around with these properties to see how you can modify the ComboBox.
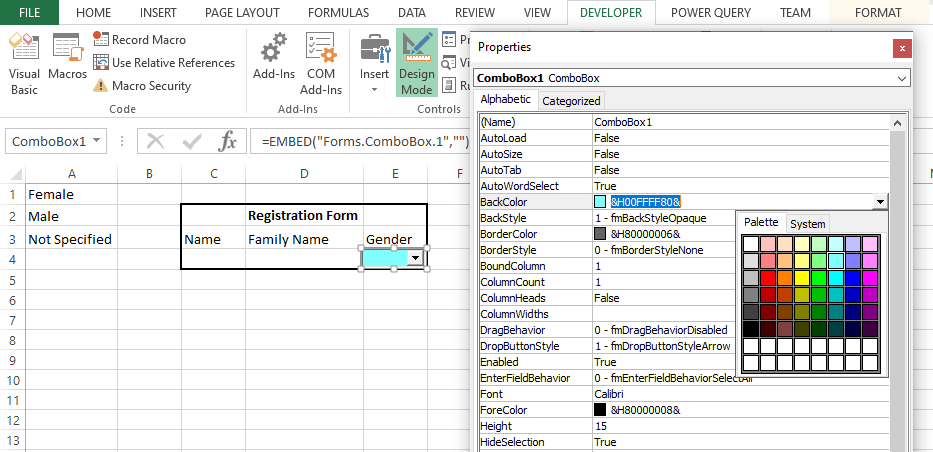
- Find ListFillRange from the Properties options. Write the name of the named range you created in the first step. If you have not created a named range in the first step, enter the input range, e.g. &A&1:&A&3.
- If you need to do further calculations on the value selected from this ComboBox, you should link it to a cell. To do this, find LinkedCell from the Properties options and add the address of the cell you want to link to this ComboBox.
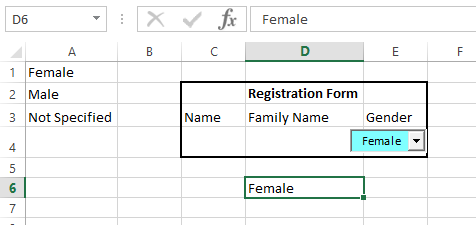
In practice, when you select an item from this ComboBox, the selected item will appear in the linked cell. For example, in our case, if ‘Female’ is selected from the ComboBox, the value of cell D6 will be ‘Female’.
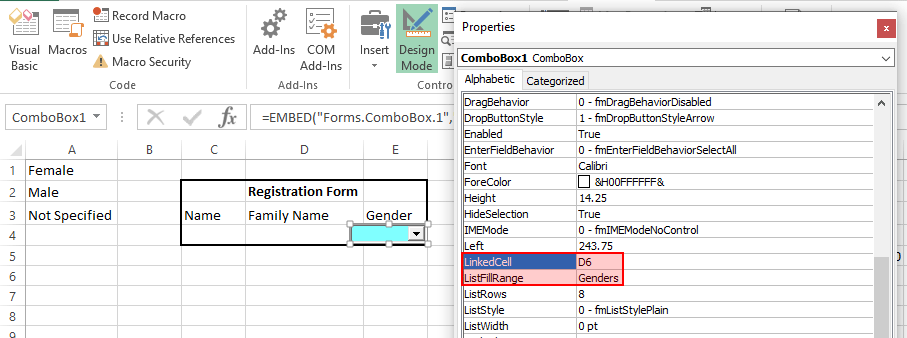
- Close the Properties window.
- On the Controls section of the Developer tab unselect the Design Mode.
Now you have a functioning ActiveX ComboBox ready to be used. You can see that as you choose an item from the ComboBox, the selected item will appear in D6.
Unlock valuable insights with our Data Visualization and Data Analytics Services, transforming complex data into clear, actionable strategies for informed decision-making.
How to Create ComboBox with Automatic Input Range Adjustment
So far, we have created ComboBoxes with static input ranges. That is, if we modify the input range on the fly, the ComboBox doesn’t reflect these changes automatically, we have to configure the ComboBox once again to account for this change. In this section, we are going to address this shortcoming in an easy and straightforward way.
Create Form Control ComboBox with Automatic Input Range Adjustment
To add a Form Control ComboBox with automatic range adjustment, you should follow these steps:
1- Select a column that you can hide on the worksheet and create a list of items that you want to display in your ComboBox.

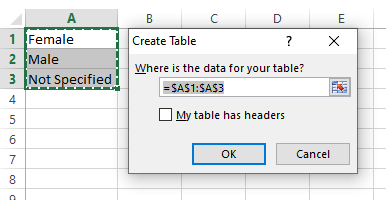
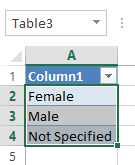
The trick to automatic range adjustment is defining an Excel Table from this list. There are multiple ways to create a table in Excel. To do it in the simplest way, select the range and press cntl + t. The Create Table dialog box opens, make sure the selected range conforms with what you like. Press OK. You can see Excel creates a table with a default name.
| Note: For the next step, we need the Developer tab activated in Excel, this is generally not the case. So if the Developer tab is not active on your Excel, go to File > Options > Customize Ribbon, and add Developer by selecting its checkbox. |
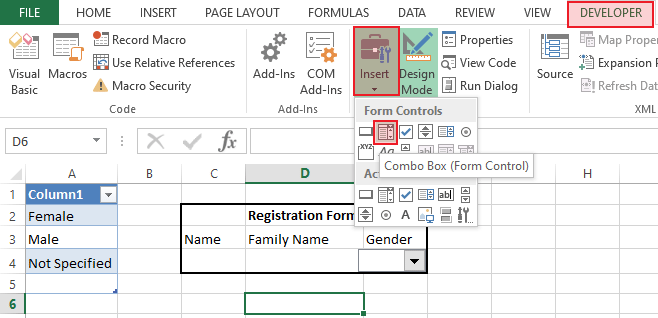
2- Go to the Developer tab. Click Controls group > Insert and select ComboBox from the Form Controls items. Then click on the Excel sheet where you want to put the ComboBox.
In our case, we want to create a ComboBox for the Gender field.
3- Adjust the position and size of the ComboBox to match the design and layout of your worksheet.
| Tips: To resize the ComboBox, point to one of the resize handles, and drag the edge of the box until it reaches the width and height you desire.To move a ComboBox to another location in the worksheet, select the box and drag it to the location you want. |
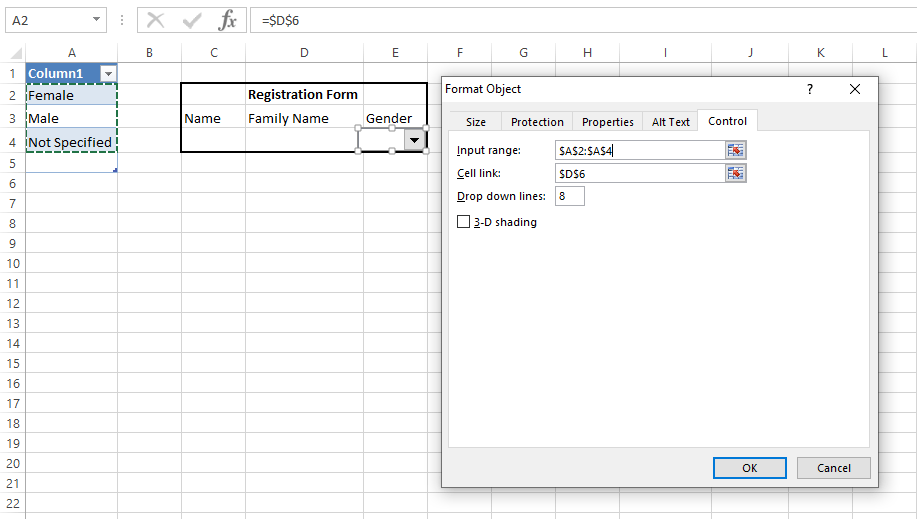
- Right-click on the ComboBox and select Format Control. The Format Object dialogue box will open.
Input range: Activate the Input range box then select the range of the table you created in the first step. This is the list of items you want to show in your ComboBox.
Cell link: If you need to do further calculations on the value selected from this ComboBox, you should link it to a cell. To do this, activate the Cell link box and then click the cell you want to link to your ComboBox. You can see the absolute address of the linked cell is added to the Cell link box.
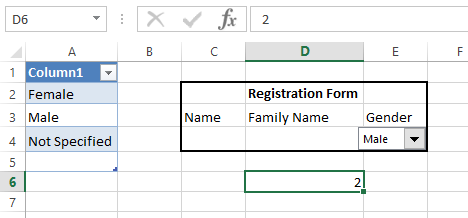
In practice, when you select an item from this ComboBox, the index of the selected item will appear in the linked cell. For example, in our case, if ‘Male’ is selected from the ComboBox, the value of cell D6 will be 2 as ‘Male’ is the 2nd item in the input range.
Drop-down lines: Enter the number of items you want to see in the ComboBox as you click on it. If the number you select for this field is smaller than the number of Input range, the list will scroll.
6. Click OK and you will have a functioning ComboBox. As you can see, the value of D6 will change based on the item you select from ComboBox.
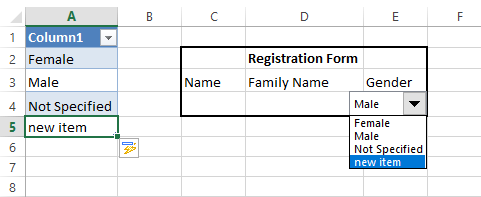
7. Add more items to the input range and you will see that the ComboBox will update automatically without any need for further manual configuration.
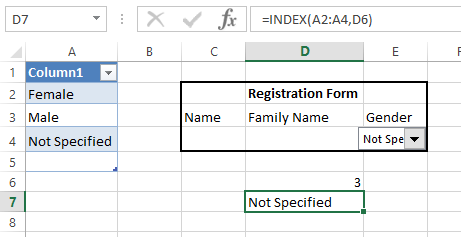
| Tip: As an inspiration for further calculations, you can use the INDEX function to show the selected item name using its index.In cell D7 type =INDEX(A1:A3, D6), press enter and you will see the selected item displaying in D7. |
Create Form Control ComboBox with Automatic Input Range Adjustment
To add an ActiveX ComboBox with automatic range adjustment, you should follow these steps:
- Select a column that you can hide on the worksheet and create a list of items that you want to display in your ComboBox.

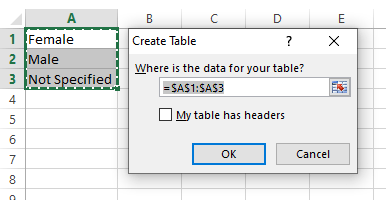
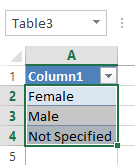
The trick to automatic range adjustment is to define an Excel Table from this list. There are multiple ways to create a table in Excel. To do it in the simplest way, select the range and press cntl + t. The Create Table dialog box opens, make sure the selected range is conforming with what you like. Press OK, you can see Excel creates a table with a default name.
| Note: For the next step, we need the Developer tab activated in Excel, this is generally not the case. So if the Developer tab is not active on your Excel, go to File > Options > Customize Ribbon, and add Developer by selecting its checkbox. |
- Go to the Developer tab. Click Controls group > Insert and select ComboBox from the ActiveX Controls items. Then click on the Excel sheet where you want to put the ComboBox.
In our case, we want to create a ComboBox for the Gender field.
- Adjust the position and size of the ComboBox to match the design and layout of your worksheet.
| Tips: To resize the ComboBox, point to one of the resize handles, and drag the edge of the box until it reaches the width and height you desire.To move a ComboBox to another location in the worksheet, select the box and drag it to the location you want. |
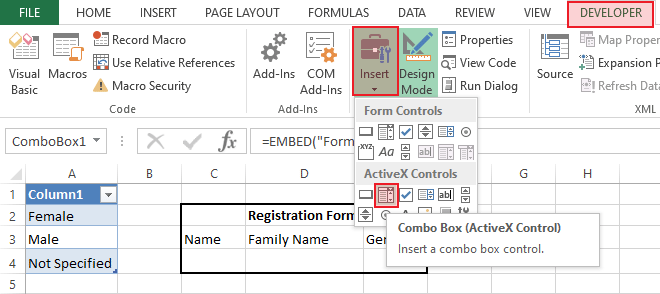
4. Go to the Developer tab > Control and make sure that Design Mode is selected. Now right-click the ComboBox, then select Properties. The Properties window will open.
5. Many options are available on the Properties window, play around with these properties to see how you can modify the ComboBox.
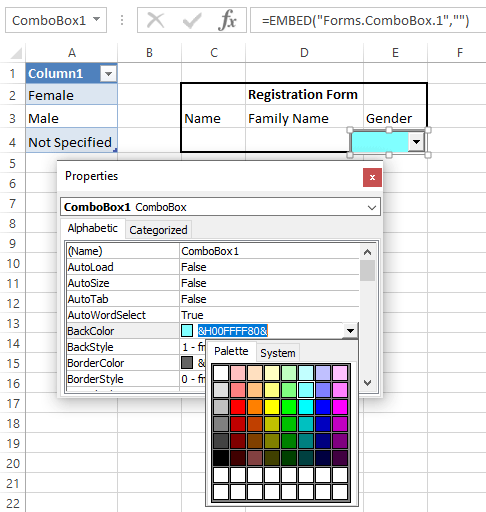
6. Find ListFillRange from the Properties options. Enter the input range of the table you created in the first step. In our case, we enter $A$2:$A$4.
7. If you need to do further calculations on the value selected from this ComboBox, you should link it to a cell. To do this, find LinkedCell from the Properties options and add the address of the cell you want to link to this ComboBox.
In practice, when you select an item from this ComboBox, the selected item will appear in the linked cell. For example, in our case, if ‘Female’ is selected from the ComboBox, the value of cell D6 will be ‘Female’.
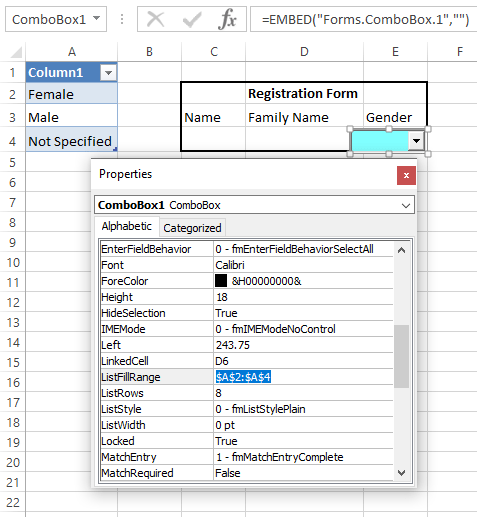
8. Close the Properties window.
9. On the Controls section of the Developer tab unselect the Design Mode.
Now you have a functioning ActiveX ComboBox ready to be used. You can see that as you choose an item from the ComboBox, the selected item will appear in D6.
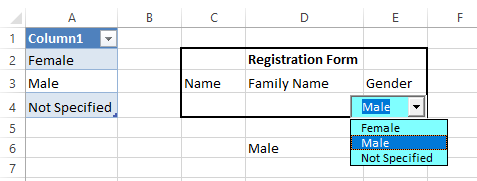
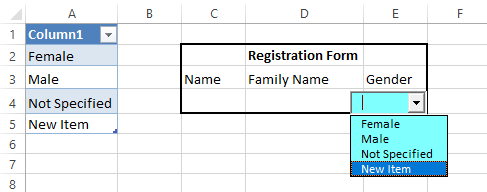
10. Add more items to the input range and you will see that the ComboBox will update automatically without any need for further manipulation.
Bottom Line
Creating a ComboBox in Excel can greatly enhance the functionality of your worksheets. By following the simple steps outlined in this guide, you can easily create a pre-set list of choices. This feature is particularly useful for tasks requiring active interaction with the user of the Excel file. With the ability to develop Excel files with conditional functionality, you can create more versatile solutions for a wide range of applications. Furthermore, knowing how to create a ComboBox in Excel is one of the Excel skills employees should possess.
Once you’ve mastered creating a ComboBox in Excel, you might also want to explore how to randomize lists and shuffle data in Excel for even more dynamic data manipulation. You can learn more in our guide on how to randomize lists and shuffle data in Excel.
| Note: Although the ActiveX ComboBox gives you more chances to style the ComboBox and create a more advanced ComboBox in Excel, it may encounter compatibility problems, especially if you open the Excel form on newer versions of Excel. Additionally, they can sometimes be blocked by security settings. Therefore, only use them if you really think it is required. |
FAQ
There are two types of ComboBoxes in Excel; the simple and most common type is the Form Control ComboBox, and the other is the ActiveX ComboBox, which has more properties than the simple one.
The ComboBox and List box seem very similar but differ in their look and behavior. One major difference between them is that a list box shows all the values in the list, and the ComboBox can only display one value that the user has selected. The other values are not visible until you open the drop-down.
With a list box, you can optionally choose to pick a single item or multiple items, whereas in ComboBox you are restricted to selecting only one item at a time.
The ComboBox feature is placed in the Developer tab under the Controls section. After clicking Insert in the Developer tab, you can select this option and add it to your spreadsheet.
Our experts will be glad to help you, If this article didn’t answer your questions. ASK NOW
We believe this content can enhance our services. Yet, it’s awaiting comprehensive review. Your suggestions for improvement are invaluable. Kindly report any issue or suggestion using the “Report an issue” button below. We value your input.


