Mastering Advanced Data Validation Techniques in Excel
- Exploring Advanced Data Validation Techniques in Excel
- Purpose and Impact of Advanced Data Validation
- Data Validation Criteria
- Data Validation with Formulas
- Input Messages and Error Alerts
- Creating Dependent Drop-Down Lists
- Custom Data Validation Rules Using VBA Macros
- Data Validation for Date and Time
- Date and Time Validation Use Cases
- Handling Data Input Errors
- Protecting Data Validation Settings
- Real-World Use Cases
- Conclusion
- FAQ
Data validation is the process of verifying and ensuring the accuracy and consistency of data before it is used in any downstream operations. It is a crucial step in data management, as it helps to prevent errors and ensure that data is reliable and trustworthy.
In this article, we’re going to take a straightforward look at how advanced data validation in Excel can help us manage data in a reliable and straightforward way.
If you’re working on a shared file or want to monitor changes made after validation rules are applied, it’s a good idea to track changes in Excel.
Exploring Advanced Data Validation Techniques in Excel
Excel offers advanced features and techniques that elevate the control and precision over data entry, commonly known as Advanced Data Validation in Excel. Let’s delve into these advanced aspects:
- Extended Data Validation Rules: While basic data validation rules include setting range limits and list validation, advanced techniques allow for more intricate conditions. You can implement complex logical rules, mathematical formulas, or even reference values from other cells to create dynamic and sophisticated validation criteria.
- Custom Data Validation Scenarios: Beyond basic custom error messages, data validation introduces the concept of custom scenarios. This involves creating tailored validation rules for specific situations or segments of data. Customization extends to the type of errors identified and the corrective guidance provided, offering a more granular approach to data validation.
- Diverse Excel Data Validation Techniques: Excel users can employ a range of specialized data validation techniques. This may include utilizing data from external sources, employing conditional formatting to highlight validation errors, or integrating with Excel’s powerful array functions to create dynamic validation lists.
Read more: 10 Useful Functions For Data Analytics In Excel
If you are looking to enhance the accuracy of your charts in Excel, you may also find it useful to learn how to add error bars in Excel. Error bars provide valuable insight into the potential variability of data, which can complement your advanced data validation efforts.
Purpose and Impact of Advanced Data Validation
Advanced data validation goes beyond the basic checks of data type, range, and format. It encompasses more sophisticated techniques to ensure the integrity and reliability of data. The aim is to address complex data quality issues that may not be apparent with traditional methods. Here is a brief list of the rewards associated with advanced data validation.
Precision in Preventing Data Entry Errors: Advanced data validation in Excel goes beyond the basics, ensuring precise control over data entry errors. Complex rules and customized scenarios minimize the risk of inaccuracies, providing a robust defense against both common and intricate mistakes.
Elevated Data Integrity Standards: With data validation rules in Excel, Excel users can set higher standards for data integrity. The ability to enforce complex conditions and customized criteria ensures that the spreadsheet maintains a superior level of accuracy and consistency, which is critical for informed decision-making.
Tailored Data Consistency Strategies: Excel data validation techniques empower users to tailor consistency strategies to specific data segments or situations. Whether through dynamic validation lists or intricate conditional rules, the consistency of data is adapted to the nuanced requirements of different sections of the spreadsheet.
Enriched User Experience through Customization: Customization reaches new heights with advanced data validation in Excel. Users not only benefit from custom error messages but also from tailored scenarios that guide them through intricate validation challenges. This enriches the user experience by providing precise and personalized feedback.
Efficient Data Entry Handling: Excel data validation techniques contribute to efficient data entry handling by addressing complex scenarios. Users can navigate through a variety of validation challenges seamlessly, ensuring a smooth and expedited data input process.
Unlock valuable insights with our Data Visualization and Data Analytics Services, transforming complex data into clear, actionable strategies for informed decision-making.
Data Validation Criteria
Setting up data validation criteria in Excel involves defining rules that control the type and range of data that can be entered into a cell. This ensures data accuracy and consistency. Let’s explore how to set up data validation formulas for various data types.
Numerical Criteria
- To set numerical criteria, select the cell or range you want to apply validation to.
- Go to the “Data” tab and click on “Data Validation” in the “Data Tools” group.


- In the “Settings” tab of the Data Validation dialog box, choose “Whole number,” “Decimal,” or “Between” depending on your needs.
- Enter the criteria, such as minimum and maximum values.
Text Criteria

For text criteria, follow the same steps as numerical criteria.
- Choose “Text length,” “Equal to,” “Not equal to,” or other relevant options in the “Settings” tab.
- Input the criteria, such as the length of text or specific text values.

Date Criteria
- Select the cell or range for date validation.
- Go to the “Data” tab, click on “Data Validation,” and choose “Date” in the “Settings” tab.

- Specify the criteria, such as allowing only dates after a certain date.
List Criteria
- To create a drop-down list, select the cell or range.
- Go to the “Data” tab, click on “Data Validation,” and choose “List” in the “Settings” tab.
- Enter the list items separated by commas or refer to a range where the list is located.
Read more: Mastering Excel Functions for Data Analysis: A Comprehensive Guide
Data Validation with Formulas
Excel formulas can be powerful tools for creating data validation rules in Excel that go beyond the standard options available in the Data Validation settings. By incorporating formulas into data validation criteria, you can implement more complex validation checks and ensure that your data meets specific requirements.
To use formulas for advanced data validation in Excel, follow these steps:
- Select the cells you want to validate.
- Go to the Data tab > Data Validation.

- On the Settings tab, choose “Custom” under “Allow.”
- Enter the formula you want to use in the “Formula” box. For example, if you want to prevent users from entering duplicate values in a list, you can use the following formula:
=COUNTIF($A$2:$A$100,A2) < 2
- Click OK.

This formula checks if the value in the current cell (A2) already exists in the range A2:A100. If the count is less than 2 (meaning the value is not a duplicate), then the input is allowed.
Examples of Formula-Based Data Validation
Here are some additional examples of how to use formulas for data validation:
- Validate data against a table of reference values: Use the VLOOKUP or MATCH functions to compare input values against a table of valid options.
- Restrict data entry to a specific range: Use formulas to check if input values fall within a defined range or pattern. For instance, you can use the AND function to ensure values are between a minimum and maximum threshold.
- Prevent entering dates in the future or past: Use TODAY() or NOW() functions to validate date entries, ensuring they are not before or after a specific date.
- Check for unique identifiers or sequential numbers: Use formulas to verify that entries are unique or follow a specific sequence, preventing duplicates or gaps in data sets.
- Perform calculations based on input values: Utilize formulas to validate input values based on calculations or relationships with other cells. For example, you can check if a sales amount matches a calculated commission rate.
Remember that custom formulas provide flexibility and control over data validation, allowing you to tailor the validation rules to your specific data requirements. However, it’s essential to ensure that the formulas are accurate and robust to prevent unintended validation errors.
Read more: Excel Data Analysis Tools: Unlocking the Power of Spreadsheets
Input Messages and Error Alerts
Input messages in Excel inform users about the valid data that is allowed to enter in a cell. It is particularly useful if you want to show some instructions to the user when they select a cell.
Creating Input Messages
- Select the cells with data validation rules in Excel.
- Click the Data tab and choose “Data Validation.”
- In the Data Validation dialog box, navigate to the “Input Message” tab.

- Enter a title for the message (optional).
- Input a meaningful message explaining the expected data format or valid entries.
- Choose “Show Input message when cell is selected” to display the message automatically.
- Click OK to save the input message.

Setting up Data Validation Error Alerts
- Select the cells with data validation rules in Excel.
- Click the Data tab and choose “Data Validation.”
- Click the “Error Alert” tab in the Data Validation dialog box.
- Select a style for the error message (“Stop”, “Warning”, or “Information”).
- Enter a title for the error message.
- Input a detailed explanation of the error and possibly corrective actions.
- Check “Show error alert after invalid data is entered” to display the message upon invalid input.
- Click OK to save the error alert.

Tips to Creating Error Alert and Input Message
- Clear instructions: Use clear and concise language in input messages to guide users effectively.
- Specificity: Clearly mention the acceptable format, value range, or type of data expected.
- Actionable: Include examples, options, or instructions for corrective action in error messages.
- Consistency: Maintain a consistent format and message style for user experience.
Enhance your software capabilities with our customizable Add-In Solutions, seamlessly integrating new features to meet your business needs.
Creating Dependent Drop-Down Lists
Cascading or dependent drop-down lists are a powerful feature in Excel that allows you to create interactive drop-down menus that filter options based on user selections in another drop-down. This enables you to organize and refine data entry dynamically, making it more efficient and user-friendly.
To create dependent drop-down lists in Excel, follow these steps:
- Prepare your data: Organize your data in a structured manner, typically using separate tables or ranges for each level of the dependent lists.
- Define named ranges: Assign named ranges to each data range that will be used in the dependent drop-down lists. This provides easier referencing within the validation formulas. In our case we have three named ranges; Country, US, and Canada.

- Create the first drop-down list: Select the cell where you want the first drop-down list to appear. Go to the Data tab and click Data Validation. In the Settings tab, choose “List” under Allow. Enter =Country. This will put the items of the Country named range in the drop down list. Click OK.

- Create the dependent drop-down list: Select the cell where you want the dependent drop-down list to appear. Repeat the Data Validation process. In the Settings tab, choose “Custom” under Allow. Enter the following formula in the Formula box: =INDIRECT(F2)

5. Click OK and you will have the cascading dropdown lists in your worksheet.


Read more: PivotCharts 101: A Step-by-Step Guide to Effective Data Presentation in Excel
Custom Data Validation Rules Using VBA Macros
While Excel provides a range of built-in validation options, there are scenarios where you may need more advanced or specific validation rules. This is where VBA, or Visual Basic for Applications, comes into play.
Using VBA, you can create custom functions and procedures to extend the capabilities of Excel, including implementing your own Data Validation Rules in Excel. This is particularly useful when the built-in validation criteria don’t fully meet your requirements.
The following sections contain some examples of how to create custom validation rules using VBA macros:
Example 1: Validating Email Addresses
This macro validates whether a cell contains a valid email address format.
Sub ValidateEmailAddresses()
Dim rng As Range
Dim validation As RangeValidation
Set rng = Range(“A1:A10”) ‘ Apply validation to cells A1 to A10
For Each cell In rng
‘ Create a new validation rule for each cell
Set validation = cell.Validation.Add(Type:=xlValidateCustom, Formula1:=”=ISEMAIL(A2)”)
‘ Set input and error messages
validation.InputTitle = “Enter a valid email address”
validation.ErrorTitle = “Invalid Email Address”
validation.InputMessage = “Please enter a valid email address.”
validation.ErrorMessage = “The value must be a valid email address.”
Next cell
End Sub
Example 2: Validating Unique Values
This macro validates whether a cell value is unique within a specified range.
Sub ValidateUniqueValues()
Dim rng As Range
Dim validation As RangeValidation
Set rng = Range(“A1:A10”) ‘ Apply validation to cells A1 to A10
For Each cell In rng
‘ Create a new validation rule for each cell
Set validation = cell.Validation.Add(Type:=xlValidateCustom, Formula1:=”=COUNTIF(A1:A10, A2)<=1″)
‘ Set input and error messages
validation.InputTitle = “Enter a unique value”
validation.ErrorTitle = “Duplicate Value”
validation.InputMessage = “Please enter a unique value.”
validation.ErrorMessage = “The value must be unique within the specified range.”
Next cell
End Sub
Data Validation for Date and Time
Effectively validating dates and times in Excel spreadsheets ensures data accuracy and consistency. This section contains a comprehensive guide to data validation for date and time, including examples.
Date Range Validation
To restrict data entry to a specific date range, go to the Data tab -> Data Validation, select Date from the Allow drop-down, and choose Between from the Data drop-down. Set the desired start and end dates in the Start date and End date fields, respectively.
Date Format Validation
To ensure consistent date formats, such as MM/DD/YYYY or DD/MM/YYYY, follow the same steps as above, but select “List” from the “Allow” drop-down and type the desired date formats separated by commas (e.g., MM/DD/YYYY,DD/MM/YYYY) in the “Source” field.
Time Range Validation
To limit data entry to a specific time range, go to the Data tab -> Data Validation, select Date, select Time” from the “Allow” drop-down, and choose “Between” from the “Data” drop-down. Set the desired start and end times in the “Start time” and “End time” fields, respectively.
Time Format Validation
To enforce consistent time formats, such as HH:MM AM/PM or HH:MM, follow the same steps as above, but select “List” from the “Allow” drop-down and type the desired time formats separated by commas (e.g., HH:MM AM/PM,HH:MM) in the “Source” field.
Validating Future Dates
To ensure entered dates are in the future, use a custom formula in the “Data Validation” dialog box. Set the “Allow” to “Custom” and enter the formula “=A2>=TODAY()” (assuming data is in cell A2), which checks if the date is greater than or equal to today’s date.
Validating Dates Relative to Another Date
To enforce date ranges relative to another date, use a formula referencing that date. For instance, to validate dates within a week of a reference date in cell A1, use the formula “=OR(A2>=A1-7,A2<=A1+7)” in the “Data Validation” dialog box.
Date and Time Validation Use Cases
- Expiry Dates: Validate product expiry dates to ensure accurate inventory management.
- Meeting Schedules: Validate event dates and times to avoid scheduling conflicts.
- Financial Transactions: Validate transaction dates and times to maintain accurate financial records.
- Employee Attendance: Validate employee attendance dates and times to track work hours.
- Project Deadlines: Validate project deadlines to ensure timely completion.
By effectively validating dates and times, you can enhance data integrity, prevent errors, and streamline decision-making processes in various Excel applications.
Read more: How to Add a Best Fit Line in Excel
Handling Data Input Errors
Effectively managing data input errors is crucial for maintaining data integrity and ensuring that Excel spreadsheets remain reliable. Here are strategies for handling errors when users enter data that doesn’t meet Data Validation Rules in Excel.
Conditional Formatting
Utilize conditional formatting to highlight cells containing invalid data visually. Set a rule to apply a distinct background color, font color, or border to cells where the value fails the Excel Data Validation Techniques. This immediately signals errors to users.
Data Bars
Employ data bars to represent the validity of data. Create a conditional formatting rule that assigns data bars based on the validation status. Cells with errors will have a distinct data bar color, making it easy to identify and rectify errors.
Error Indicators
Use error indicators, such as triangles or icons, to mark cells containing invalid data. Set a conditional formatting rule to display an error indicator in cells where the value fails the Advanced data validation in Excel. This provides a clear visual cue for users.
Data Validation Input Messages
Utilize input messages from the Data Validation dialog box to guide users and prevent errors upfront. When a user selects a cell with validation applied, a descriptive message appears, explaining the expected data format or value range.
Data Validation Error Messages
Implement error messages from the Data Validation dialog box to inform users of invalid data entry. If a user enters data that violates the validation criteria, an error message pops up, prompting them to correct the input.
VBA Macros for Error Handling
Leverage VBA Macros to handle errors more dynamically. Use macros to identify cells with invalid data, display custom error messages, and even guide users through error correction steps. This provides a more interactive and personalized error-handling experience.
Error Reporting Lists
Create separate lists or tables to collect error information. Use formulas or VBA Macros to extract data from cells with invalid values and populate the error lists. This provides a centralized record of errors for further analysis and correction.
Data Alerts
Implement data alerts to notify users of errors. Use VBA Macros to monitor data entry and trigger alerts when invalid values are detected. This proactive approach ensures that errors are promptly addressed.
By combining visual error highlighting, error correction tools, and dynamic error handling mechanisms, you can effectively manage data input errors, maintain data quality, and enhance the reliability of Excel spreadsheets.
Boost your productivity by getting a free consultation from Excel experts, and discover tailored solutions to optimize your data management and analysis.
Protecting Data Validation Settings
Data validation is a crucial tool for maintaining data integrity by ensuring that only valid entries are made into specific cells or ranges. To safeguard these validation settings and prevent unauthorized alterations, it’s essential to implement Advanced data validation in Excel, utilizing the built-in features for Excel Data Validation and establishing Custom Data Validation Rules.
Protecting Worksheet Data Validation Settings
Apply Cell Protection
- Once you’ve established data validation rules, select the cells containing the validation settings.
- Access the ‘Review’ tab and click ‘Protect Sheet.’
- In the ‘Allow all users of this worksheet to’ section, deselect the ‘Format cells’ and ‘Sort, filter, or group data’ options.
This prevents users from modifying cell formats or data organization, potentially disrupting validation rules.

Utilize Cell Locking
Lock the cells containing data validation settings by selecting them and pressing ‘Ctrl+1’ (Windows) or ‘⌘+1’ (macOS). This locks the cells, preventing users from directly altering their contents, including validation rules.
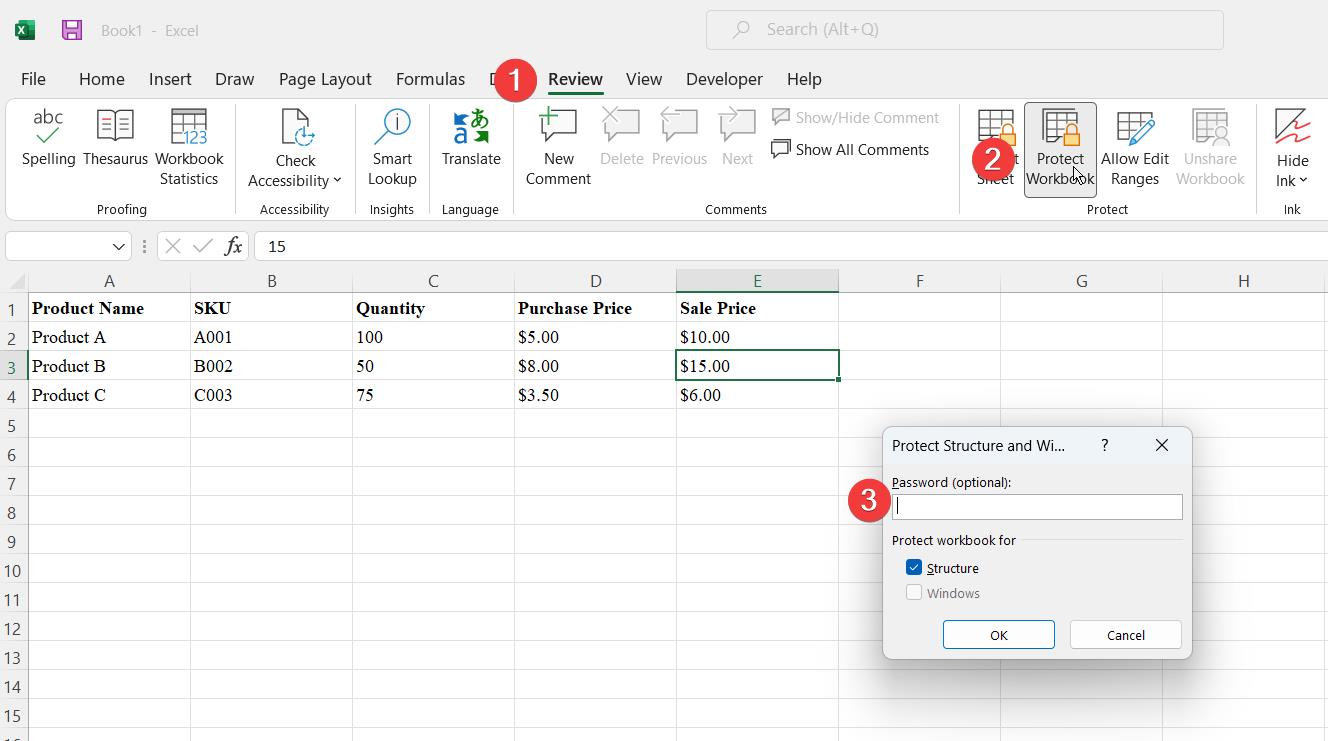
Protecting Workbook Data Validation Settings
- For workbooks shared with multiple users, apply workbook protection.
- Go to the ‘Review’ tab and click ‘Protect Workbook.’
- Set a password and choose permissions for specific users, restricting their ability to modify data validation settings across the entire workbook.
Real-World Use Cases
Here are some real-world use cases for advanced data validation, along with step-by-step instructions for implementing data validation in these scenarios:
Inventory Management
Data validation plays a critical role in inventory management systems, ensuring accurate tracking of stock levels, minimizing discrepancies, and optimizing operations.
- Data Preparation: Create a list of valid product codes and their corresponding quantities.
- Data Validation Rule: Implement a data validation rule that restricts product code entries to the list of valid codes and ensures that quantities are numerical values within the acceptable range.
- Data Entry: When entering new inventory items or updating existing ones, users will be restricted to valid product codes and quantities, preventing errors and maintaining data accuracy.
Project Tracking
Data validation can streamline project tracking processes, ensuring project tasks are accurately assigned, deadlines are met, and resource allocation is optimized.
- Data Preparation: Create a list of valid task statuses (e.g., Not Started, In Progress, Completed) and a list of valid assignee IDs (e.g., employee IDs).
- Data Validation Rules: Implement data validation rules that restrict task status entries to the valid list of statuses and ensure that assignee IDs match the list of valid IDs.
- Data Entry: When updating task status or assigning new tasks, users will be restricted to valid entries, preventing errors and maintaining project tracking accuracy.
Survey Forms
Data validation ensures that survey responses are consistent, complete, and adhere to the format required for analysis.
- Data Preparation: Define the valid options for each multiple-choice question.
- Data Validation Rule: Implement a data validation rule that restricts responses to the list of valid options for each multiple-choice question.
- Survey Completion: As survey respondents select answers, they will be restricted to valid options, ensuring consistent and accurate response data.
Conclusion
Data validation emerged as a linchpin for maintaining data integrity, acting as a gatekeeper to permit only valid entries into designated cells or ranges.
In recognizing its pivotal role, the blog underscored the significance of ensuring the accuracy and reliability of data through meticulous validation practices.
The post elaborated on practical measures for data protection at both the worksheet and workbook levels. Applying cell protection and implementing cell locking techniques were identified as essential safeguards against unauthorized alterations to data validation settings at the worksheet level.
Meanwhile, protecting the entire workbook was highlighted as paramount for shared workbooks, ensuring the preservation of data validation settings and fostering data consistency across various applications.
Additionally, the blog offered a real-world perspective by exploring diverse use cases in inventory management, project tracking, and survey forms, accompanied by detailed step-by-step instructions. This comprehensive guidance aims not only to enhance data quality but also to empower users with the tools needed to mitigate errors effectively.
If you’re working with CRM systems like Maximizer, mastering field mapping is equally crucial. Learn more in our guide to mapping fields to database columns in Maximizer CRM.
If you’re looking to streamline your workflow even further, learn how to create your own custom Excel workbook with just a few clicks perfect for building data entry tools with built-in validations.
Now that you’ve learned about advanced data validation in Excel, it’s time to try it out! Apply these techniques in your projects – secure your worksheets, protect your workbooks, and customize data validation rules.
The best way to get the hang of it is by actively experimenting with Excel. Share your experiences and questions with us. Your input enriches our learning community.
Leave your comments below or reach out with any questions. Let’s create a collaborative space where we collectively improve our Excel skills and ensure accurate and reliable data.
FAQ
Can I use Excel formulas as data validation criteria?
Yes, you can use Excel formulas indirectly as data validation criteria. While you cannot directly input a dynamic formula as a validation criterion, you can use named ranges or reference cells containing formulas to achieve a dynamic validation effect. This allows your validation criteria to depend on the results of the formulas. I appreciate your patience and understanding.
What are input messages and error alerts in data validation?
In Excel data validation, input messages provide non-blocking guidance to users about expected data types, appearing as pop-ups when a cell is selected.
Error alerts notify users of invalid data, appearing as warnings, information, or critical error pop-ups. Configurable in the “Error Alert” tab, users set the alert style, title, and error message text, with options to allow or disallow invalid data. Both features enhance user experience and data integrity.
Are there any advanced data validation options in Excel?
Excel offers several advanced data validation options to provide more sophisticated control over data entry. Some of these advanced options are listed below.
- Custom Formulas: You can create custom formulas for data validation criteria. This allows for more complex and dynamic validation rules based on specific conditions and calculations.
- Cell References in Formulas: Instead of static values, you can use cell references in your data validation formulas. This allows the validation criteria to depend on the values in other cells, providing flexibility and dynamic validation.
- Dropdown Lists from a Range: You can use a range of cells as the source for a dropdown list in data validation. This allows you to update the list of valid entries easily without modifying the data validation settings.
- Date and Time Validation: Excel provides specific options for date and time validation. You can set criteria to ensure that entered dates fall within a certain range, meet specific conditions, or conform to a particular date format.
- Decimal and Whole Number Validation: In addition to basic numeric validation, you can set more advanced criteria for decimals or whole numbers. For example, you can require a specific number of decimal places or restrict entries to integers.
- Unique Values: You can use data validation to ensure that entries in a range are unique. This is particularly useful when you want to prevent duplicate entries in a list.
- Data Length Validation: You can set criteria to restrict the length of the entered data, ensuring that it falls within a specified range.
Our experts will be glad to help you, If this article didn’t answer your questions. ASK NOW
We believe this content can enhance our services. Yet, it’s awaiting comprehensive review. Your suggestions for improvement are invaluable. Kindly report any issue or suggestion using the “Report an issue” button below. We value your input.


