Master Data Consolidation in Excel: A Quick Guide
- What is Consolidate Data in Excel?
- Consolidate Data in Excel by Position
- Consolidate Data in Excel by Category
- Consolidate Data in Excel from Multiple Rows
- Consolidate Data in Excel from Multiple Ranges
- Consolidate Data in Excel from Multiple Worksheets
- Consolidate Data in Excel from Multiple Workbooks
- Consolidate Data in Excel Using 3D Formula
- How to Automate Consolidation in Excel?
- Bottom Line
- FAQs
Have you ever wanted to create a report in Excel with data in different sheets? Whether a beginner or an experienced Excel user, learning about consolidating data can help you make better reports or datasheets with only a few clicks. So, let’s begin this journey toward mastering the art of data consolidation in Excel!
What is Consolidate Data in Excel?
Consolidating data is one of the features in Excel that allows users to combine data from different sources into one place. Located under the Data Tools section in the Data tab, the Consolidate Data feature can be used to summarize or report results from separate worksheets or even workbooks.
Assume you have a worksheet about your sales in different months and want to make an annual report about the number of products you sell. In this scenario, you can easily create the report using Consolidate data.
There are several methods for consolidating data in Excel that you can use depending on your data. Here are the most common ones:
- Consolidate data in Excel by Position
- Consolidate data in Excel by Category
- Consolidate data in Excel from multiple rows
- Consolidate data in Excel from multiple ranges
- Consolidate data in Excel from multiple worksheets
- Consolidate data in Excel from multiple workbooks
- Consolidate data in Excel by 3D Formulas
Consolidate Data in Excel by Position
This technique to consolidate data in Excel is best when the worksheets in your workbook have exactly the same structure. This can mean using a common template for the constituent worksheets or using the same rows and columns. Using the By Position method then combines the values from the same location in the source data into the target worksheet and adds the labels.
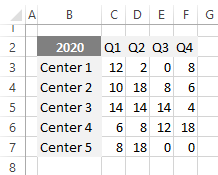
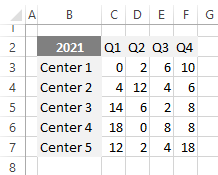
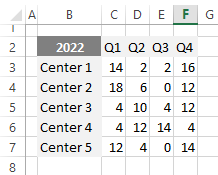
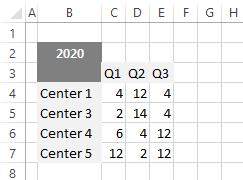
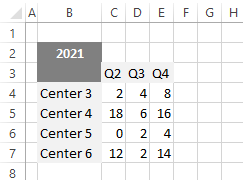
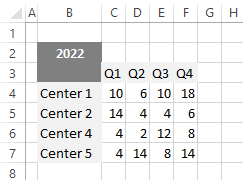
Suppose we have data on the number of leads a company gets for each quarter from 2020 to 2022, each residing in a separate worksheet. As you can see, all the worksheets follow the same template.
Follow these steps to consolidate data by position.
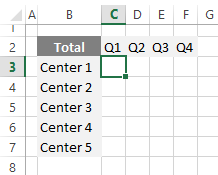
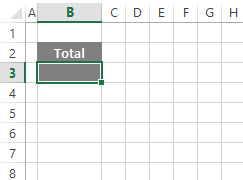
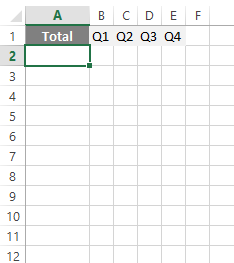
- Add a sheet where you want to consolidate data. The structure and layout of this sheet must conform with that of the source sheets.
- Select the top-left cell to place the consolidated data.
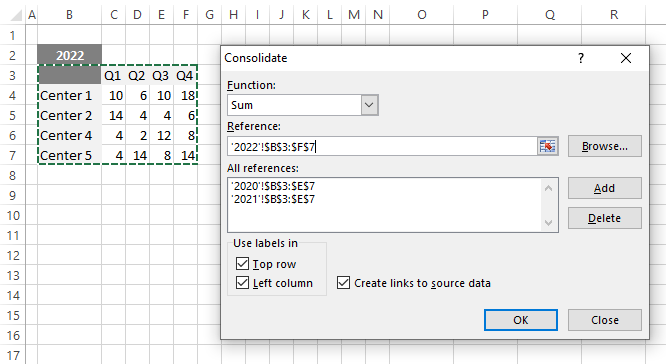
3. Go to the Data tab and under Data Tools click Consolidate.

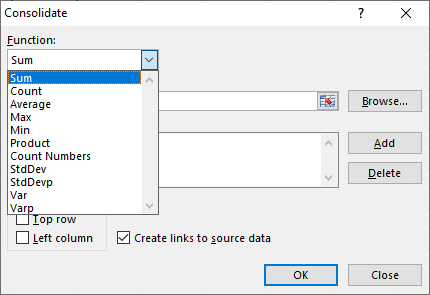
4. The Consolidate dialogue box will open where you can select the Function you want Excel to use to consolidate the data. In our example, we want to sum up the leads, so we select SUM.

5. Click in the Reference box and select the first reference range you want to consolidate. You don’t have to include the headers and labels when referencing.
Click the Add button. Repeat the same process for all three constituent datasets.

6. If you want your consolidated data table automatically updated when the source data changes, simply check the Create links to source data check box. If this box is left unchecked, you can update the consolidation manually. For more details on automatic consolidation of data in Excel, refer to How to Automate Consolidation in Excel?
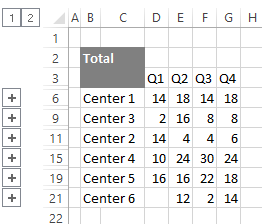
7. Click OK and you will have your data consolidated in the destination worksheet.
Look at the left of the sheet, and you’ll notice gaps in the row numbers, and these little pluses. They appear here because we have selected the Create links to source data checkbox in the Consolidate window in the previous section. Refer to the How to Automate Consolidation in Excel? section for more details on this feature in Excel.

Unlock valuable insights with our Data Visualization and Data Analytics Services, transforming complex data into clear, actionable strategies for informed decision-making.
Consolidate Data in Excel by Category
This technique is best used when the worksheets you want to consolidate share dissimilar headings and labels as well as different coordinates. In this case, Excel copies the headings and labels to ensure the source data matches the information in the destination worksheet.
As opposed to the previous approach, you have to include the labels and headers of the source data when referencing. A misspelling or capitalization mismatch in the labels and headers can result in inaccurate results.
Note: Data consolidation by category is similar to creating a Pivot Table in Excel. The difference is that with a Pivot Table, you can easily reorganize the categories. If you need more flexible consolidation by category, consider creating a Pivot Table.
Suppose we have data on the number of leads a company gets for each quarter from 2020 to 2022, each resides in a worksheet. As you can see, the layout, the heading, and the labels of the source data are dissimilar. Excel will handle all these inconsistencies effortlessly.
Follow these steps to consolidate data by category.
- Add a sheet where you want to consolidate data.
- Select a cell to place the consolidated data.
3. Go to the Data tab and under Data Tools click Consolidate.

4. The Consolidate dialogue box will open where you can select the Function you want Excel to use to consolidate the data. In our example, we want to sum up the leads, so we select SUM.

5. Click in the Reference box and select the first reference range you want to consolidate. You have to include the headers and labels of the source data when referencing. Click the Add button. Repeat the same process for all three worksheets.
6. Check the Top row and Left column checkboxes. If you want your consolidated data table automatically updated when the source data changes, simply check the Create links to source data check box. If this box is left unchecked, you can update the consolidation manually. For more details on automatic consolidation of data in Excel, refer to How to Automate Consolidation in Excel?
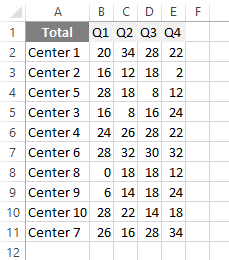
7. Click OK and you will have your data consolidated in the destination worksheet. As you can see, the consolidated data contains the union of all headers and labels of the constituent data.
Look at the left of the sheet, and you’ll notice gaps in the row numbers, and these little pluses. They appear here because we have selected the Create links to source data checkbox in the Consolidate window in the previous section. Refer to the How to Automate Consolidation in Excel? section for more details on this feature in Excel.
Enhance your software capabilities with our customizable Add-In Solutions, seamlessly integrating new features to meet your business needs.
Consolidate Data in Excel from Multiple Rows
Rows consolidation in Excel can be helpful when you have multiple rows in a worksheet with common fields. With consolidation, you can make use of these common fields to perform the “group by” operation on your data.
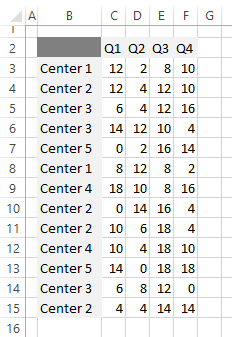
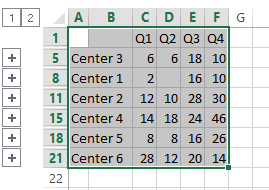
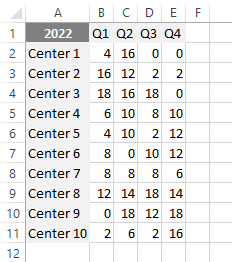
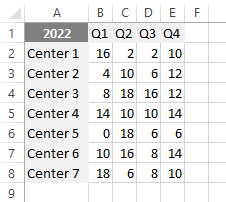
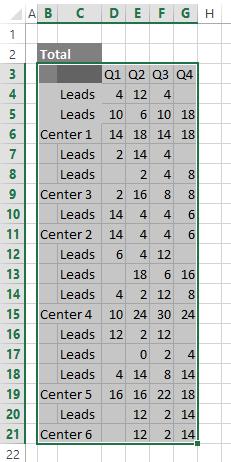
Let’s say you have a record of leads a company has in its different centers on a quarterly basis within a single worksheet. As you can see, some centers are repeated in multiple rows. We need to organize this data to have one row for each center and the leads summed up for each quarter.
Follow these steps to consolidate data from multiple Rows.
- [Optional] Add a sheet where you want to consolidate data.
- Select a cell to place the consolidated data.

3. Go to the Data tab and under Data Tools click Consolidate.

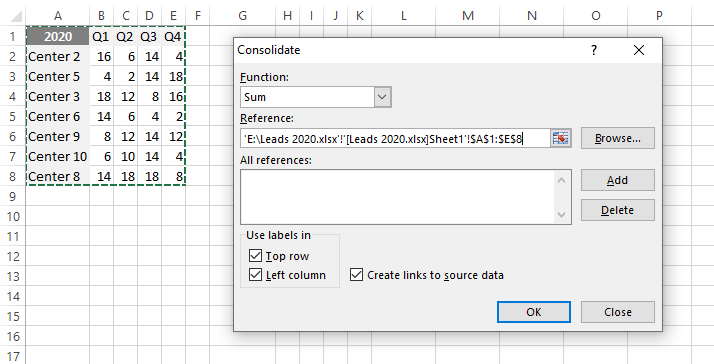
4. The Consolidate dialogue box will open where you can select the Function you want Excel to use to consolidate the data. In our example, we want to sum up the leads, so we select SUM.
5. Click in the Reference box and select the reference range you want to consolidate. You have to include the headers and labels of the data when referencing. Click the Add button. Check Top row and Left column checkboxes.
Note: If your source and destination areas are located on the same sheet, you should not select the Create link to source data checkbox or Excel will return an error.
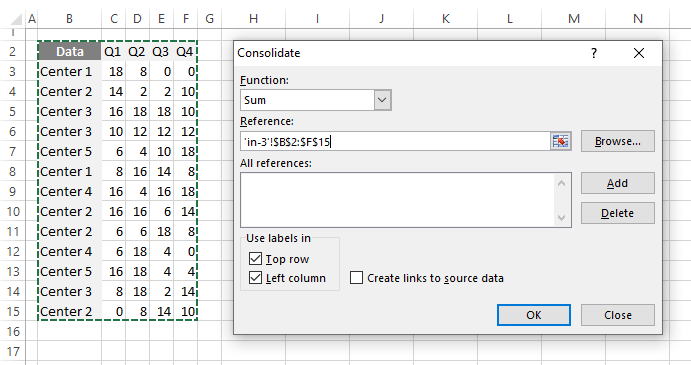
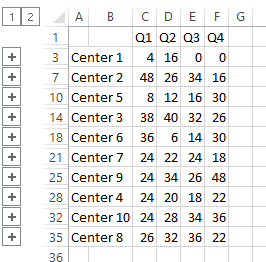
6. Click OK and you will have your data consolidated in the destination area. As you can see, the source data is grouped by the Center column, and the number of leads is summed up for each quarter.
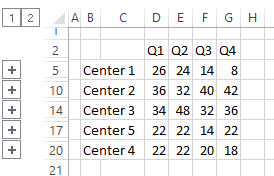
Look at the left of the sheet, and you’ll notice gaps in the row numbers, and these little pluses. They appear here because we have created a new sheet for the result in the first step and selected the Create links to source data checkbox in the Consolidate window in the previous section. Refer to the How to Automate Consolidation in Excel? section for more details on this feature in Excel.
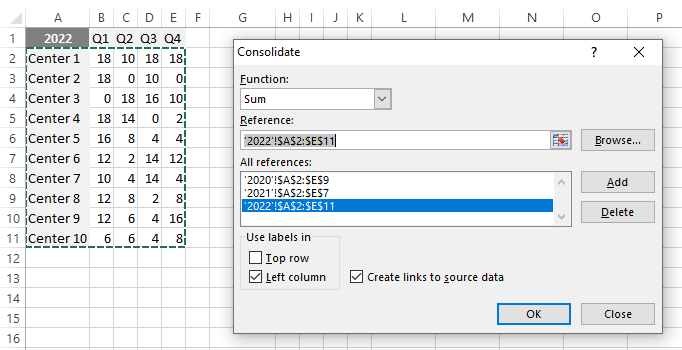
Consolidate Data in Excel from Multiple Ranges
To consolidate data in Excel from Multiple Ranges, we need to define source data as named ranges in Excel. The source data don’t need to have consistent layouts, they can reside in the same worksheet, different worksheets of a workbook, or even in multiple workbooks.
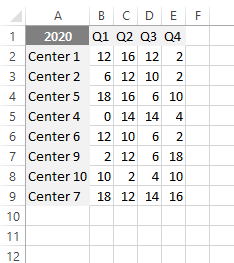
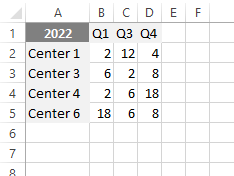
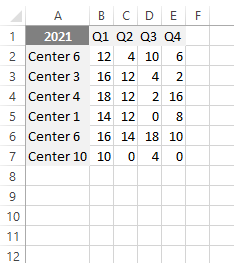
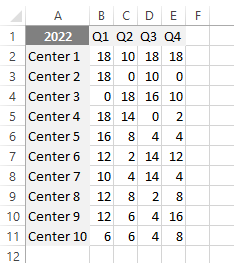
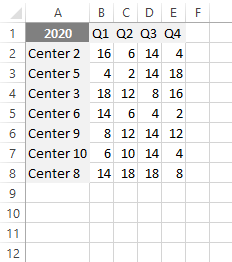
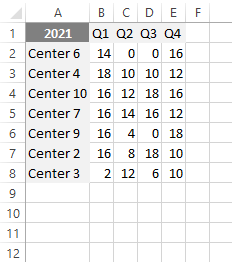
Suppose we have data on the number of leads a company gets for each quarter from 2020 to 2022. In this case, each dataset resides in a separate worksheet. As you can see, the layout, the heading, and the labels of the source data are not similar. Excel will handle all these inconsistencies effortlessly.

Follow these steps to consolidate data from multiple ranges:
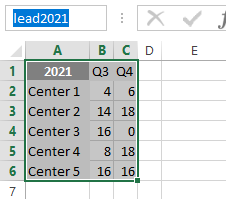
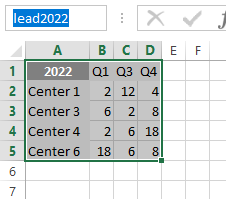
- Create a named range for each source data. There are multiple ways to create a named range in Excel, we explain the simplest one here.
Select the range you want to name, including the row or column labels. Type an appropriate name in the Name Box and press enter. Repeat this process for all source data.
In our case, we have created three named ranges; lead2020, lead2021, and lead2022.

2. Add a sheet where you want to consolidate data.
3. Select a cell to place the consolidated data.
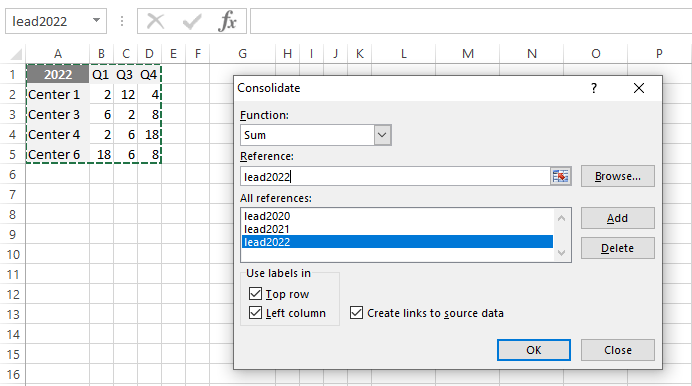
4. Go to the Data tab and under Data Tools click Consolidate.

5. The Consolidate dialogue box will open where you can select the Function you want Excel to use to consolidate the data. In our example, we want to sum up the leads, so we select SUM.

6. Click in the Reference box and type the name of the first named range you created in the first step. Click the Add button. Repeat the same process for all three named ranges. Check Top row and Left column checkboxes.
7. If you want your consolidated data table automatically updated when the source data changes, simply check the Create links to source data check box. If this box is left unchecked, you can update the consolidation manually. Check Top row and Left column checkboxes. For more details on automatic consolidation of data in Excel, refer to How to Automate Consolidation in Excel.
8. Click OK and you will have your data consolidated in the destination worksheet. Look at the left of the sheet, and you’ll notice gaps in the row numbers and the little pluses. They appear here because we have selected the Create links to source data checkbox in the Consolidate window in the previous section. Refer to the How to Automate Consolidation in Excel? section for more details on this feature in Excel.
Consolidate Data in Excel from Multiple Worksheets
In this method for consolidating data from multiple worksheets, the source data reside in separate worksheets in the same workbook. We can consolidate data by position and by category depending on whether the source data has consistent structures and coordinates or not.
Suppose we have data on the number of leads a company gets for each quarter from 2020 to 2022, each resides in a worksheet. As you can see, the headers of the data are all the same while the labels are not similar. Excel will handle all these inconsistencies effortlessly.

Follow these steps to consolidate data from multiple worksheets.
- Add a sheet where you want to consolidate data.
- Select a cell to place the consolidated data.
3. Go to the Data tab and under Data Tools, click Consolidate.

4. The Consolidate dialogue box will open where you can select the Function you want Excel to use to consolidate the data. In our example, we want to sum up the leads, so we select SUM.

5. Click in the Reference box and select the reference range you want to consolidate. In our case, the source data share the same headers but inconsistent row labels, so we have to include the labels of the source data, but including the headers is totally optional. Click the Add button. Repeat the same process for all three worksheets.
6. Select the Left column checkbox.
7. If you want your consolidated data table automatically updated when the source data changes, simply check the Create links to source data check box. If this box is left unchecked, you can update the consolidation manually. For more details on automatic consolidation of data in Excel, refer to How to Automate Consolidation in Excel?
8. Click OK and you will have your data consolidated in the destination worksheet. As you can see, the consolidated data contains the union of all headers and labels of the constituent data.
Look at the left of the sheet, and you’ll notice gaps in the row numbers, and these little pluses. They appear here because we have selected the Create links to source data checkbox in the Consolidate window in the previous section. Refer to the How to Automate Consolidation in Excel? section for more details on this feature in Excel.
Look at the left of the sheet, and you’ll notice gaps in the row numbers, and these little pluses. They appear here because we have selected the Create links to source data checkbox in the Consolidate window in the previous section. Refer to the How to Automate Consolidation in Excel? section for more details on this feature in Excel.
Consolidate Data in Excel from Multiple Workbooks
In all of the scenarios we talked about so far, all source data reside in the same workbook. However, in this case, we are going to consolidate data from separate workbooks. We can consolidate data by position and by category depending on whether the source data has consistent layouts and structures or not.
Suppose we have data on the number of leads a company gets for each quarter from 2020 to 2022, each resides in a separate workbook. As you can see, the headers of the data are all the same while the labels are not similar. Excel will handle all these inconsistencies effortlessly.
Follow these steps to consolidate data from multiple workbooks.
- Open all workbooks containing the source data.
- Open a new workbook where you want to consolidate data.
- Select a cell to place the consolidated data.
4. Go to the Data tab and under Data Tools, click Consolidate.

5. The Consolidate dialogue box will open where you can select the Function you want Excel to use to consolidate the data. In our example, we want to sum up the leads, so we select SUM.

6. Click in the Reference box. Since the source data reside in other workbooks, click Browse to locate the workbook. After locating the workbook and clicking OK, Excel will enter the file path in the Reference box and append an exclamation point to that path. You can then continue to select the data range in the selected workbook. Since the constituent data don’t have the same structure, we have to include the headers and labels when referencing. Click the Add button. Repeat the same process for all three workbooks.
7. Check Top row and Left column checkboxes.
8. If you want your consolidation data table automatically updated when the source data changes, simply check the Create links to source data check box. If this box is left unchecked, you can update the consolidation manually. For more details on automatic consolidation of data in Excel, refer to How to Automate Consolidation in Excel?
9. Click OK and you will have your data consolidated in the destination workbook. As you can see, the consolidated data contains the union of all headers and labels of the constituent data.
Look at the left of the sheet, and you’ll notice gaps in the row numbers, and these little pluses. They appear here because we have selected the Create links to source data checkbox in the Consolidate window in the previous section. Refer to the How to Automate Consolidation in Excel? section for more details on this feature in Excel.
Boost your productivity by getting a free consultation from Excel experts, and discover tailored solutions to optimize your data management and analysis.
Consolidate Data in Excel Using 3D Formula
So far, we have used Excel’s Consolidate feature to consolidate data from a relatively small number of sources. To do that, we needed to simply select datasets one by one in the Consolidate dialog box. But what if the number of source datasets increases to say 25? In such cases, it is more efficient to use 3D formulas to consolidate data. For the 3D formula to work properly, the source datasets must have consistent layouts and positions. This means that the number of rows and columns as well as the position of corresponding data points must be similar in all constituent datasets.
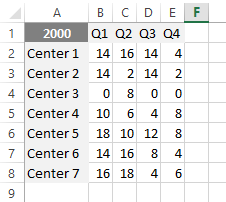
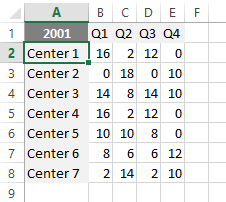
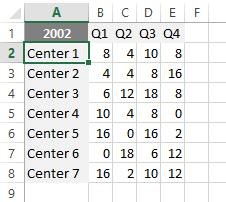
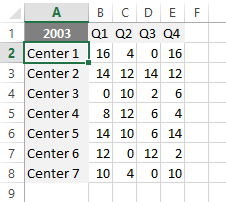
Suppose we have data on the number of leads a company gets for each quarter from 2000 to 2022, each residing in a separate worksheet named 2000, 2001, and 2002 all the way down to 2022. As you can see, the layout and structure of the datasets are all consistent.
…
Follow these steps to consolidate data using 3D formulas.
- Open a new workbook where you want to consolidate data and apply the required headers, labels, and formatting to conform with the source data.
- Select a cell to place the consolidated data.
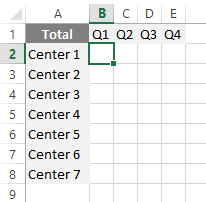
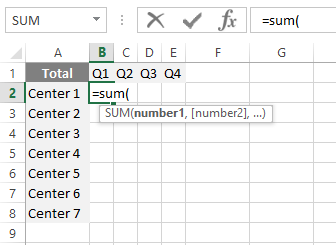
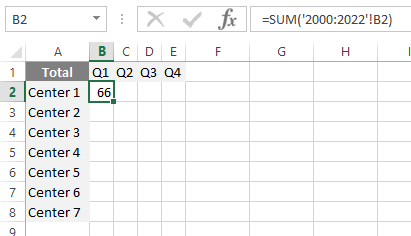
3. Type =sum(
4. Click on the worksheet 2000, and then select cell C4.
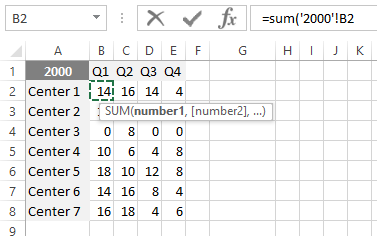
5. Hold the shift key down, click on the 2022 worksheet, and the formula changes to SUM(‘2000:2022’!B2), meaning that the value of B2 in all worksheets from 2000 to 2022 will sum up.
6. Press enter and you will have the result in C4 of the destination worksheet.
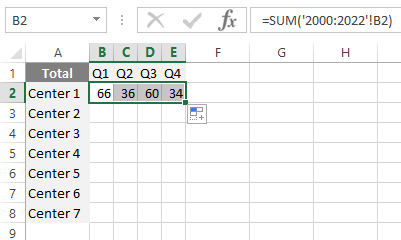
7. Use the fill handle to copy that formula across, and double-click to copy down.

As you can see, 3D formulas are really, really efficient. There are however two things to be aware of. If we were to move the constituent worksheets around, say we move worksheet 2020 to be after worksheet Total, because we’re summing everything from 2000 to 2022, 2020 values are no longer being included.
So one thing to be aware of is you don’t really want to be moving the sheets around too much if there are 3D formulas being used.
Another limitation to repeat once again is that the structure of the worksheets you’re summing up must be identical.
So they’re not without their limitations, but at the same time, you can see that 3D formulas are a very efficient tool for summing values across multiple worksheets.
How to Automate Consolidation in Excel?
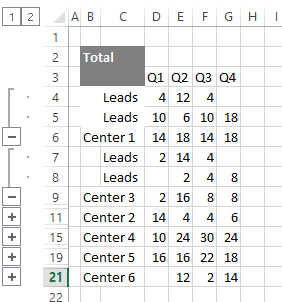
If you are merging data from the sheets using the Consolidate Data option in Excel, you can select Create Links to Source Data to link the destination sheet to the constituent sheets. Therefore, whenever any change is made to any of the constituent sheets, the destination sheet will be updated. If you consolidate data by selecting the Create Links to Source Data check box, at first glance, the result looks like an identical consolidation, but have a look to the left, and you’ll notice gaps in the row numbers, and the little pluses.

What has happened is, that Excel has actually created an outline, and if you click on one of these pluses to expand it, you’ll see it’s actually pulled through each individual row from each of the worksheets/workbooks and then summed them up. So while the links are quite powerful, it is also a little bit messy. And you should be warned up front, you cannot undo a consolidation of links.
So now if we needed to get rid of this outline, it’s going to be a bit of a manual job. Select all the cells affected, come to Data tab > Outline > Ungroup, and then Clear Outline.
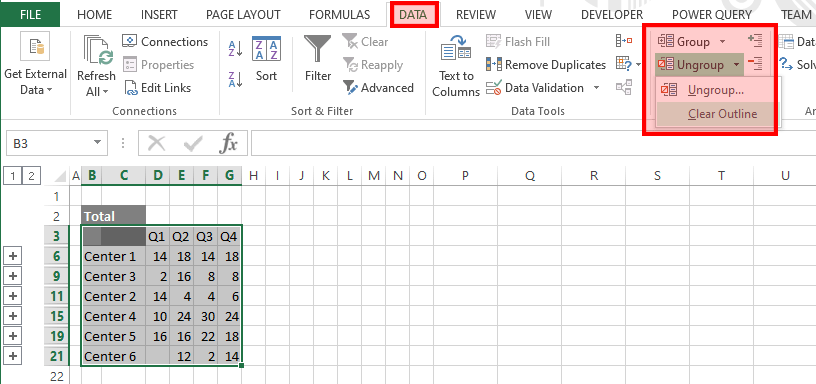
That will get rid of the outline for you, but then you’ll still have to manually go and remove those extra rows that have been added. So just think carefully about whether this is what you want before you go about consolidating your data using Excel’s Consolidate command.
Bottom Line
Consolidating data in Excel is a powerful tool that can save time and improve accuracy. By using Excel’s consolidate data feature, users can easily combine multiple sets of data into one cohesive dataset, making it easier to analyze and draw insights. Whether you are working with financial data, sales reports, or any other type of data, consolidating it in Excel can help you streamline your workflow and make better-informed decisions.
Other methods of doing any automation on Excel are using macros and creating reports using VBAs. Check out each method to discover how you can automate consolidation in Excel.
FAQs
Consolidating data in Excel is a quick and easy way to collect data from different worksheets/workbooks and create a report.
If we needed to get rid of the outlines after consolidation with links, it’s going to be a bit of a manual job. Select all the cells affected, come to Data tab > Outline > Ungroup, and then Clear Outline. That will get rid of the outline for you, but then you’ll still have to manually go and remove those extra rows that have been added. So just think carefully about whether this is what you want before you go about adding it.
If you want to merge data from different sheets in the same workbook, you should note that the labels and position of the tables should be the same so the Consolidate Data feature in Excel can perform more accurately.
Depending on what error you receive you may have one of the following mistakes:
– Your sheets don’t have the same schema with consistent column headers, data types, and number of columns.
– The Excel file you want to consolidate might have a password.
– The function you are using to consolidate data is not compatible with the data type. For example, performing the SUM function on a sheet that doesn’t contain any number.
Our experts will be glad to help you, If this article didn’t answer your questions. ASK NOW
We believe this content can enhance our services. Yet, it’s awaiting comprehensive review. Your suggestions for improvement are invaluable. Kindly report any issue or suggestion using the “Report an issue” button below. We value your input.


