How To Remove Duplicates In Excel
Microsoft Excel is not always used as a calculation tool. We often use it as a database to store different types of information such as sales numbers, inventory management of goods, or even a list of contact information. In this article, we will find how to remove duplicates in Excel and get rid of the data we don’t need.
Using Excel in this manner will inevitably lead to the duplication of data. You’re going to end up with a lot of duplicated entries in rows, such as the same contact information for a person repeated a bunch of times, or the inventory information of a product repeated twice. This type of duplication of data can actually be very detrimental to your operations.
So in this tutorial, we’re going to look at how to delete duplicates in Excel. The methods described here apply to most versions of Microsoft Excel. So let’s get to it.
Remove Duplicate Rows with a Built-in Tool
In Excel version 2007 onwards, there is a built-in tool called Remove Duplicates, which can be quite useful for automatically removing duplicate entries.
This tool can remove absolute duplicates, which are entire rows or columns that contain duplicate entries or partial records, which removes parts of the entries that are found to be duplicated.
follow these steps to use the tool:
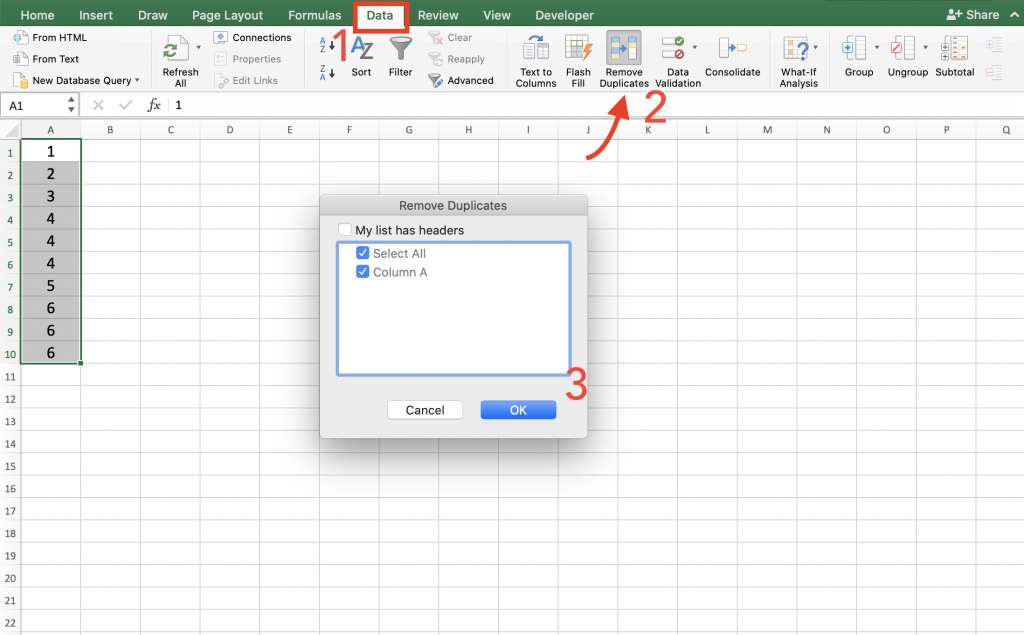
- Select the range of data that you want to check for duplicates, or select the entire sheet with Ctrl +A
- Navigate to the Data tab and then the Data Tools group. Click on the Remove Duplicates button.
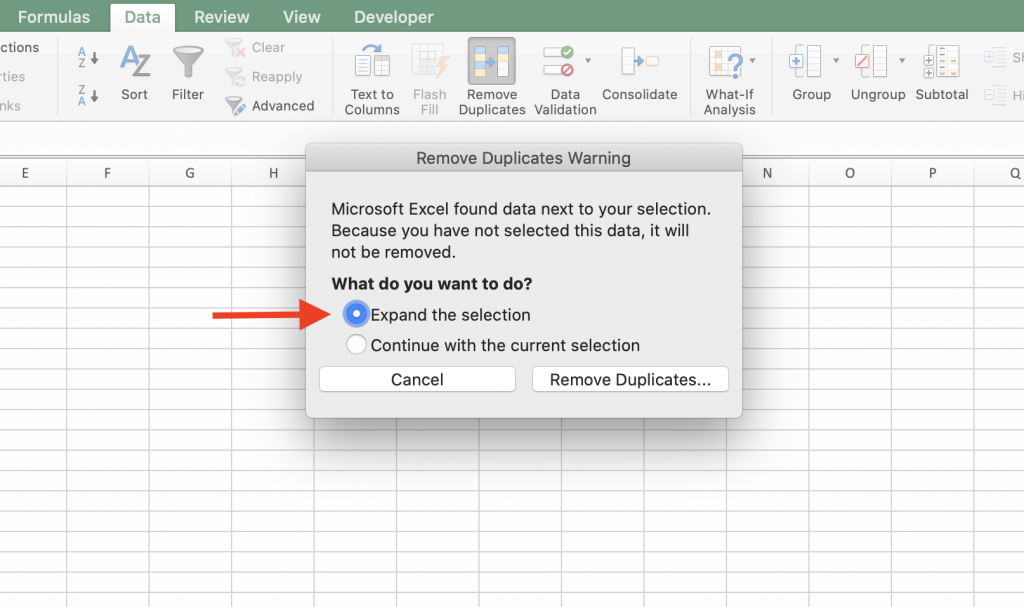
Note: If you face such a remove duplicates warning window while selecting your range, you need to choose the “Expand the Selection” option, which allows you to remove the duplicated data.

- In the new window, you can select the columns you want to check for duplicate entries.
- If you want to delete all the duplicate rows with the same entries, you have to check the box for all of the columns
- If you’re looking to remove duplicate entries in some columns partially, then only select the checkmark for desired columns.
- Select or deselect the My data has headers depending on your data
4. Click OK.

You’re done now. All the duplicate entries will be deleted automatically, and the dialogue box will show the number duplicates found and removed.
Please remember that this tool will keep the first unique instance that it finds from all entries. So it will start deleting the records, from the second instance onwards. It will eventually leave one individual record for each entry. If you want to remove ALL duplicate records, you will have to use other tools.
Before you remove duplicates, it’s often helpful to sort your data alphabetically in Excel to better visualize and organize repeated values.
If you’re trying to find differences or matches between two lists before removing duplicates, check out our guide on how to compare two columns in Excel using 4 easy methods.
Enhance your productivity and efficiency with our comprehensive Excel Automation Services, designed to simplify complex tasks and save you valuable time.
Move Duplicate Records to Another Location.
With this method, you can separate the duplicate values from the unique and move them to another location.
- Select the cell range you want to remove from duplicates or select the whole sheet
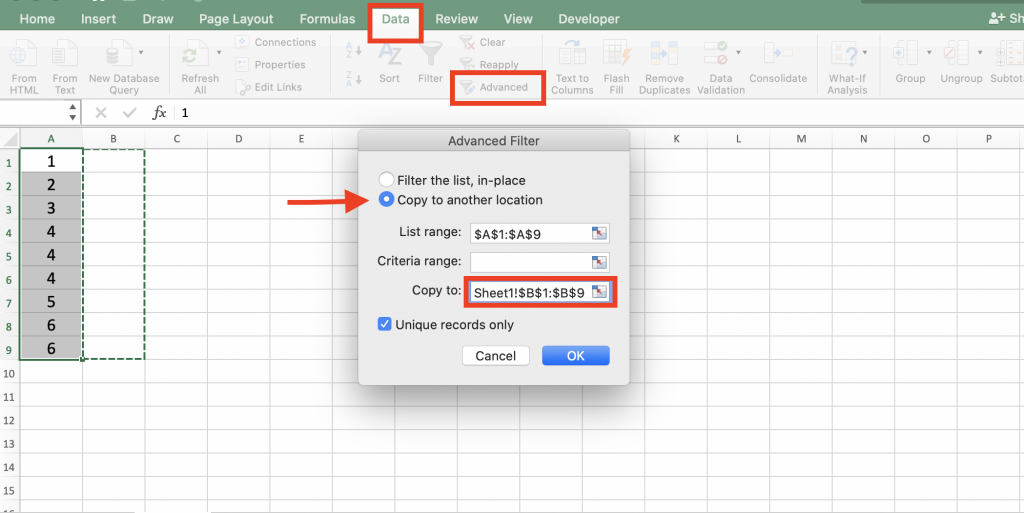
- Go to the Data tab and Sort & Filter group, then click on Advanced
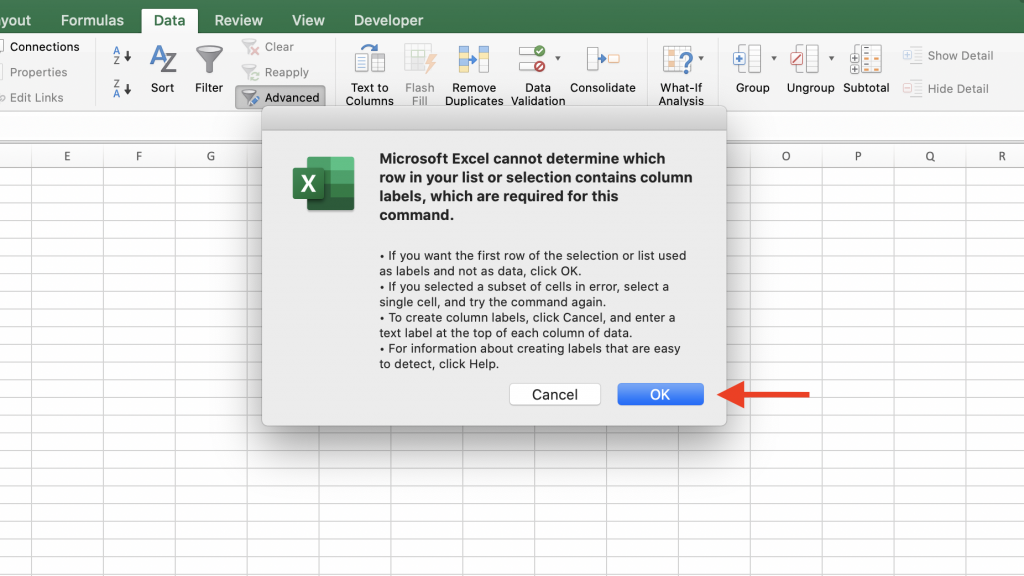
Note: Here you need to determine the label for each column, otherwise you will face such an error which enables you to keep the process by clicking “OK”.

- In the new dialog box, follow these steps:
- Select the Copy to another location button
- Make sure the correct range is selected
- In the Copy To Box, select the destination range where the unique entries should be copied to.
- Check the Unique records only box
- Click OK.

And that’s it! The unique values in the range you selected will be copied to the new location. This can be an efficient way to weed out duplicate values, and it also helps out in other ways because you can actually see what values were duplicated. Using this technique, you could figure out ways to reduce the duplication of similar data in the future.
Unlock valuable insights with our Data Visualization and Data Analysis Services, transforming complex data into clear, actionable strategies for informed decision-making.
How to Remove Duplicate Rows in Excel Using Filters
We can use formulas to remove duplicates in Excel. In this method, you can use a formula to detect duplicate entries and remove them. Using this method, you can have more freedom in how you want to conduct the removal. You can remove duplicate values in several columns based on selected criteria, and you can decide whether to keep the first instance of the entry. However, there is a disadvantage since you have to remember quite a few formulas.
Let’s take a look:
- Choose one of these formulas to find the duplicates in your data:
These are formulas to find the duplicated entries in one column.
- Finds duplicates except the first instance: =IF(COUNTIF($A$2:$A2, $A2)>1, “Duplicate”, “”)
- Finds duplicates with the first instance: =IF(COUNTIF($A$2:$A$10, $A2)>1, “Duplicate”, “Unique”)
A2 is the first, and A10 is the last cell in the range to be checked.
And these are the formulas to find duplicate in rows:
- Finds duplicates in rows except the first instance: =IF(COUNTIFS($A$2:$A2, $A2, $B$2:$B2, $B2, $C$2:$C2, $C2)>1, “Duplicate row”, “Unique”)
- Finds duplicates in rows with the first instance: =IF(COUNTIFS($A$2:$A$10, $A2, $B$2:$B$10, $B2, $C$2:$C$10, $C2)>1, “Duplicate row”, “Unique”)
A B and C are the columns that are going to be checked for duplicate rows.
2. Select any cell in the table. Then go the to Home tab, Sort & Filter then click Filter
3. Click the arrow next to the duplicate column and then check the box for Duplicate Row
4. Now you have to delete duplicate rows. Select the rows that are duplicated, right-click and select Delete Row
Using this method allows you to only delete a specific duplicate within the entries. For example, maybe you only want to delete the third instance of a duplicated entry.
So far, we’ve looked at different methods to find and delete duplicates in Excel. Some of these methods can be a little complicated because most people are not going to remember the formulas.
It’s likely that every time you want to use the method, you have to fire up Google to find the formulas!
There is another internal tool within Excel called Duplicate Remover, which makes things much easier. We’re going to explain it in detail in this next section. Let’s see how to find and delete duplicates in Excel.
How to get rid of duplicates in Excel using pivot tables
Pivot tables are usually used to analyze data, but you can do some tricks to remove duplicated data. The advantage is that you won’t delete any data, but display the unique data using a pivot table.
Let’s follow these steps:
- Create a new pivot table. Select a cell in your sheet, then navigate to Insert tab, select Pivot Table and then press OK.
- With the pivot table selected, navigate to the Design Tab and select Report Layout. You have to change two settings:
- Select the Show in Tabular Form option
- Select Repeat All Item Labels option
- You might also need to remove subtotal from the table. You can do so by going to Design tab > Select Subtotals > Do not show subtotals.
Pivot tables by design only show unique entries, So this can be another method to weed out duplicate entries.
If you’re also working with data that originates from PDFs, you might find our guide on how to convert PDF to Excel helpful.
Our experts will be glad to help you, If this article didn’t answer your questions. ASK NOW
We believe this content can enhance our services. Yet, it’s awaiting comprehensive review. Your suggestions for improvement are invaluable. Kindly report any issue or suggestion using the “Report an issue” button below. We value your input.


