How to use Excel IFS Function
Writing formulas in Excel help you reach the results quicker and easier. One function that can make it easy to evaluate multiple conditions is the IFS function. There is a slight difference between the IFS function and the IF statement in Excel. Here is the guide to using the Excel IFS function.
What is the difference between IF and IFS Functions?
You may be familiar with the IF conditional statement, which can only check one statement. It means it can return TRUE or FALSE. For example, we can only check if a value is higher or lower than 50. However, Excel 2016 and later versions have the IFS function that can make it easier to check several conditions.
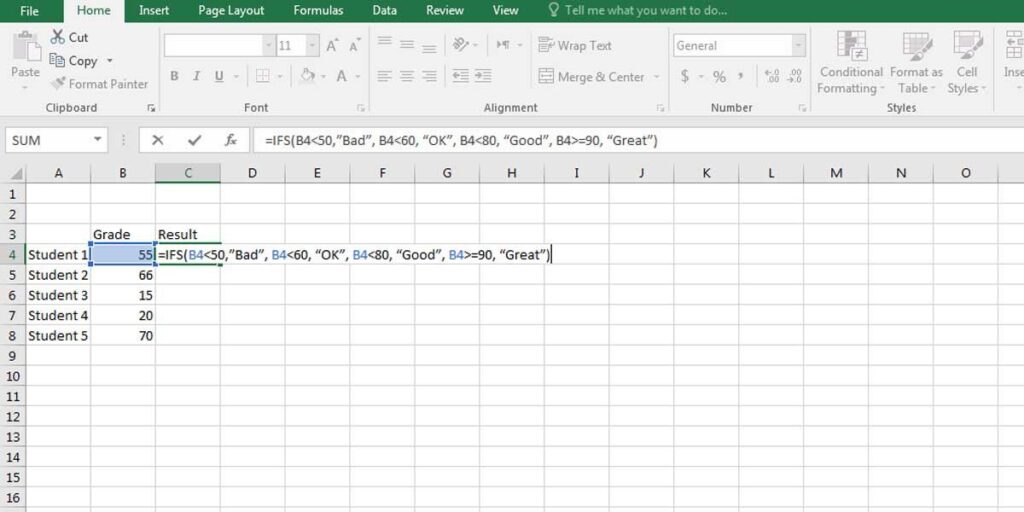
Using the IFS Function, you can check several conditions in one formula and get different results. For example, it is possible to check grades to see if they’re above 80, between 80 and 60, between 60 and 50, and lower than 50. Excel will check to get the first “True” condition and show its corresponding result. Let’s see the example below:
=IFS(B4<50,”Bad”, B4<60, “OK”, B4<80, “Good”, B4>=80, “Great”)
If we wanted to get the same results using the IF statement, we would have to write an IF formula for each condition.
Please note that it is better to write the formulas from lower to higher. This helps you write the formula easily and makes the conditions look more practical and logical. Moreover, the IFS function can handle up to 127 arguments. Yet, it would be impractical to have that many conditions in one formula.
If you’re combining multiple logical tests in Excel, you might also want to handle errors gracefully. Check out our guide to using ISERROR in Excel to learn how to manage formula errors effectively.
Boost your productivity by getting a free consultation from Excel experts, and discover tailored solutions to optimize your data management and analysis.
How to use IFS Function?
Like all other Excel formulas, it’s easy to write a statement using the IFS function:
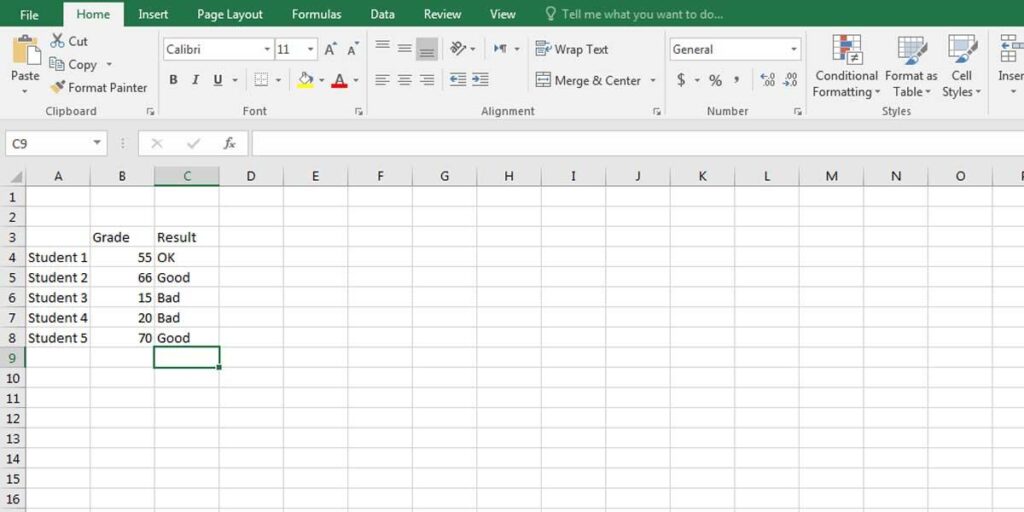
- First, you need to have a table of values, which you want to check and return a message. In our example, we have a table of students and their grades.
- In the next step, click on the cell where you want to write the formula. In our example, it’s C4.
- You can either write the formula in the cell or the Formula bar. You only need to start with an “=” sign; then, Excel will show you the statements you can write.
- Write IFS and open parenthesis after it.
- Select the cell with the value you want to compare. In our example, it’s B4, which relates to the students’ grades.
- Write the logical formula and dedicate a message for each one. So, if the logical test is TRUE, Excel will show that message on the cell.
- Copy the formula to other cells and change the cell numbers.
* Please note that you should consider all the possible conditions because if the value on the cell doesn’t match any of the conditions, you’ll get an “#N/A” error. This error means the function didn’t find any True condition. In our example, the formula would return an “#N/A” error if we didn’t have the last statement (B4>=80) and we had 80 on our list.
For more advanced decision-making scenarios, especially those requiring optimization, check out how to use Solver in Excel.
Interested to know more about Excel formula errors and their meaning? Click on the link to find out.
Unlock valuable insights with our Data Visualization and Data Analysis Services, transforming complex data into clear, actionable strategies for informed decision-making.
Using IFS with ELSE
You can also use IFS and ELSE Functions together. It will help you get a better result, especially if you are working with lots of conditions, which are mostly text. The ELSE function can prevent errors in the results because it will help the formula to return a special message if none of the statements are True.
In this case, the last logical test at the end of the formula doesn’t check any cells’ values. It means all the values will be checked, and if none of them are true, Excel would return the last logical test result. Here is the formula:
=IFS(B4<50,”Bad”, B4<60, “OK”, B4<80, “Good”, B4>80, “Great”,”Good Student”)
This formula will return “Good Student” if the value in B4 is equal to 80.
If you’re working with data from multiple columns, you might also find it useful to compare two columns in Excel using methods like conditional formatting, formulas, and more.
Bottom Line
The IFS function is one of the most useful functions in Excel because it can check several conditions in one formula. If it is used with the ELSE function, it will be more efficient because there will be no more #N/A errors on the results. Therefore, it is necessary to learn more about this function to work on Excel forms easier.
Our experts will be glad to help you, If this article didn’t answer your questions. ASK NOW
We believe this content can enhance our services. Yet, it’s awaiting comprehensive review. Your suggestions for improvement are invaluable. Kindly report any issue or suggestion using the “Report an issue” button below. We value your input.


